Top 3 Ways To Display Powerpoint On Raspberry Pi + Bonus Tip
Raspberry Pi is well known for its small and compact size. Although it needs peripherals like a mouse and keyboard to actually be used, I found out that it is possible to do presentations with this device.
Consequently, you may be wondering: “How can you show powerpoints on a Raspberry Pi?”
There are 3 easy ways you can display powerpoints on a Raspberry Pi: use LibreOffice Impress, utilize WPS Office, and employ Google Slides. Although the last option is used through the browser, you can create a desktop shortcut to it on your Raspberry Pi to access it quicker!
If you don’t know how to start using these tools, then you should really check out the rest of this guide! I’ll go super in-depth on installing the necessary software to work with these apps as well as showing you how you can use them.
I’ve also included a bonus technique that you should stick around for! Anyways, let’s begin:
How To Display Powerpoint On Raspberry Pi
1. Use LibreOffice Impress
LibreOffice Impress is very similar to Microsoft Office’s Powerpoint in that it will let you create presentations and present them. The software has a friendly user interface, which makes creating a slideshow as easy as pie (Raspberry Pi that is).
LibreOffice is actually a community fork from Oracle’s OpenOffice. Simply put, people came together to obtain a copy of Oracle’s OpenOffice repository and made improvements to it that contains actual useful features for users today.
I highly recommend using this method (hence the reason I made it first on my list) because it comes pre-installed on your Raspberry Pi OS (Operating System).
In the event you don’t have it installed, you can always perform the following steps to download it from the package manager:
- Open up your terminal. You can do this by using the keyboard shortcut CTRL + WINDOWS KEY + T (or CTRL + COMMAND + T if you’re a Macbook user).
- Alternatively, you can click on the terminal icon near the top left corner of the screen. It looks like a blackboard and it’s near the Raspberry Pi icon (which is the start menu).
- You’ll need to update your Raspberry Pi to make sure that the packages you install are the latest versions:
sudo apt update- Install LibreOffice, which not only comes with Impress, but also Base, Calc, Draw, and Writer.
sudo apt-get install libreofficeIn order to open Impress up and use it, you’ll need to do the following:
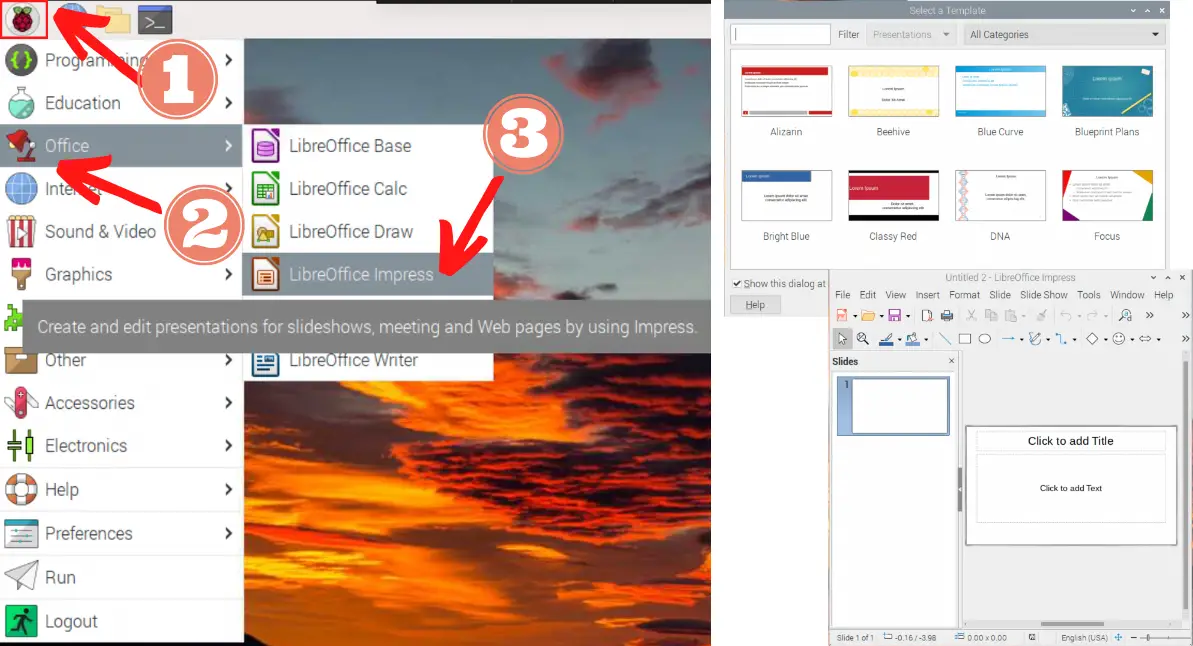
- Open up the start menu. You can do this by clicking on the Raspberry Pi icon near the top left corner of your screen.
- Click on the “Office” category
- Click on “LibreOffice Impress”
Congratulations! Now that you have Impress opened, you should be greeted with a few windows. One will ask you to choose a basic template while another will let you start creating a slideshow.
Of course, if you already have a slideshow ready, you can always import it to your Raspberry Pi and open it up using LibreOffice Impress. This software can read and edit .ppt, .pptx, and .pptm files!
One way you can do that is by removing the SD card from your Raspberry Pi and plugging it into a device that contains your presentation file. Move that file onto the SD card and put it back into the Raspberry Pi.
Another less tedious way is to transfer it over the network. A great command to use is the scp command. You just need the IP addresses and the passwords for the devices you’re accessing.
If you want to learn how to use the scp command (or any other file transferring methods), then you need to check out my article on transferring files between your Raspberry Pi and laptop.
Once you have that all set up on your Raspberry Pi, you may be wondering how you can present and move through the slides.
You can use a wireless mouse to click through the slides while presenting or use your smartphone. The last method might not be the best since developers are still working on the iOS version as of this moment, but you can still check it out at LibreOffice’s site.
2. Use WPS Office
WPS Office is a Chinese clone of Microsoft Office and you don’t need to create an account to use it. According to its description, the software is a faster, better looking, and more stable version of LibreOffice Impress.
But before we can install WPS office, we need to first install Pi-Apps. This is a collection of apps that you can install and run quickly thanks to the installation scripts it possesses.
You can think of it as a Play Store for Android phones or the App Store for Apple devices (like Macbook, iPad, or iPhone).
- Open up your terminal.
- You’ll need to update your Raspberry Pi:
sudo apt update- Install Pi-Apps on your Raspberry Pi:
wget -qO- https://raw.githubusercontent.com/Botspot/pi-apps/master/install | bashNote: if you’re getting errors when installing Pi-Apps, then you’ll need to restart your system. If that still doesn’t work, then you’ll need to flash your Raspberry Pi’s SD card again and set it up from the start. This last method worked for me.
If you forgot how to flash your SD card with Raspberry Pi Imager or want to see how I approach it, take a look at my guide on a headless Raspberry Pi setup.
Now, you can download WPS Office:
- Open the start menu (by clicking on the Raspberry Pi icon near the top left corner)
- Click on the “Accessories” tab
- Click on the Pi-Apps
- Click on “Office”
- Click on “WPS Office”
- Click on “Install”
- A new window will pop up. That’s the terminal. If you don’t have the 64-bit kernel set up, a message will be displayed asking you to type ‘y’ (for yes) and press the enter key (to confirm).
- Now you’ll need to reboot your system to make sure this goes into effect. To do this, type the following command in the terminal:
sudo reboot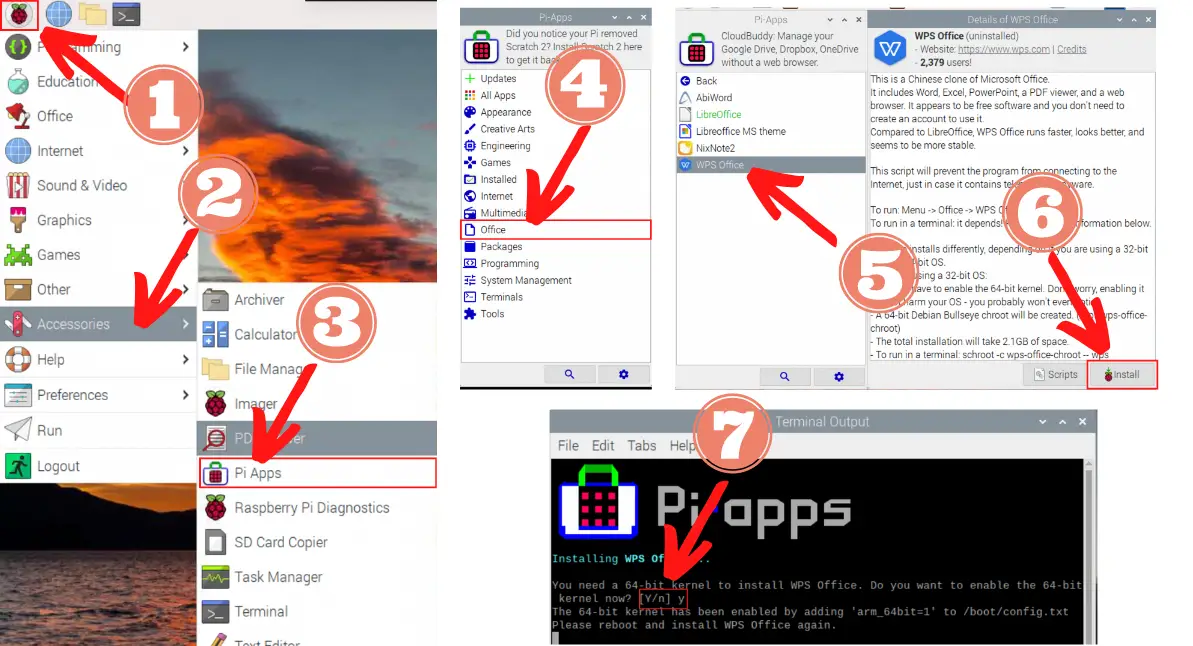
- [OPTIONAL STEP – In case you need a 64-bit kernel] Once your Raspberry Pi comes back on, you’ll need to install WPS Office now: click on Start menu < Accessories < Pi-Apps < Office < WPS Office < Install
- It’ll take about 5 to 10 minutes for the software to install. You can monitor the progress by clicking on the new terminal window that popped up.
- Once it’s done downloading, you can open up WPS Office. First, open the start menu
- Click on “Office”
- Click on “WPS Office”
Congratulations! You’ve opened WPS Office. Of course, you can create a new Powerpoint (or an Excel or Document) by going to the left menu and clicking on the “New From Docer” tab.
Now, if you want to open a powerpoint on WPS Office, you’ll need to do the following:
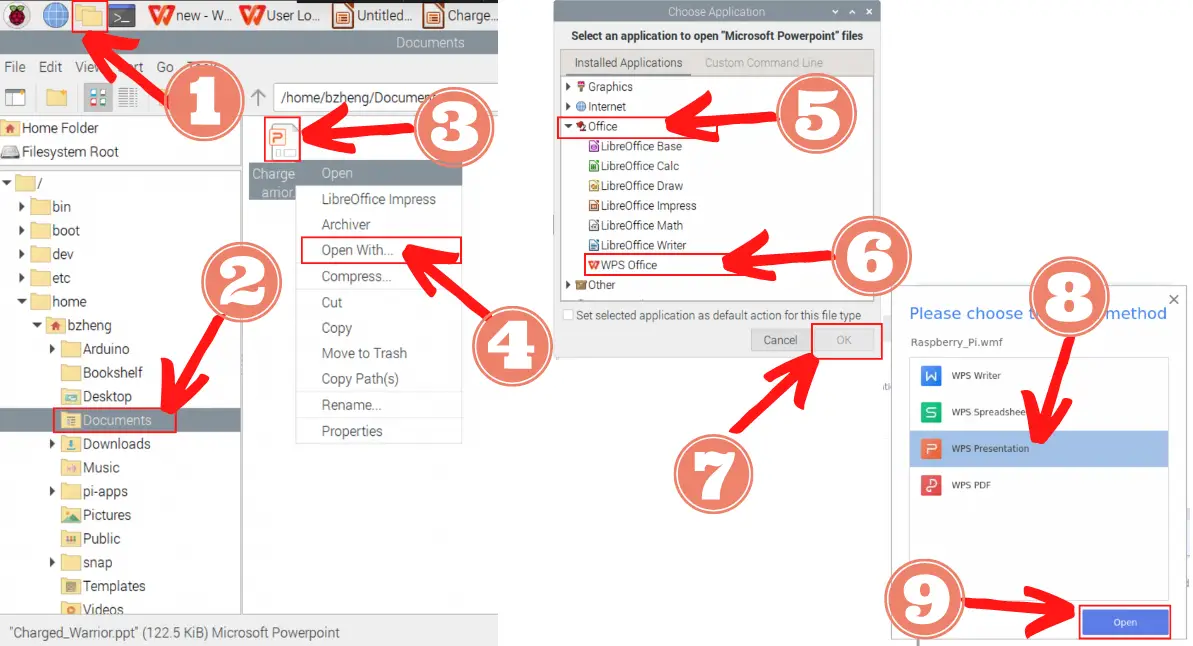
- Open Files. This should be the Files icon near the top left corner of your screen (right next to the Raspberry Pi icon).
- Find the folder that contains your powerpoint file
- Right-click on the powerpoint file
- Select the “Open With … ” option
- Click the tab next to the “Office” section
- Select “WPS Office”
- Press “OK”, which is near the bottom right corner of the “Choose Application” window
- A new window will pop up. Select “WPS Presentation”
- Press the “Open” button near the bottom right corner of the screen.
- Voila! You can now present using WPS Office!
3. Using Google Slides
Everyone should know that they can easily access Google Slides on Raspberry Pi (or any other laptop, phone, etc.) using its website link: https://slides.google.com/.
But this guide is about installing presentation software on your Raspberry Pi, and that’s what I’m going to do. I’ll show you how to create a desktop shortcut on your Raspberry Pi to Google Slides in your browser. This will give the illusion that you installed it.
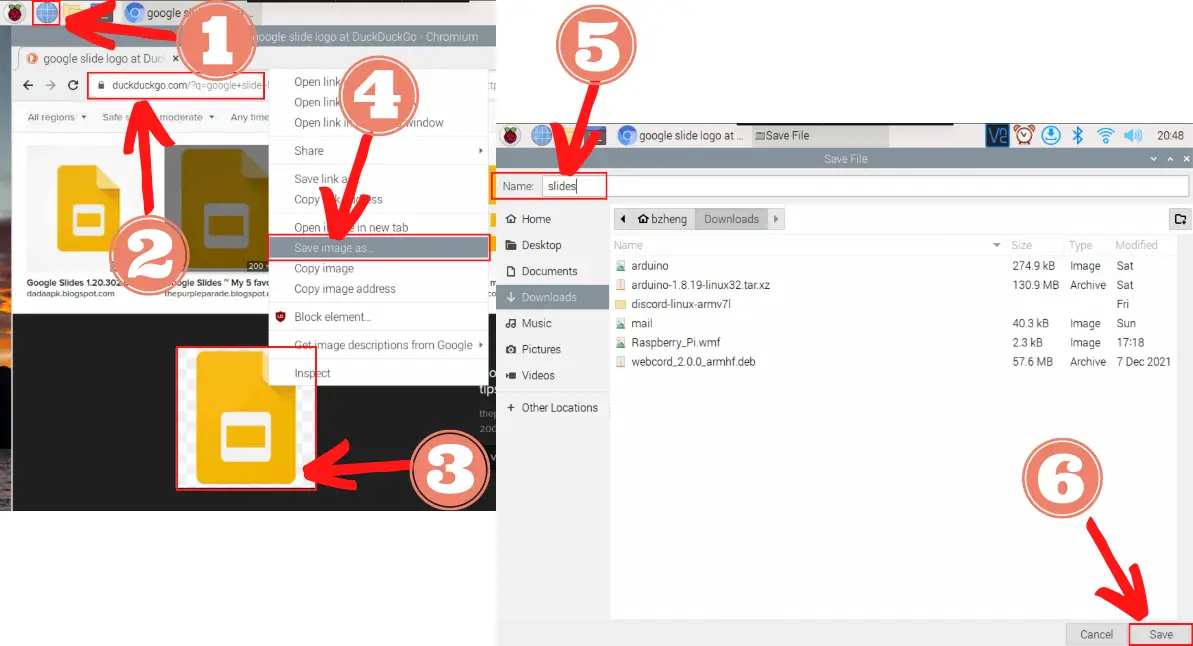
The first step you’ll need to take is open your favorite browser or you default browser. It can be the preinstalled one (which is Chromium) or something fun like Firefox.
Either way, you want to get onto a search engine like DuckDuckGo and search “Google Slides image” (or logo). Find an image you like since this will be the image of the desktop shortcut you’ll be creating.
Click on the image and then right-click on the image to see additional options. Now, you’ll need to click on “Save image as … ” to save it. This will open a new tab in which you’ll need to name it and then save it by pressing the “Save” button near the bottom right corner of the window.
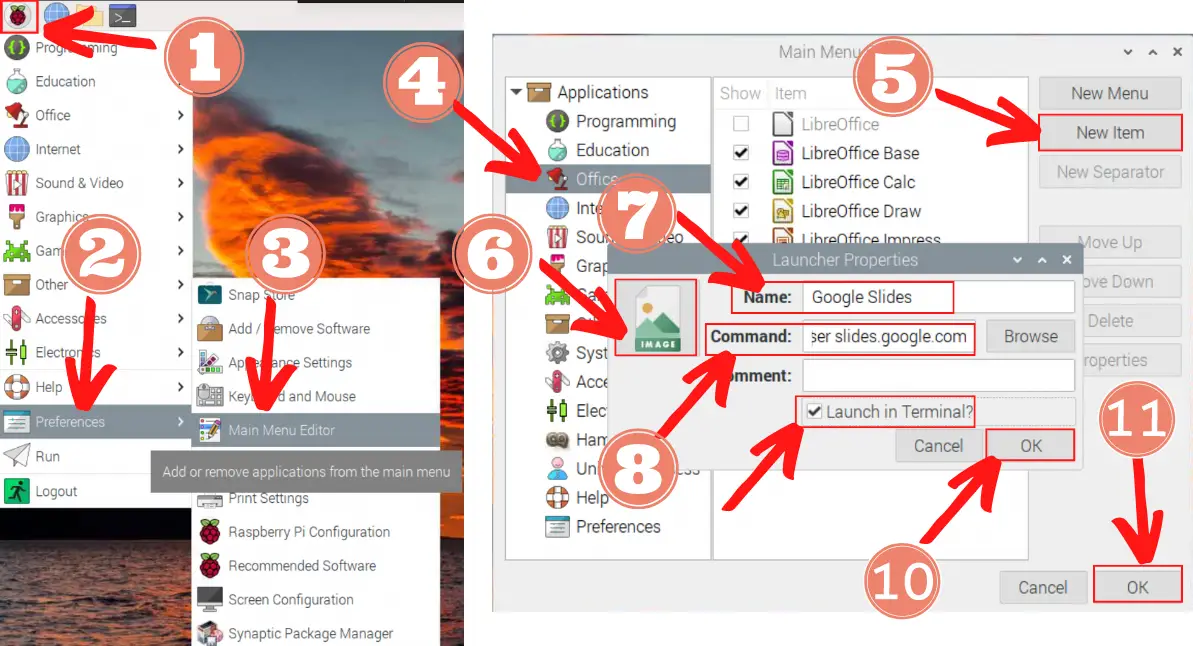
Now, you’ll want to click on the Raspberry Pi icon near the top left corner of your screen. This should display a drop down menu (also known as the start menu).
Next, you’ll need to click on “Preferences” and then “Main Menu Editor”.
Because Google Slides is an office tool, I decided to put this shortcut under the “Office” section. Of course, if you have a better idea or preference on which section Slides should go, you can perform this process there too (since it’s the same).
Anyways, I’ll click on the “Office” tab and then click on “New Item” near the top right.
Now, you’ll see a new window pop up. This is the “Launcher Properties” window, and it’s where you’ll handle the functionality of the shortcut when you click on it later.
- First, you should pick an image. Click on the empty image icon and choose the Slides image you saved earlier.
- You’ll need to give it a name. This will show up underneath the image as the desktop shortcut.
- You’ll need to type in a command. Because we want to open a browser, we’ll need to type:
sensible-browser slides.google.comYou can open any other browser from your terminal if you replace slides.google.com with a different browser link.
- Check the box next to “Launch in Terminal?” because this is a terminal command. Then, you can click on “OK” to save all that information.
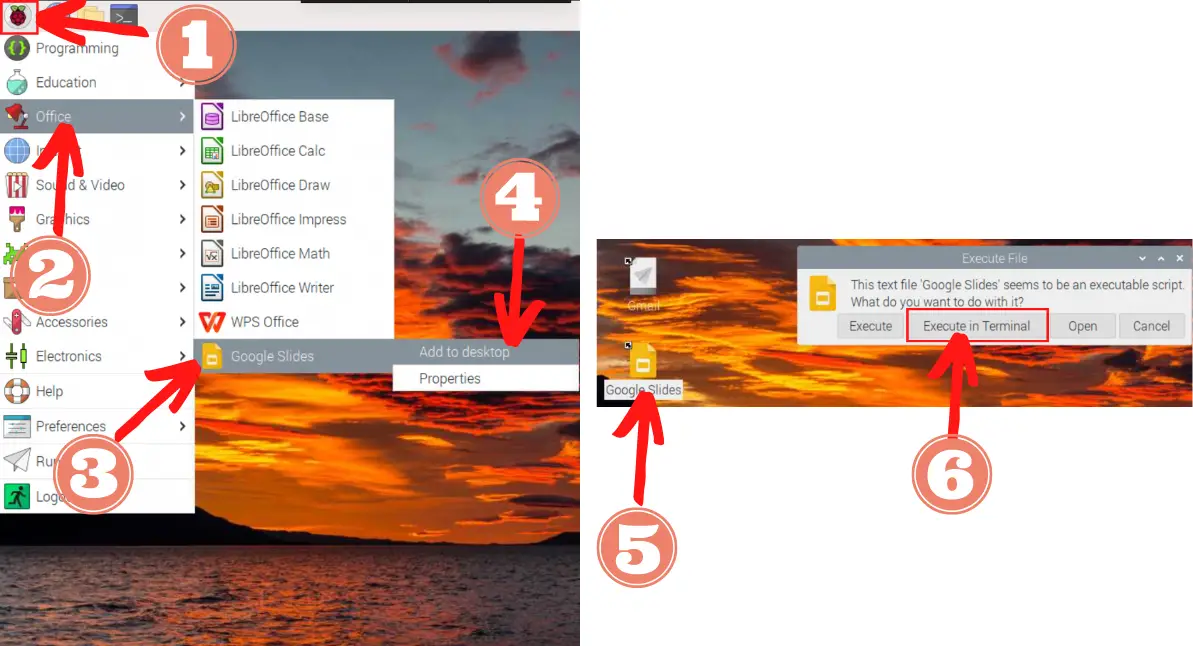
After that, you’ll need to go back to the start menu again (click on the Raspberry Pi icon near the top left corner of the screen) and click on the “Office” tab.
Now, you’ll need to right-click (or double-click if you’re using a mouse pad) on the “Google Slides” and select “Add to desktop”.
Congratulations! You’ve now successfully created a desktop shortcut to Google Slides! To actually use it, you’ll need to click on the icon twice and a new window will pop up. In the “Execute File” window, select the “Open” button.
Finally, a browser will appear and take you to Google Slides.
Bonus Tip: Use Nativefier
Nativefier is a command line tool that can create a desktop app (thanks to Electron, which is a framework for creating native applications) for any website with minimal effort on your part. This is basically like my third method, but you can do it all from your terminal, which is great if you’re using SSH to use your Raspberry Pi.
If you want to learn how to use SSH on your Raspberry Pi, I made a special guide on it that you should definitely check out! I include tips and tricks in there, so you can avoid the mistakes I made!
The original method of installation isn’t compatible with Raspberry Pi, so I did a lot of researching and extensive testing to come up with the method that worked.
So if you want to use it, perform the following steps:
- Open up your terminal. You can do this by using the keyboard shortcut CTRL + WINDOWS KEY + T (or CTRL + COMMAND + T if you’re a Macbook user).
- Alternatively, you can click on the terminal icon near the top left corner of the screen. It looks like a blackboard and it’s near the Raspberry Pi icon (which is the start menu).
- Update the terminal to make sure we pull the most recent and up to date files:
sudo apt update- You’ll first need to switch to root to become a super user (since many of the following commands require this privilege):
sudo su- Enable NodeSource Repository because you want to install Node.js in the next step to make this work:
curl -fsSL https://deb.nodesource.com/setup_17.x | bash -- Install Node.js:
sudo apt install nodejs- Install corepack with npm (this stands for Node Package Manager and comes installed with Node.js since it manages packages):
npm i -g corepack- Enable corepack since it acts as a bridge between npm and Node.js:
corepack enable- Now you can install nativefier:
npm install nativefier -g- Move into the Downloads folder. This is where we want to store the app that nativefier builds when we run the command in step 10:
cd Downloads- Finally, you can start converting the website into an app with nativefier:
nativefier --arch="armv7l" -n slides https://slides.google.com/From my research, nativefier doesn’t support the current Raspberry Pi architecture, which is why we needed to add the code --arch="armv7l". This changes the architecture, which makes it possible to use nativefier.
Now, if you want to use the Google Slides app you downloaded, you’ll need to run a few more commands back in the terminal:
- If you haven’t already exited root, type the command to exit:
exit- Change directory into the folder you created in Downloads:
cd Downloads/slides-linux-armv7lNote: If you get an error with this command, that means the name of the folder in Downloads isn’t the same. Consequently, you’ll need to find the name. To do that, go into your Downloads folder:
cd Downloads
Run the list command to find the name of all the files and folders in the directory. You should be able to locate the folder because it should have the word “slides” in it:
ls
Copy and paste the name when you change directory again with the cd command
- Change the execution permission so you can run the app:
sudo chmod +x *If you want to learn more about permissions and how you can create or remove them for files or folders you want to keep secret or open on your Raspberry Pi, then I highly suggest you check out my full permissions guide for Raspberry Pi!
- Now you can finally run the app!
./slidesSummary – tl;dr (Too Long; Didn’t Read)
Here are the key takeaway points you should keep in mind after reading this article:
- You can show presentations using:
- LibreOffice Impress
- It should come pre-installed with Raspberry Pi OS
- WPS Office
- To obtain this, you’ll need to install it through Pi-Apps
- Google Slides
- You can access this through the browser or create a desktop shortcut to quickly get to it
- A bonus tip is to use nativefier to quickly create an app through your terminal only!
- LibreOffice Impress
Now that you have the knowledge on how to do presentations on Raspberry Pi, you have the power to succeed in any point of your Raspberry Pi journey!

