How To Get Audio Out Of Your Raspberry Pi? 5 Sound Answers!
When I first started working with Raspberry Pi, I didn’t know I needed to buy additional tools to even use it. After receiving it and opening it, I found out I needed a mouse, keyboard, a cable, monitor, etc. to even start seeing and using it.
Later on, when I wanted to start watching Youtube videos on it, I quickly realized (to my dismay) that there weren’t any sound coming out of it.
Raspberry Pis don’t have speakers built-in, but there are 5 different ways you can hear the audio output from it. You can utilize its built-in Bluetooth, its audio jack port, its USB port, its mini HDMI port, and through the laptop using an HDMI Video Capture Device. Granted, the last 2 are not the most common ways to obtain sound out of Raspberry Pis.
Still, I’ll go over each approach for the rest of the article, as well as highlighting some cool audio software you can use and install on your Raspberry Pi.
1. Bluetooth
This is a great option if you have a bluetooth speaker or wireless headphones lying around.
The setup is pretty simple:
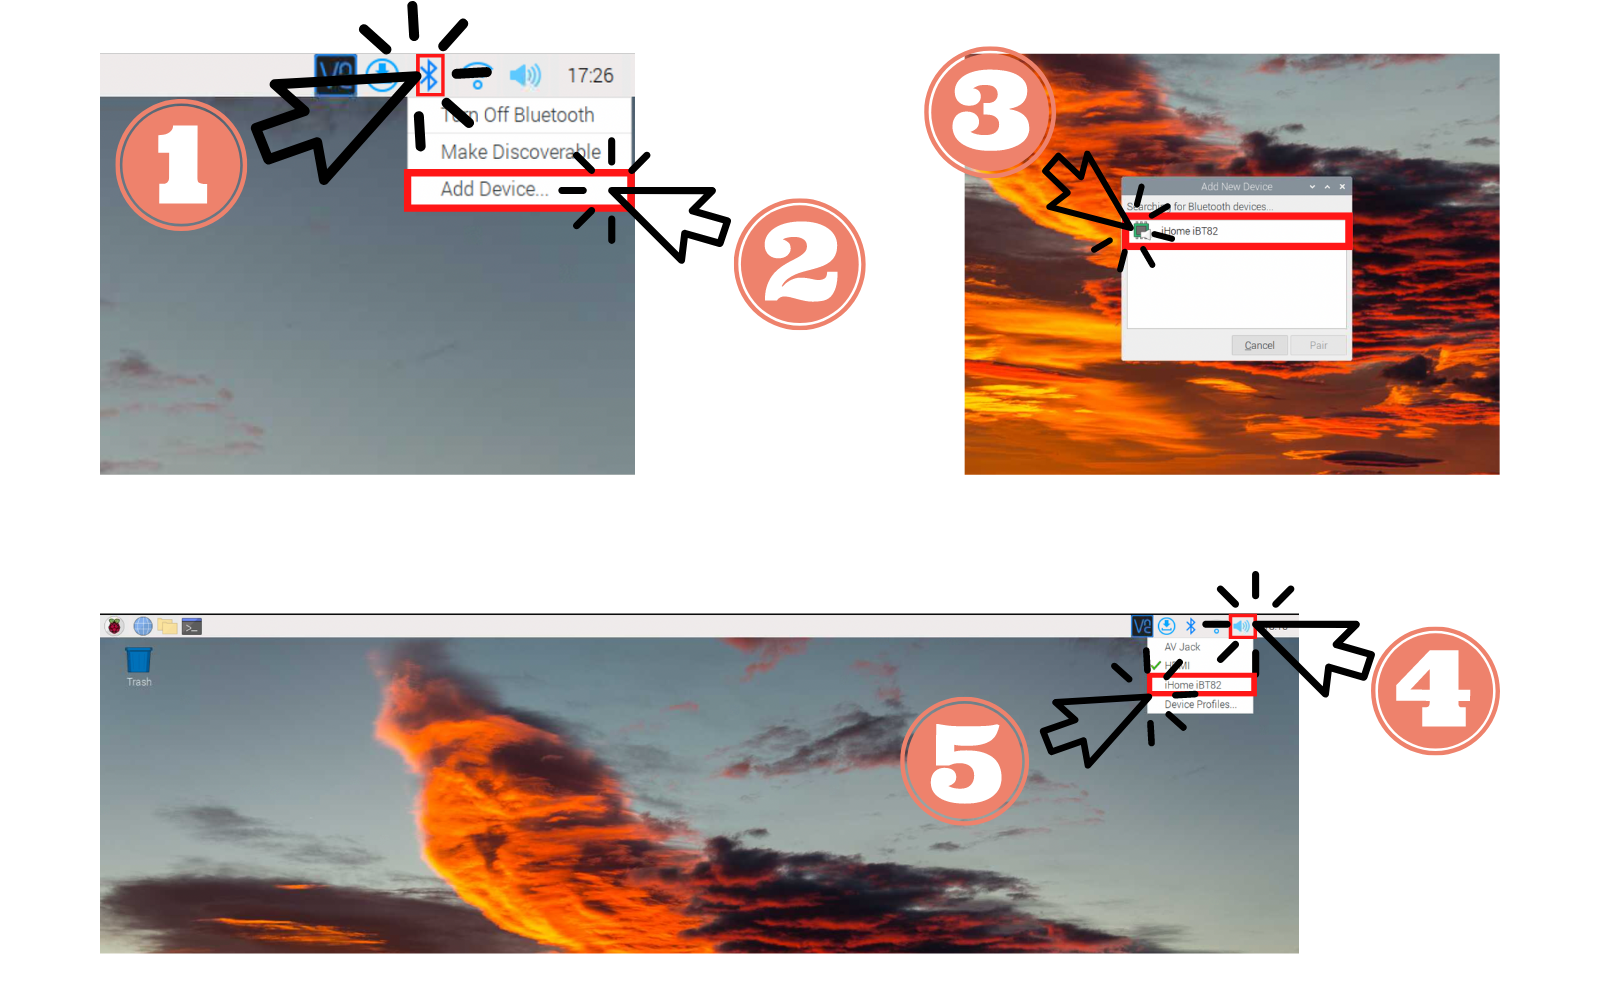
- Click the Bluetooth icon near the top right corner of your Raspberry Pi screen
- Click “Add Device”
- Turn on your Bluetooth speaker and make it discoverable
- Sometimes your speaker makes itself automatically discoverable, or there is a Bluetooth button you need to press on it first to make it discoverable
- Select the speaker on your Raspberry Pi screen
- You should now see a notification that the pairing was successful.
- Right-click (or double-click) on the speaker icon near the top right corner of your screen to adjust the audio output.
- Select the bluetooth speaker’s name
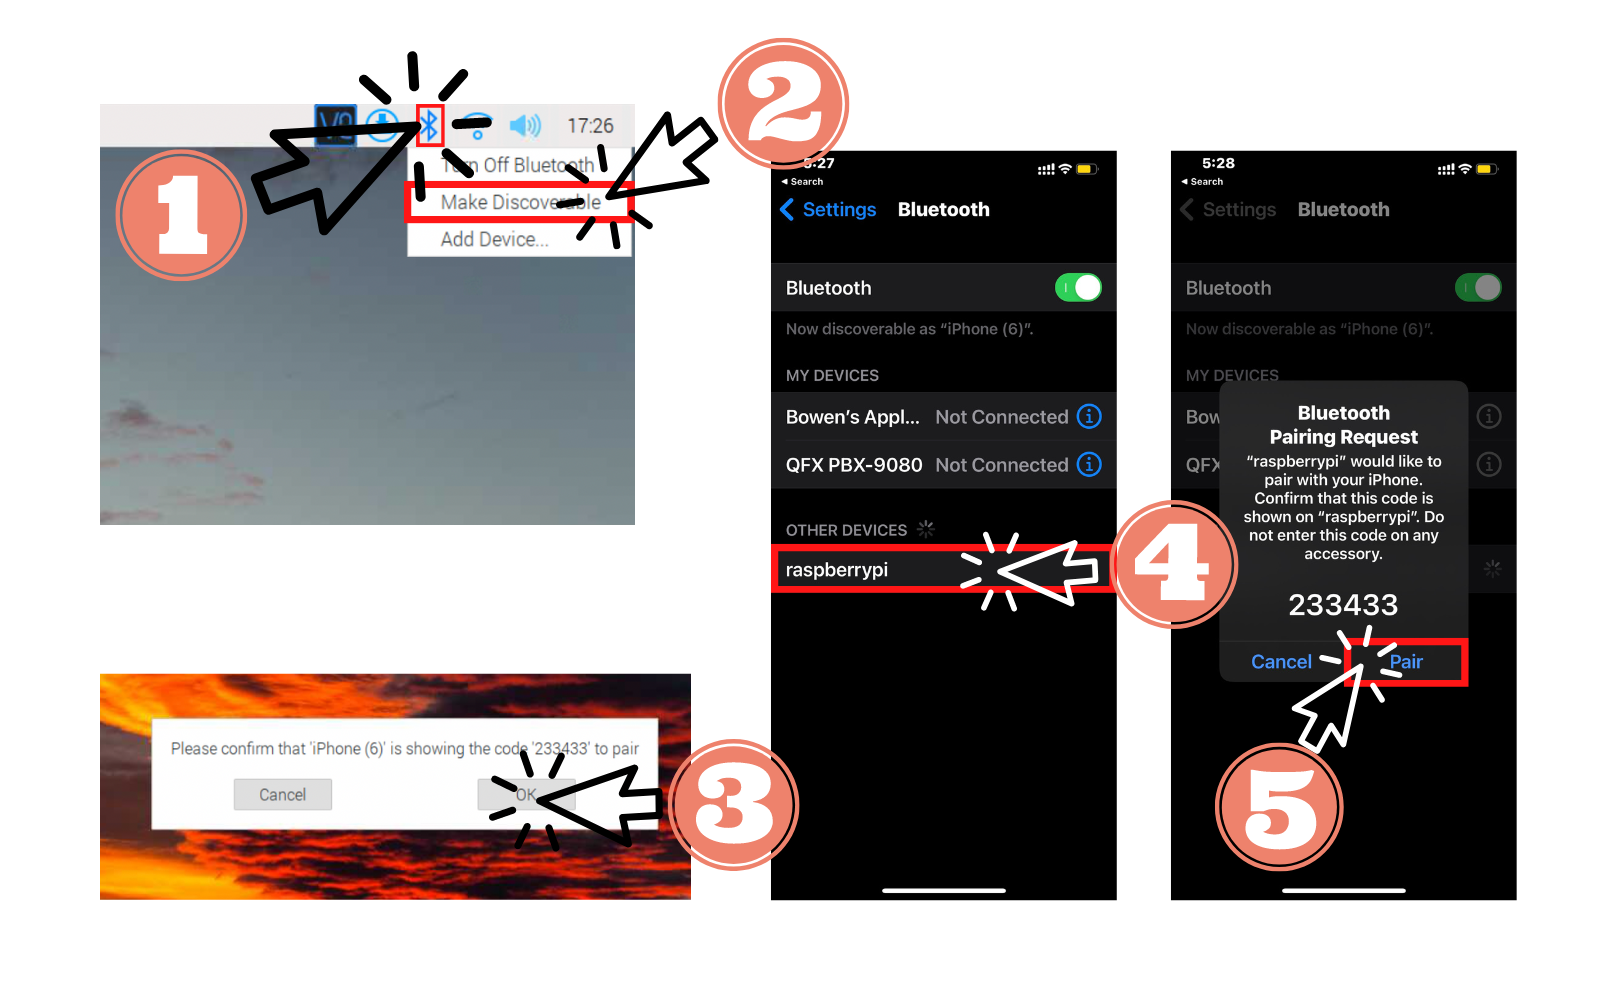
In my experiments, I also found that you can connect your Raspberry Pi to your iPhone (or any bluetooth devices that can be made discoverable).
This is how I did it:
- Make your Raspberry Pi discoverable
- Go to your iPhone and turn on Bluetooth
- Click on “raspberrypi”, which should be listed under “Other Devices” in your phone
- Click “Ok” on the popup window in your Raspberry Pi
- Click “Ok” on the “Bluetooth Pairing Request” window on your phone
Initially, I thought I could play sound from my Raspberry Pi through the phone, but it turns out, it’s the other way around.
Still, you can connect multiple bluetooth devices to the Raspberry Pi and make your life overly complicated. For instance, when I connected my bluetooth speaker and phone to it, the sound that originates in my phone goes through the Raspberry Pi whose audio will be outputted to the bluetooth speaker.
In the event you don’t have bluetooth speakers, you can always buy some from Walmart or Amazon. If you want the best deals however, you should look at eBay or even Facebook marketplace.
If you’re buying on eBay, you can always make an offer to the seller or bid on an item.
Besides that, eBay has a cool feature called automatic bidding that lets you name your highest price so you won’t have to waste time competing with another bidder.
On Facebook marketplace, you can negotiate with the sellers, you don’t have to pay sales tax, and there’s always a chance you won’t even have to pay for shipping fees if you’re nearby.
For instance, I got my device for $10, but I had to pick it up from the seller. Thankfully, the seller was nearby, so I didn’t have to factor in transportation costs.
Still, you need to be careful when buying on these platforms since there can be scams. Here are some things I look out for:
- Make sure the seller is reputable
- For example, read their reviews and peruse other items they’ve sold.
- If they don’t have any products sold or reviews, I’d be a little cautious.
- Only buy what you see. If you don’t see something in the picture, don’t infer that it’s there.
- Be wary of stock photos.
- Unless you can pick up the item and inspect it, you should pay through a method that can protect you.
- For instance, eBay has a 3-day return policy.
- Another example is that PayPal offers Purchase Protection for buyers if you pay through Goods and Services, but their stipulations for protection are:
- You were charged for something you didn’t purchase.
- Your order never arrived.
- Your order arrived, but it’s significantly different than it was described.
- For a more in-depth understanding of PayPal’s policy, click this link to go to their site.
Now, if you wanted the cheapest speakers possible, then you should look to wired speakers. In my experience, they are usually cheaper, but you’ll have to make sure it’s compatible with your Raspberry Pi operating system (OS).
2. Audio Jack Port
A wired way to coax sound out of your Raspberry Pi is to use its audio jack port.
This is a great option because the Raspberry Pi should instantly recognize the audio device you connected to it and configure the settings so that you can hear sound coming out of it.
When I first realized this, I instantly thought of the old Apple headphones that came with the older iPhone models that could easily plug into it. When I tried it, I found it to be a free and effective way to hear my YouTube videos.
On the off chance you don’t hear sound, you should check the audio output first.
3. USB Port
Raspberry Pi comes with 4 USB ports built-in (2 USB 2 ports and 2 USB 3 ports), which means there’s only 2 available if you need to attach a mouse and keyboard to it.
There are some USB speakers that are not compatible with the Raspberry Pi operating system, but if you do have some lying around, it doesn’t hurt to try them out.
Once again, if you don’t hear any audio immediately, you should first look at the audio output configuration to see if it’s set correctly.
4. Mini HDMI Port
Since Raspberry Pi comes with 2 mini HDMI ports (which support 4K displays), it is also possible to use these ports on your Raspberry Pi for audio purposes.
To do that, you’ll need to use a mini HDMI to HDMI cable to connect it to a monitor or display that has speakers built into its system. For example, if you have a flat screen TV, you can see the display of the Raspberry Pi and hear its sound.
If the display has speakers built-in, Raspberry Pi should automatically configure the settings to use those speakers. Still, if you’re having issues with the audio output, the first place you should check is the sound settings (access it by double-clicking on the sound icon).
5. HDMI Video Capture Device
This is an extension of the fourth method because this method is still going to be using the mini HDMI port on your Raspberry Pi.
However, the point where this differs is that it uses the speakers that are already installed in your laptop. Consequently, the only extra thing you’ll need to buy besides your Raspberry Pi, its peripherals (like mouse, keyboard, etc), and your laptop is an HDMI Video Capture Device.
Simply put, the capture device will make it possible for your laptop to take the HDMI output from your Raspberry Pi and show it on your laptop screen.
I wrote a detailed step-by-step guide on what the HDMI Capture device is and how you can set it up on your laptop. Consequently, if you want to try this method, but don’t have the capture device set up yet, then you definitely need to check out that post.
However, if you want to get the sound, you’ll need to stream your activities.
Thankfully, you can make this private by using streaming services like Facebook Live or Youtube Live if you already created accounts for them. However, in this example, I prefer Facebook Live because Twitch doesn’t allow you to make your stream private and Youtube Live requires a 24 hour wait before you use the live feature if you’re a new creator.
First, you’ll need to go to the Facebook Live site: https://www.facebook.com/live/producer/.
Note that if you have a relatively new account, Facebook will force you to make some friends before you can live stream.

Secondly, click on the “Create new” button under the “Go Live” section.
After that, choose the “Webcam” option under the “Select a video source”.
Under “Camera controls”, you’ll need to select the camera that will output the display for your Raspberry Pi. If you don’t know which option is which, you can always select one at random. The display will pop up underneath so you can always verify if the option you selected was correct.
Then, in the same section, you’ll need to select the audio input (which should be something other than the default or built-in one).
Finally, you can press the “Go Live” button to start streaming.
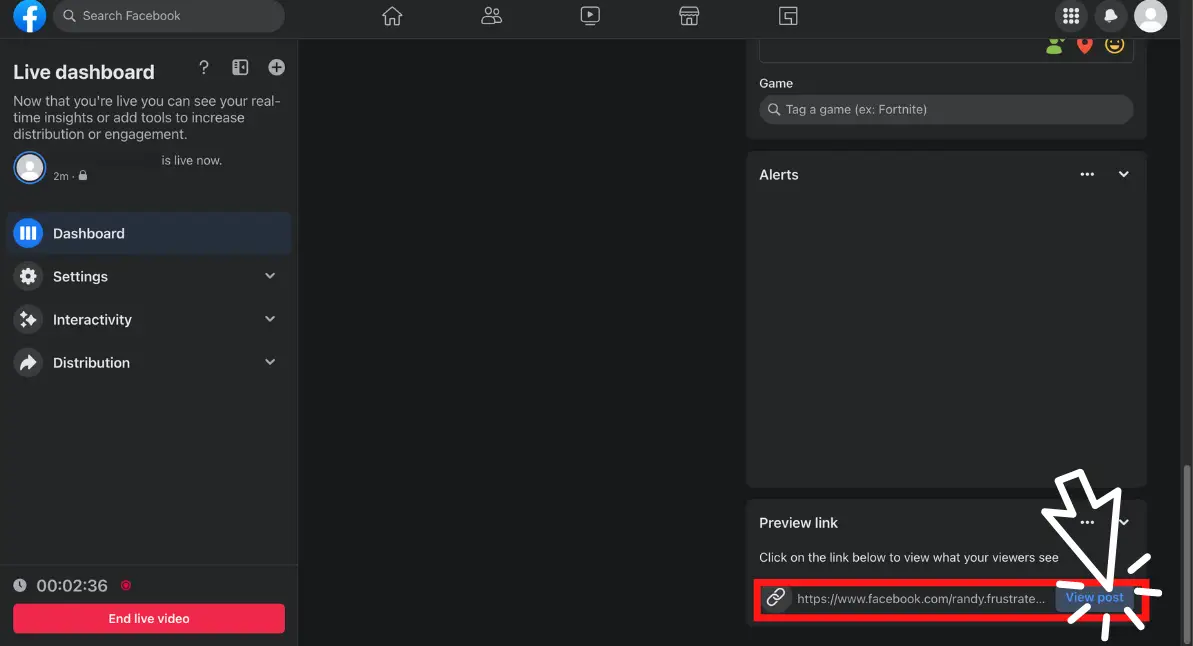
However, you still won’t be able to hear audio because you’re not seeing the stream from the viewer’s perspective. That means you should scroll all the way down and click on the “View post” button under the “Preview link” section. Now, you should hear the audio nice and crisp.
Now, if you want to remain as private as possible, you can always go to the Privacy tab (through this link) and make it so that no one else but you can access the stream.
As a side note, once you end the live stream, Facebook will save the video you created under “Videos” in your profile. As a result, if you want to destroy its existence, you can go there and delete it.
Additionally, this option may not be the best way to get audio out of your Raspberry Pi because there will always be a lag. For example, I timed the lag for Facebook Live, and I always ended up with a lag time around 15 to 16 seconds.
If you want to reduce the lag, you can always choose the “Streaming software” option rather than the “Webcam” option in the “Select a video source” section. Based on my tests, the lag will last half as long (between 7-8 seconds) but the audio will also pick up sound from your environment. That means if you speak, you’ll hear it in the live stream.
Either way, if you are doing audio work, then this isn’t the best method for you. However, if you just want to be able to play background music or watch some videos on the livestream, then this could suffice.
This method also could be appealing because an HDMI Video Capture Device is cheaper than a Bluetooth speaker.
Summary – tl;dr (Too Long; Didn’t Read)
Here are the key takeaway points you should keep in mind after reading this article:
- There are 5 ways you can get sound out of your Raspberry Pi:
- One way is to use the built-in Bluetooth and connect your Raspberry Pi to a wireless speaker
- The second way is to use the audio jack port
- Thirdly, you can use the USB port and connect speakers with wires. Granted, you have to pay attention to which speaker you get because not all wired speakers are compatible with this system
- The fourth way is to use the mini HDMI port and connect it to a monitor that has speakers built in
- Lastly, if you’re feeling adventurous, you can go out and purchase an HDMI Video Capture Device and play sound through your laptop (although there may be a noticeable lag).
- In either case, if you’re not getting sound out of your Raspberry Pi, the first thing you should check is your audio output
In the end, I hope that the techniques mentioned are sound and provide you with great results!