What’s The Purpose Of The Red & Green Lights On Raspberry Pi?
Every time I start up my Raspberry Pi and wait for the screen to load, I’m often captivated by the assortment of green and red lights that appear. You’re probably like me and sit there entranced, wondering what the red and green lights mean on the Raspberry Pi 4.
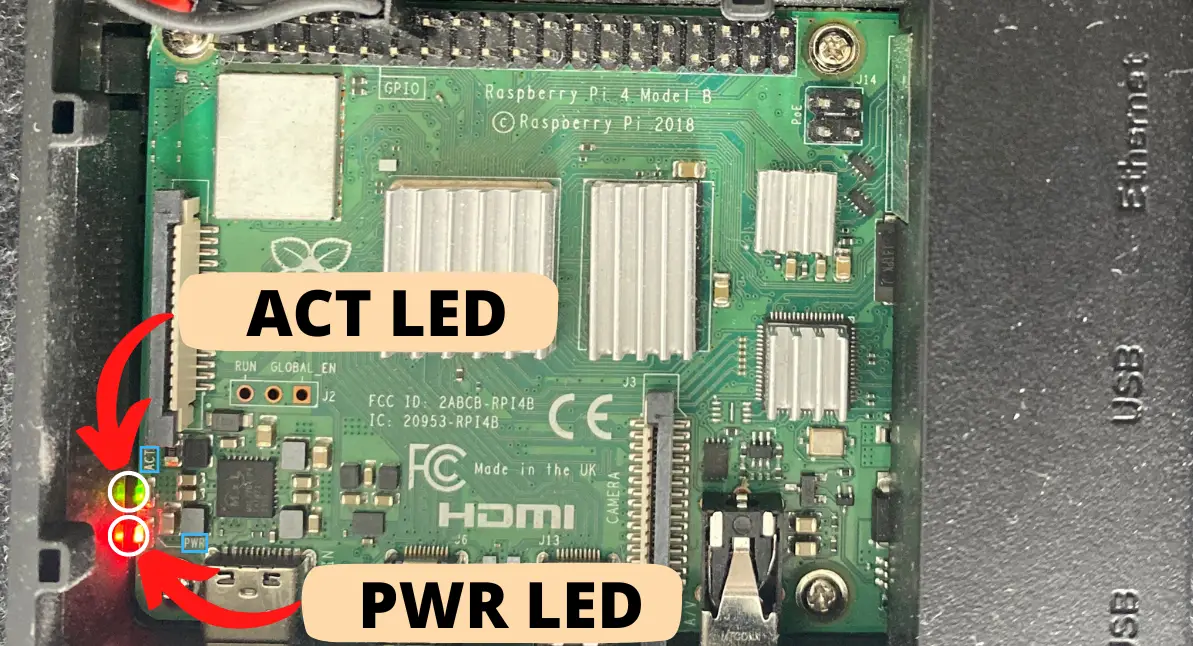
The Raspberry Pi 4 Model B has 2 LEDs (Light-Emitting Diode) built into its board. One of the two emits a red light, which indicates the power status. The other LED emits a green light, and it indicates the SD card activity. A healthy, working Raspberry Pi should have both LEDs continuously emitting a red light and a green light.
Although this guide will mainly focus on interpreting the lights on a Raspberry Pi 4 Model B board, I’ll also go over the other light activity you may find on other Raspberry Pi models as well as their meanings.
But before we can understand the lights’ activities, we need to first learn:
How Do The Lights On The Raspberry Pi Work?
A specific GPIO (General Purpose Input/Output) pin will be assigned to turning on or off these onboard LEDs. This pin is able to perform normally only if it can read the software programmed on the SD card by your Raspberry Pi Imager.
Consequently, it is possible to manipulate the lights on your Raspberry Pi if you change the code in a file.
What Do The Lights On A Raspberry Pi Mean?
As I’ve mentioned before, there are 2 lights on the Raspberry Pi that informs you of the power and SD status.
I’ll start each section with basic, common occurrences surrounding the red and green lights. Then, I’ll transition to more advanced, special cases you could encounter.
Red Light
The red LED is connected to a component called PWR. This is an abbreviation for power, which means that anything that is right or wrong with the power supply the Raspberry Pi is receiving will be conveyed through this light.
Note: Virtually all Raspberry Pi models have a red LED built into them to signal its power status.
There are 3 different basic signals the LED can make, and they notify you the state your Raspberry Pi is in regarding its power (see the table below):
| RED LIGHT PATTERN | EXPLANATION |
| Constantly Lit (No Blinking) | Sufficient power received |
| Steady Blinking | Low power received |
| No Light | Not enough power received (“brownout” detected) |
Ideally, you want to see a strong, stable non-blinking red light.
However, if you start seeing the red light start to blink, you’ll need to check out your power source before it gets even worse and leads to a “brownout”, which is a dip in the voltage level.
You don’t want to see a “brownout” event since it leads to adverse consequences like boot issues and a corrupted SD card, which means neither the Raspberry Pi nor you can access it.
Newer models (like the Raspberry Pi 4 Model B) have a “brownout” detector that will automatically turn off the red light when it notices a brownout event. These detectors are controlled by a new software that will also interrupt your screen with a ‘rainbow’ screen, just in case you’re not paying attention to the lights on the board. These signs are a “cry for help” from your Raspberry Pi, so you’ll need to treat its power supply issues.
Now, you may be wondering what causes a brownout event and power problems. There are 2 main culprits:
- The power adapter
- Your Raspberry Pi needs at least 4.63 V (or volts) to work properly. A great way to make sure you’re meeting this limit is by purchasing an official power supply from the Raspberry Pi company.
- Alternatively, perhaps it’s not the power adapter that causing you the issue but the outlet it’s plugged into. This means you’ll need to switch to a different outlet that you know works.
- The micro USB cable
- You’ll need to switch it out if your cable is too long and the wire is too thin. These hindrances won’t power your Raspberry Pi properly.
Do note that if you reboot your Raspberry Pi 4 (like typing the sudo reboot command in the terminal), you don’t need to freak out if the red LED blinks.
That’s because the PWR component is fully operated by a GPIO expander, which means that when your device boots up again after being rebooted, its system will reset the expander, which causes LED to turn off and then on again (hence a blink). This feature only happens on the Raspberry Pi 4 model.
In any situation other than a manual reboot, you’ll need to check the power supply when you see the Raspberry Pi start flashing.
Beyond these basic signals, here are 2 additional, complicated signals you could encounter:
| LONG FLASH | SHORT FLASH | EXPLANATION |
| 4 | 6 | Type A Power Failure |
| 4 | 7 | Type B Power Failure |
Type A Power Failure and Type B Power Failure will occur separately. No single Raspberry Pi model can have both types of failure.
That means that the power failure type will depend on the Raspberry Pi model. For instance, all Raspberry Pi Model A devices can only display the Type A Power Failure whereas all Raspberry Pi Model B devices can only display the Type B Power Failure.
This is convenient because you don’t really have to memorize the flashes to the power failure type. As soon as you see 4 long flashes of light, you know there is an issue with your power supply.
Of course, if the situation is really bad, the GUI (graphical user interface) will respond accordingly so you don’t need to worry about the lights.
This means that you will know when your Raspberry Pi is dying from a lack of power because the screen will be replaced with a square with rainbow colors and preventing you from doing anything with the device.

Green Light
The green LED is connected to a component called ACT. This is an abbreviation for ‘activity’, which means that anything that is right or wrong with the SD card the Raspberry Pi is reading from will be conveyed through this light.
| GREEN LIGHT PATTERN | EXPLANATION |
| Constantly Lit (No Blinking) | SD card can be read |
| Repeated Flashing | Reading or writing code |
You should definitely pay attention to the flashing if it happens and make sure the flashing occurs at regular intervals. That’s because there are other flash patterns the ACT component could be using. I’ve included a table below to show you what I mean:
| LONG FLASH | SHORT FLASH | EXPLANATION |
| 0 | 3 | Generic failure to boot |
| 0 | 4 | start*.elf not found |
| 0 | 7 | Kernel image not found |
| 0 | 8 | SDRAM failure |
| 0 | 9 | Insufficient SDRAM |
| 0 | 10 | In HALT state |
| 2 | 1 | Partition not FAT |
| 2 | 2 | Failed to read from partition |
| 2 | 3 | Extended partition not FAT |
| 2 | 4 | File signature/hash mismatch |
| 3 | 1 | SPI EEPROM error |
| 3 | 2 | SPI EEPROM is write protected |
| 3 | 3 | I2C error |
| 4 | 4 | Unsupported board type |
| 4 | 5 | Fatal firmware error |
Admittedly, some of these descriptions may include some unfamiliar terms, so I’ve decided to break each one into understandable chunks in this list:
- Generic failure to boot
- If the Raspberry Pi can’t identify which of the pre-programmed reason (listed below) that’s causing an error, it will default to this message.
- You can think of this error as a last resort.
- start*.elf not found
- Start.elf is one of the key processes in the boot up process of your Raspberry Pi.
- Essentially, the bootcode.bin file will load a start.elf in addition to establishing a DRAM (Dynamic random access memory) online.
- Then, the start.elf will start the software and the kernel. That’s why if the Raspberry Pi can’t find start*.elf, your Raspberry Pi can’t boot up.
- Kernel image not found
- This means that your Raspberry Pi can’t find and load any images on your SD card.
- The Raspbian image is needed for the successful booting of your device
- SDRAM failure
- SDRAM stands for Synchronous Dynamic Random Access Memory, and it means that data cannot be accessed since your Raspberry Pi doesn’t recognize the SDRAM.
- This either means that your SDRAM is damaged or you need a new bootcode.bin and start.elf firmware.
- Insufficient SDRAM
- There’s not enough SDRAM to be accessed
- In HALT state
- This signifies your Raspberry Pi’s inability to execute any code
- Partition not FAT
- Partitions are separate sections in the hard drive (like an SD card) that gives users more control over it.
- They need to be in file allocation tables (FAT) in order for Raspberry Pi to process the partitions.
- I’d suggest formatting your SD card as FAT32 before using the Raspberry Pi Imager to install an OS on it
- Failed to read from partition
- This occurs when your partitions are FAT, but they still can’t be read. Once again, I’d suggest reformatting the SD card with FAT32 since it’s an established baseline.
- Extended partition not FAT
- This suggests that not all the partitions are FAT, so you’ll need to format the SD card with FAT32.
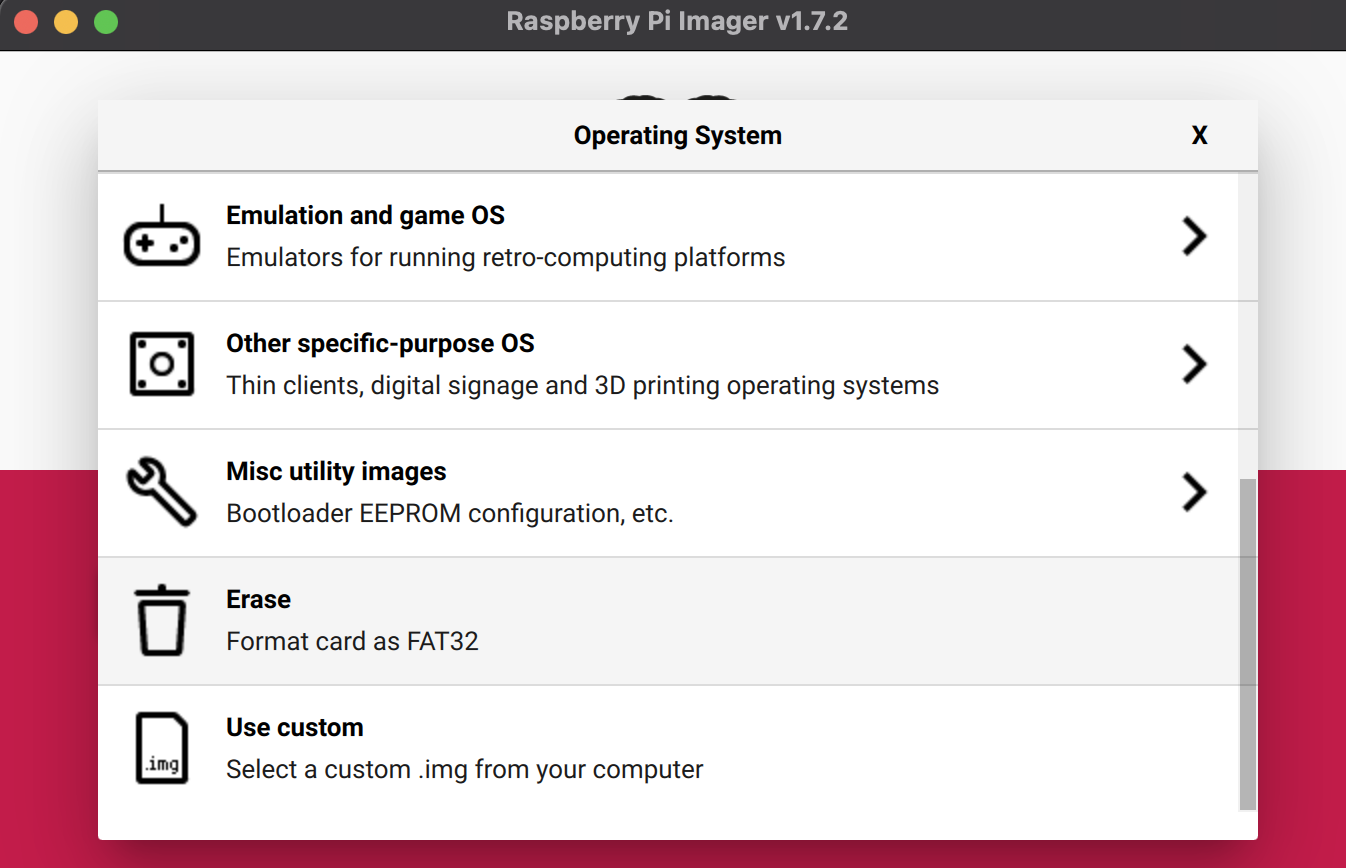
- You can easily do this on Raspberry Pi Imager if you scroll down to the bottom after clicking on “Choose OS” and selecting “Erase”.
- This error (and the preceding 2) most likely occur when you’re using a used SD card.
- File signature/hash mismatch
- A file signature is a unique number located at the beginning of a file that’s used to identify it
- A hash is a unique generated ID for each file
- They must both match before Raspberry Pi will boot up
- Raspberry Pi might be expecting one specific ID and the file’s ID don’t match. Consequently, you’ll need to make sure the Raspbian image you install on your SD card matches with the Raspberry Pi model you have.
- SPI EEPROM error
- EEPROM stores the pre-programmed code that Raspberry Pi needs to use to boot.
- It’s highly unlikely that this error means the content in your EEPROM has an issue because all Raspberry Pis are tested in the factory.
- To double check, you’ll need to turn off your Raspberry, remove everything, and then plug back in your Raspberry Pi. A different pattern might emerge.
- Alternatively, you could reflash your SD card to make sure it boots from the SD card first with the Raspberry Pi Imager: Choose OS < Misc Utility Images < Bootloader < SD Card Boot
- If you still get the same error, then the Pi might have been mishandled
- For instance, not turning it off when messing around with its circuitry on a breadboard
- SPI EEPROM is write protected
- To make it is not write-protected, you’ll need to add this line of code in the config.txt file.
eeprom_write_protect=0If you don’t know how to open the config.txt file, you can do so with this command;
sudo nano config.txtThen, you can save by pressing CTRL + X, press the y button to confirm, and press the enter key to go back to the terminal.
If this still doesn’t work, then the device is defective and can’t be repaired. This is because the connection to the EEPROM is faulty, which means the Raspberry Pi won’t be able to boot
- I2C error
- I2C stands for (Inter-Integrated Circuit) and it allows for communication with low-speed peripherals. This allows for multiple devices to be connected to your Raspberry Pi like a mouse or keyboard.
- To fix this error, just go to your terminal and type in the following commands to enable I2C:
sudo raspi-configChoose the following options: “3 Interface Options” < “I5 I2C” < “Yes” < “OK” < “Finish”
- Unsupported board type
- This is pretty self-explanatory, but this could be hinting that you need to update the firmware so that your board model can be recognized.
- Fatal firmware error
- Firmware is a programmed software that’s either built into board or found on the SD card. In either case, you should be able to rewrite them.
Since most of these errors are related to your SD card, I’d suggest reflashing your SD card again, checking that you’re installing the correct operating system, and making sure your SD card isn’t corrupted.
If these errors persist, you should also switch the SD card with one that you know works. That way, any further problems you encounter lets you know that your Raspberry Pi has some faulty hardware that limits its ability to read an SD card.
Some final thoughts before we conclude:
- The brightness of these LEDs have no significance (other than letting you know the model you have in certain cases). For instance, Model B Raspberry Pis have a dimmer LED.
- When you first power up your Raspberry Pi, the green LED can blink frantically and irregularly. You’ll need to give it a good 20 seconds before you should start thinking there’s something wrong with your SD card.
How To Interpret Other Raspberry Pi Models’ Lights?
Here are some information regarding the onboard LEDs for other Raspberry Pi models.
You may find other LED components besides the ACT and PWR components on your board such as the ones listed in the following table:
| COMPONENT LABEL | LED COLOR | EXPLANATION |
| OK | Green | SD card activity (Just like the ACT component) |
| FDX | Green | Full Duplex connection – Indicates whether or not Ethernet cable is connected and whether full duplex is running (if Raspberry is connected to a computer) |
| LNK | Green | Ethernet Controller Link/Activity – Indicates that Ethernet cable is connected and will flash if there is network activity |
- Raspberry Pi 400’s LEDs should behave the same as Raspberry Pi 4
- Models 1A, 1B, 3A, and 3B, Zero, and Zero W have their green LED off initially, but when it’s booting the light will appear
- Models 2A and 2B have their green LED on initially, but when it’s booting, the light will not appear.
- The Raspberry Pi Zero only has one LED: the ACT. This will only turn on if there is SD card activity
Summary – tl;dr (Too Long; Didn’t Read)
Here are the key takeaway points you should keep in mind after reading this article:
- There are 2 LEDs built into the Raspberry Pi
- One is red, which is the PWR component. This tells you the power status of the Raspberry Pi
- The other is green, which is the ACT component. This tells you the status of the SD card activity
- Most of the problems that arise usually stem from issues with reading the SD card. That means you should reflash it, make sure it’s not corrupted, and that you are downloading the right Raspbian OS that fits with your Raspberry Pi model on it.
In the end, you shouldn’t be taking the light warnings from your Raspberry Pi too lightly and try to find a way to fix it!