Is Raspberry Pi A Good Way To Learn Programming? (3 Levels)
I‘ve been programming for more than 3 years now, and have been doing it either in my spare time or for school projects. It’s a great way to test your logical thinking, creativity, and problem solving skills. Consequently, one of the things I had to know before buying a Raspberry Pi was whether or not it was worth learning programming on it.
Raspberry Pi is a miniaturized computer that can be used for programming, which can appease programmers with varying skill levels. You can start with the basics with Scratch or move to independent work in text editors like Geany or Thony. If you really want to challenge yourself and code something useful for your Raspberry Pi, you can head into shell scripting.
I went through all of these levels, so I will talk about each level more in-depth for the rest of this guide.
Level 1: Scratch Programming
Scratch is a block-based visual programming editor, which means you drag and drop blocks of code to program.
It was initially created by the Lifelong Kindergarten Group, which is at the MIT Media Lab in Boston. The first prototype appeared in 2003 and the second one appeared a year later in 2004. The group’s goal was to help younger audiences between the ages of 8 to 16 learn programming languages and have fun doing it.
Fun Fact!
The Scratch programming language even has a mascot. It’s a cat, and it’s named Scratch Cat. You’ll usually see a picture of this in the staging area when you start a new project in Scratch.
I’d highly recommend this for beginners because I feel it’s better to first learn the key concepts of programming languages (like if statements and loops) before you dive into the syntax and the nitty gritty details.
The nice thing about Raspberry Pi is that it should have Scratch already installed. Here are the steps to open it:
- Open the start menu.
- You can do this by either clicking on the Raspberry Pi icon near the top left corner of the screen or by using the keyboard shortcut CTRL + esc.
- Click on “Programming”
- Click on “Scratch”
Alternatively, you can just open up your terminal and type this command to open Scratch2:
scratch2If you don’t have it installed, I’ll go over how you can install it from Pi-Apps in the next section!
If you haven’t seen the user interface (also known as the UI), it’s divided up into 3 different sections.
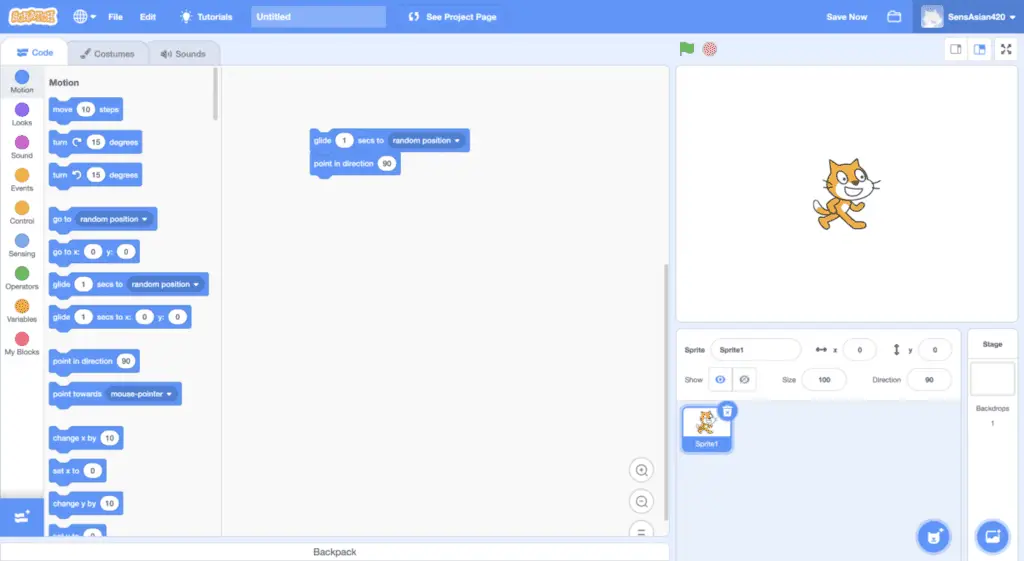
The three sections are the block palette, the coding area, and the staging area.
The leftmost section (in the image above) is the block palette. This is where you can choose the blocks you want. Then, you can drag it into the middle section, which is the coding area. You can snap blocks of code to each other, which is very satisfying.
Finally, you can implement your code, and watch your code run on the staging area (which is the rightmost section). If you programmed your character to move or any type of action, you’ll see your sprite (which is a character) do the action there.
Like I said before, this is very addicting and very visually pleasing.
Level 2: Programming In Text Editors
Like I’ve mentioned before, once you understand these programming ideas, then they can be pretty much transferable from one programming language to another. By then, you’ll just need to familiarize yourself with the rules and programming structures for the languages.
Some good beginner-friendly ones I would recommend are Python, Javascript, or Java.
You should already have some IDEs (Integrated Development Environment) pre-installed on your Raspberry Pi like Geany, and Thony Python. They should all be located in the start menu’s “Programming” section.
However, if you want more IDEs or find that the existing ones don’t support a programming language you want to learn, then you should install Pi-Apps.
Pi-Apps is a collection of apps that you can install and run quickly thanks to the installation scripts it possesses.
You can think of it as a Play Store for Android phones or the App Store for Apple devices (like Macbook, iPad, or iPhone).
Here are the steps to install it:
- Open up your terminal. You can do this by using the keyboard shortcut CTRL + WINDOWS KEY + T (or CTRL + COMMAND + T if you’re a Macbook user).
- Alternatively, you can click on the terminal icon near the top left corner of the screen. It looks like a blackboard and it’s near the Raspberry Pi icon (which is the start menu).
- You’ll need to update your Raspberry Pi:
sudo apt update- Install Pi-Apps on your Raspberry Pi:
wget -qO- https://raw.githubusercontent.com/Botspot/pi-apps/master/install | bashNote: if you’re getting errors when installing Pi-Apps, then you’ll need to restart your system. If that still doesn’t work, then you’ll need to flash your Raspberry Pi’s SD card again and set it up from the start. This last method worked for me.
If you forgot how to flash your SD card with Raspberry Pi Imager or want to see how I approach it, take a look at my guide on a headless Raspberry Pi setup.
- Open up Pi-Apps. To do this, click on the Raspberry Pi icon (the start menu), Accessories, and Pi-Apps.
- After that, click “Programming” and choose a text editor.
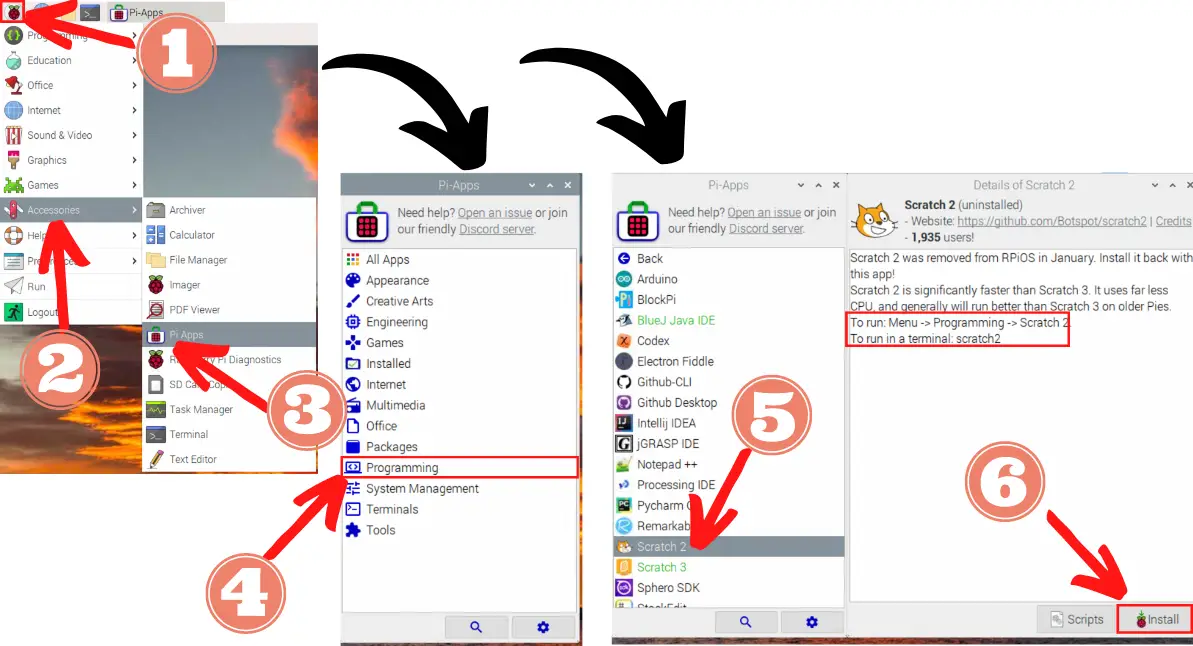
Let’s install Scratch as an example to help you better understand how you can use Pi-Apps:
- Click on Raspberry Pi icon
- Click “Accessories”
- Click “Pi-Apps”
- A new window called “Pi-Apps” should appear. Click “Programming”
- Select either Scratch 2 or 3
- Click “Install”
Note: when you click on the app you want to install, there are helpful information included. For example, the below image will highlight how you can run Scratch 2 after installing it.
Level 3: Programming With Shell Scripting
If you really want a challenge, then I’d suggest you work in the Raspberry Pi terminal. Writing and executing code for shell scripts requires you to learn Bash, which is a command language used in the terminal.
Of course, you can use other programming languages like Python if you’re already familiar with them.
Before I go any further, I first want to talk about shell scripting:
A shell script is an executable text file that contains shell commands and other specific structures and components like variables, functions, and loops, and etc., and they are executed sequentially.
Shell scripting is a powerful Linux administration tool. When you find yourself doing a task over and over again, use shell scripts as it is well-known as a repetitive task automation tool.
When you’re using shell scripting, you can customize your own tasks or create simple applications. Plus, the person that runs these scripts doesn’t have to know much about programming. They just have to know how to run that one command!
Shell scripts are applicable to any Linux system, and since Raspbian (which means Raspberry Pi OS) is a Debian-based operating system,you can use it for Raspberry Pi.
I’ll give you a taste of shell scripting by going over some information on how you can set up and execute scripts.
Setting Up Scripts
By convention, we end a text file with .sh to indicate that it’s a shell script to the user. However, the system doesn’t pay attention to that so you can name it whatever you want (just make sure there’s no whitespace).
To create a script, just use the touch command in your terminal:
touch file_nameIf you get an error, that means the file name is already taken, so you need to name it something else.
There are an assortment of programming languages you can use to program scripts (like Bash, Shell, Python, or PHP), which means the structure and keywords will be different for each one.
However, they all start the same way: you need to create a shebang, which indicates which program to run as the interpreter .
Simply put, you’re telling the system what programming language you’re going to use for the file. You always want to put the shebang on the first line so that the system knows what to do with the rest of the code. Plus, if you’re planning to execute these scripts, then the system will expect the first line to be a shebang.
However, if you forget to add this shebang directive, then it will use the default language, which is Bash.
The syntax for a shebang is as follows:
#!<path to the interpreter that will run the file>If you’re using Bash for example, then the path would be /bin/bash. However, if you don’t know the path to the interpreter, then type in the following command in your terminal (making sure to replace the parentheses and the stuff inside it):
which (interpreter)For instance, if I wanted to find the path to Python, I’d write:
which pythonOn a side note, if you’re using bash, you can write a comment by starting with a hashtag. This tells bash to ignore everything written after that. Comments can be on the same line as code that will be ran or on a different line
But now you may be wondering, how does Bash differentiate between a shebang and a comment? Bash will be on the lookout for an exclamation mark following the hashtag. Plus, it expects the shebang in the first line, so that’s why I recommend putting the shebang there.
Executing Scripts
There are 3 ways you can run a script.
1. Path To Script
The most common way is to write the path to the script. For example:
./script_to_run.shHowever, this will only work if the script is in the same directory as you. If it’s not, you can either move into that directory using the cd (change directory) command or by writing the full path to the shell script.
When you are using this method, you might run into some permission issues, especially if you didn’t create the script. To bypass this issue, you’ll need to change the executable permission so you can run it:
chmod +x script_name.shIf you want to learn more about setting or removing permissions for your files and directories, then you need to check out my Raspberry Pi permissions guide!
Remember to replace ‘script_name.sh’ with the name of your script file.
2. Name The Interpreter
Another way you can run a script is by writing the name of the interpreter that will run the script and the script name.
For example, if I’m using Bash, I’ll write:
bash first_script.shHere’s another example: if I’m using Python, then I’d write this:
python2 myscript1.shI like this method because you don’t need the executable permission to run it, and it’s great for overriding the default shebang if you didn’t write one in the script.
3. Source Command
The last way you can execute a script is by using the source built-in command and the script name:
source first_script.shOnce again, this doesn’t require the executable permission.
Summary – tl;dr (Too Long; Didn’t Read)
Here are the key takeaway points you should keep in mind after reading this article:
- If you’re a beginner, I’d recommend starting with Scratch
- This is located in Start Menu < Programming < Scratch
- The next tier up from that is programming with the text editors on the Raspberry Pi (either preinstalled or ones you can install)
- These IDEs can all be found in Start Menu < Programming
- You can always download Pi-Apps and install more IDEs from there
- If you really want a challenge and program something you can automate on your Raspberry Pi, then you’ll need to get into shell scripting.
- You can create a shell file with the touch command and have it end in .sh by convention
- There are 3 ways you can execute the file:
- Using the path to the file
- Naming the interpreter
- Using the source command
If you got this to work, you should throw yourself a little bash to celebrate!