Can’t Delete Files In Raspberry Pi? Easy Permission Guide
I remember when I first tried to delete files on my Raspberry Pi. There were a few that gave me permission denied errors, which stumped me. Now that I have some good foundational knowledge of Linux, I wanted to make a guide that will help you bypass errors like these and even restrict permissions for others.
So how do you obtain permission to delete files on Raspberry Pi?
If you are receiving permission errors to delete files, that means you don’t have the executable permission set up. Consequently, you’ll need to type this command in your terminal (replacing file_name with the name of the file you want to remove) before you can run the remove (rm) command:
chmod u+x file_nameNote: if you are getting permission errors running this command, then it means you don’t own the file and you’ll need root access to modify it. To do that, you’ll need to add a sudo command before it, like this:
sudo chmod u+x file_nameIf you want to learn more about how you can avoid issues like these, restrict others from access, or give them permission, then you need to read the rest of the article. I boiled down the essence of handling permissions on Linux systems (like Raspbian).
How To Get Root Access
Raspberry Pi uses a Linux distribution called Raspbian (also known as Raspberry Pi OS). That means if you want to make changes to your system, you’ll need to learn the techniques of obtaining root access, which can be applicable to other Linux systems.
There are 2 categories in Linux: the root user (which is either the superuser or the administrator) and the non-privileged users (who have no special rights on the system).
Root privileges are powers that the root account has on the system. It has the most power over the system. It’s not recommended to use root for ordinary tasks, but if root permissions are needed, you can become root to perform that task at that moment.
There are 3 ways you can obtain root access: run sudo su to temporarily become root, run su to become root temporarily, or add the sudo command before commands that require it.
I’ll break down each method so you can use one that benefits you the most in the moment.
1. SUDO SU
To temporarily become root in the terminal, run the command:
sudo suThis command means superuser do substitute user, and it activates the root home environment as if the user was in a fresh session.
Once you’re finished with the command, exit it with this command:
exitOf course, if you don’t know which user you are currently logged in as, you can run this command:
idBased on my experience, you don’t really need this command since you can look at the username and the hostname on the command line. If they’re both white, then that means you have root access. However, if they are the traditional colors on Raspberry Pi OS (green), that means you are a non-privileged user.
Plus, if you’re root, your username should automatically be changed to root.
2. SU
Similar to the sudo su command, this command (which stands for switch user) will also grant you root privileges since it takes you to an interactive root shell. You can also exit using the exit command once you’re done.
In fact, su is effectively identical to this command:
sudo -iThe difference between su and sudo su is that you’ll need to enter the password of your target account for the first command and the password of your current password for the account you’re using for the second one.
Since these passwords are different, you are unlikely to know the password for su. Therefore, you can change it to the same one or a password you can remember with this command:
sudo passwd root3. SUDO
This command will only let you become a superuser for the command you add the sudo command to.
It’ll prompt you to enter your password (which should be your current one). After typing this in, you can run as many other sudo commands without having to retype your password for 5 minutes.
5 minute is the default time, so if you want to require a password every time you use the command, then run:
sudo -kFile Permissions
File permissions (also known as file modes) specify who can access, change, or execute a file on a Linux system.
It ensures that only authorized users and processes can access files and directories.
Each file or directory has an owner and a group. By default, the owner is the user who creates the file and the group is the primary group of that user.
The ownership of a file or a directory can be changed only by root using the chown (stands for change owner) and chgrp (stands for change group) commands.
For each file, the permissions are assigned to three different categories of users:
- The file owner
- The group owner
- Others (anyone else)
There are three file permissions types that apply to each category:
- The read permission (r)
- The write permission (w)
- The execute permission (x)
To view the files permission run:
ls -lAlternatively, you can run this command:
statYou should see something like this:
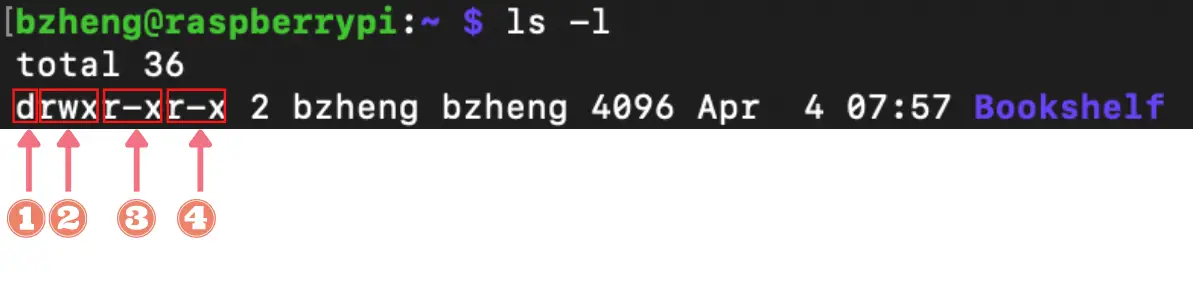
Let’s break down each group so you understand what the code means:
- The first character should tell you what file type it is.
- For example, this picture shows the letter ‘d’ in the first space, which means it’s a directory.
- If you see a hyphen (-) instead, that means it’s a file.
- The next 3 characters tells you the user’s permissions
- You can see that the user in this example has all 3 permissions
- The second set 3 characters after the first tells you the group’s permission
- You can see that this example doesn’t give the group permission to write it
- The last 3 characters shows everyone else’s permission (the other)
Do note that a hyphen indicates an absence of a permission.
You can change the file permission with chmod (stands for change mode), which is the command used to change the permissions of a file or a directory. Chmod uses either the symbolic or the numeric notation (octal notation).
Remember that only the root (or the file’s owner) can change the file’s permissions. As a result, if you get a permission denied error when using this command, you’ll need to add a sudo command before it.
Numeric Notation
Octal notation uses a number that represents the permission in base-8, which can be either a 3 or a 4-digit number with digits ranging from 0 to 7. The leading zero can be omitted.
For example, 0744 can be written as 744.
When a 3 digit number is used, the first digit represents the permissions of the file’s owner, the second one represents the file’s group, and the last one shows the permissions of the ‘others’ class.
Read, write, and execute have their own fixed number value:
- r (read) = 4
- w (write) = 2
- x (execute) = 1
- ‘-‘ (no permissions) = 0
The permission number of a specific user class is represented by the sum of the values of the permissions for that group.
Let’s do an example so you know what I mean:
Let’s say we want the owner to have all the permissions (r, w, and x), the group should only have write and execute permissions (w and x), and the others class should only have the read permission (r). This is what we’d type in the terminal:
chmod 734 file.txt
I came up with the 7 since it’s the sum of the r, w, and x (4+2+1). I put it in the hundreds place, which handles the permissions for the file owner.
I came up with the 3 since it’s the sum of the w and x permissions (0+2+1=3). I put it in the tens place, which handles the permissions for the group.
I came up with 4 because it’s the sum of the r permission (4+0+0=4). I put it in the ones place, which handles the permissions for the ‘others’ class.
Now that you got the basics down for changing file permissions, you can get a little more advanced and learn how to change the permission of all the files in a directory without changing the directory’s permission. Run this in the terminal (make sure to replace the square brackets (not the curly ones) and the stuff in them:
find [path to the directory] -type f -exec chmod [permission numbers] {} \;Let’s break down this command:
- The find command searches for a file
- The type f means that we are looking for files
- The {} represents the files found with the find command
- The \; helps the command that needs to be executed (take it as the syntax)
If you don’t want to do the math, don’t worry. I created a table you can use to identify the numeric code you need to change the file permissions for each group:
| NUMBER | READ | WRITE | EXECUTE | MEANING |
| 7 | r | w | x | You want read, write, and execute permissions added |
| 6 | r | w | – | You want only read and write permissions added |
| 5 | r | – | x | You want only read and execute permissions added |
| 4 | r | – | – | You only want read permission added |
| 3 | – | w | x | You want only write and execute permissions added |
| 2 | – | w | – | You only want write permission added |
| 1 | – | – | x | You only want execute permission added |
| 0 | – | – | – | You don’t want any permissions added |
Symbolic Notation
For some, the symbolic notation may be easier to learn. To get started, you need to remember this syntax:
chmod [who][OPERATION][permissions] filenameLet’s break down each bracket:
- [who] signifies the user category whose permissions will be changed.
- u: the user that owns the file.
- g: the group that the file belongs to.
- o: the other users.
- a: all users (basically u, g, and o all combined)
- [OPERATION] defines whether the permissions are to be removed, added, or set:
- – : a hyphen means remove the specified permissions.
- + : the plus sign means add the specified permissions.
- = : equals means change the current permissions to the specified permissions.
- [permissions] are specified using the letters:
- r (read)
- w (write)
- x (execute)
Let’s do an example and use the same scenario so you know what I mean:
Let’s say we want the owner to have all the permissions (r, w, and x), the group should only have write and execute permissions (w and x), and the others class should only have the read permission (r). That means I’d have to type in multiple commands in the terminal:
chmod u=rwx file.txt
chmod g=wx file.txt
chmod o=r file.txt
Permission Meanings
Now that you know how to change the permissions, you might be wondering how each permission (or a combination of permissions) are supposed to work.
Let’s break it down:
- If you only have the r permission, then you can only see or list the contents of a file or a directory. You can’t make any changes to them
- If you only have the w permission, then you can only remove the file
- If you want to remove a directory or create a file or directory inside that directory, then you’ll need both the write and execute permissions.
- If you only have the x permission, then you run files or access the contents of the directory (like moving into that directory)
Summary – tl;dr (Too Long; Didn’t Read)
Here are the key takeaway points you should keep in mind after reading this article:
- To avoid permission-related errors, you need to either have root access or change the file permissions.
- There are 3 ways to get root access:
- Run sudo su
- Run su
- You can exit this command and the one before it using the exit command
- Add the sudo command before each command
- You can change file permissions using either the numeric or symbolic notation along with chmod, which stands for change mode.
- There are 3 different permission types: read (r), write (w), and execute (x).
- There are 3 different categories of users: file owner (u), group owner (g), and others (o)
- The ‘others’ category is anyone besides the owner
In the end, I hope that once you read this article, you’ll go write some code of your own, and execute it!