Can’t Access Config.Txt On Raspberry Pi? Here Are 5 Easy Ways
When I wanted to make some changes to my Raspberry Pi (like changing the screen resolution), I found out that you need to edit the config.txt file.
I realize that some people might have trouble accessing it, depending on their situation, so they may even be wondering: “How do I edit the config.txt on my Raspberry Pi?“
There are 5 ways you can access the config.txt:
- Use the terminal in your Raspberry Pi
- Use the file manager in your Raspberry Pi
- Use SSH to make changes through the terminal
- Use VNC to make changes through the file manager
- Open the SD card from your Raspberry Pi on your laptop
If you want to learn more about these techniques, I’ll go super in-depth on each one in the rest of this article. Moreover, I included a troubleshooting section in case you run into problems.
But before we go any further, let’s answer the question:
Where Is The Config.txt File On Raspberry Pi?
The config.txt file is located in the boot folder, which is where the Raspberry Pi will go to read configuration specifications when it’s booting up. You can open it by running the following command in your terminal:
sudo nano /boot/config.txtHow To Edit Config.txt File On Raspberry Pi
Before you start using one of the following methods to edit your config.txt, I highly suggest creating a backup for it. This is a precaution just in case you mess up. Otherwise, you’ll need to reflash your SD card with the Raspberry Pi Imager and start all over again.
In order to create a backup, type the following command in your terminal:
sudo cp /boot/config.txt Downloads/config_backup.txtWhat this command essentially does is copy the contents of config.txt and paste it in a new file called config_backup.txt and store it in the Downloads folder.
Now, whenever you need to fix your mistake in the actual config.txt file, just copy the contents in config_backup.txt into the config.txt file.
Once you’re done using any one of the 5 methods listed below, make sure to restart your device to make sure the changes go into effect.
One way to do that is type this in the terminal after you’re done:
sudo reboot1. Use Raspberry Pi’s Terminal
If you have access to your Raspberry Pi and can connect to a display or monitor, then this method is the one for you.
There are only 2 steps involved;
- Open the terminal
- You can do this by clicking on the blackboard icon near the top left corner of the screen (to the right of the Raspberry Pi icon) or by using a keyboard shortcut CTRL + WINDOWS KEY + T (or CTRL + COMMAND + T if you’re a Macbook user).
- Type in the following command to open it:
sudo nano /boot/config.txtHere are some notes about the command:
- Sudo is a command that grants you root access. It stands for ‘superuser do’, and you need it every time you’re making changes to a file, directory, or system.
- Nano is a command-line text editor. Simply put, it lets you edit files in your terminal.
- Once you finish making changes, you can do the following steps to save and exit:
- Press CTRL + X (to save)
- Press the ‘y’ key (to confirm)
- Press the enter key (to exit)
- Once you finish making changes, you can do the following steps to save and exit:
2. Use Raspberry Pi’s GUI
This method is similar to the first one in that you need to have access to your Raspberry Pi and have it connected to a screen.
The part where it differs is that you’re using the Raspberry Pi’s GUI, which stands for Graphical User Interface. In essence, it’s the stuff you see on the screen.
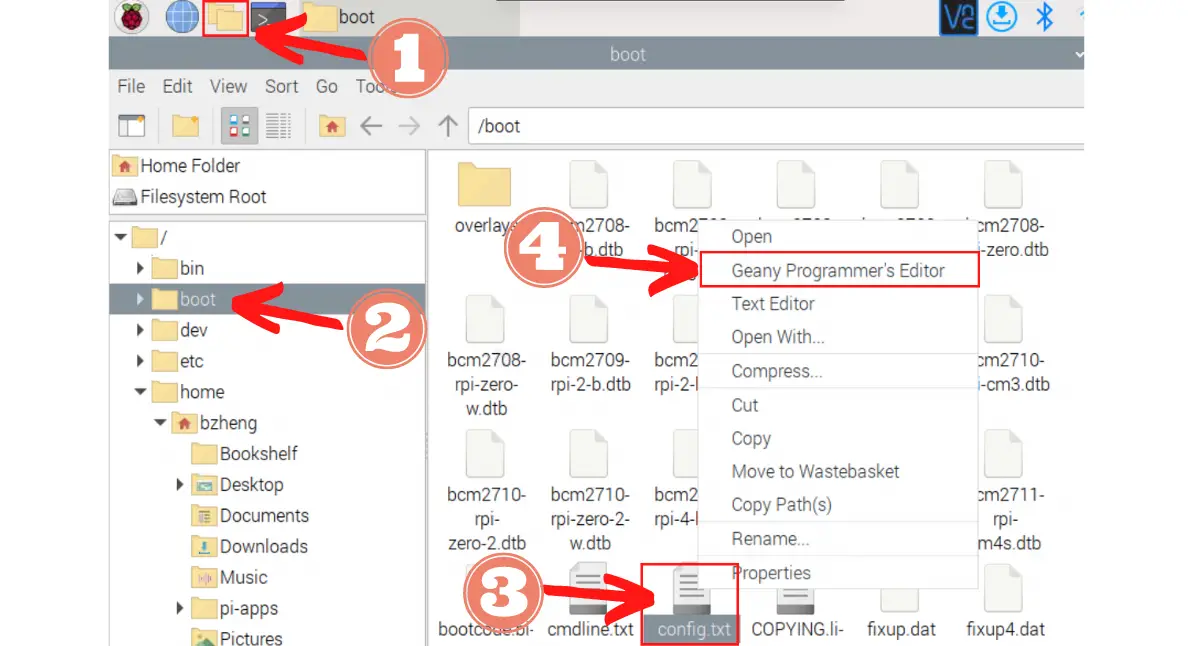
To edit the file, follow these 4 steps:
- Open Files on your Raspberry Pi
- This is a folder icon near the top left corner of your screen. It’s smushed between the Raspberry Pi icon and the terminal icon.
- Click on the ‘boot’ folder (since config.txt is stored there)
- Right-click on the config.txt file
- Select the text editor you want to use to edit the file
- For instance, I can choose the Geany Programmer’s Editor
3. Use SSH
If you lack access to a display to connect your Raspberry Pi, don’t worry. We can use SSH (Secure SHell), which lets you access the terminal of the Raspberry Pi.
It’s similar to the first method, but you’ll need to perform these steps:
- Open your computer’s terminal.
- On macOS, you can use the keyboard shortcut Command + Spacebar and type in ‘terminal’ to find it
- On Windows, you can type in ‘command prompt’ in the start menu
- Find your Raspberry Pi’s IP address
- On macOS, you can run this command: ping raspberrypi
- On Windows, you can run this command: nslookup raspberrypi
- If these methods don’t work for you, you can install a tool to search for the IP address like Angry IP Scanner.
- Use SSH
- Type this in your computer’s terminal, making sure to replace the parentheses and what’s inside them: ssh (username of your Raspberry Pi)@(IP address)
- Edit the config.txt file with this command: sudo nano /boot/config.txt
4. Use VNC
If you really want to see the graphical interface of your Raspberry Pi and edit the config.txt file from there, but you don’t have the Raspberry Pi connected to a screen, then you’ll need to use VNC (Virtual Network Computing).
You’ll need a laptop for this since it combines aspects of methods 2 and 3. Follow these steps to use VNC:
- Install RealVNC on your laptop: https://www.realvnc.com/en/connect/download/viewer/windows/
- Open your computer’s terminal.
- Find your Raspberry Pi’s IP address
- Use SSH
- Type this in your computer’s terminal, making sure to replace the parentheses and what’s inside them: ssh (username of your Raspberry Pi)@(IP address)
- Open Raspberry Pi Configuration
- Type in the command: sudo raspi-config
- Enable VNC:
- Select ‘3 Interface Options’
- Select ‘I3 VNC’
- Select ‘Yes’
- Select ‘OK’
- Select ‘Finish’
- Open your RealVNC app on your laptop
- Type in the IP address
- Type in the username and password
- Click on the File icon near the top left corner of the screen
- Click on the boot folder
- Right-click on config.txt
- Select a text editor to work with
5. Use SD Card
If you have access to your Raspberry Pi but not a display, then the you can use this method:
- Remove the SD card from your Raspberry Pi and plug it into your laptop
- Note: you may need a dongle to do so if your laptop doesn’t come with an SD card reader (like a Macbook)
- Open the file manager on your laptop
- This can be the Finder on Macbook, File Explorer in Windows, or Files on Linux-based laptops like Chromebooks.
- Click on the SD card, which should show its name in the left menu
- Right-click on the config.txt file
- Select something along the lines of “Open With”
- Select a text editor
- It can be the default one if you don’t have it installed, like TextEdit on Macbook
- Once you’re done, save the file (based on how your text editor works) and exit
- Go back to your file manager and eject the SD card by clicking on the little triangle icon that’s pointing it. It should be to the right of the name of the SD card.
- Reinsert it back into your Raspberry Pi and power it on.
Troubleshooting
There’s always a possibility that you might run into an issue when using any one of these method, so I decided to include a section to provide solutions to some common problems.
1. Can’t Use SSH
There is a possibility you might encounter this error if you tried to use SSH in methods 3 or 4.

Although the text may be daunting, you don’t need to worry. Instead, focus on the line: “Offending ECDSA key in …”.
This tells you exactly where the error is. All you need to do is go to that file and remove the line that’s causing you an error. For me, it’s line 14, which is in the /Users/bowenzheng/.ssh/known_hosts file.
Here is the steps I took to fix it:
- Open the file
- In my Macbook, I have vim (which is a text editor) installed
- If you want to follow along with the rest of the steps, you can install vim on your machine at this site: https://www.vim.org/download.php
- You should copy and paste the name of the file you want to open after the vim command. For example:
vim /Users/bowenzheng/.ssh/known_hosts- Enter last line mode by typing a colon (:)
- Enable line numbers by typing:
set nu- Go into insert mode by hitting the esc key and pressing the ‘i’ key
- Delete that line
- Go into last line mode again. Press the esc key and type a colon
- Press enter after typing the command to save and exit:
wq!Now you can run your SSH command again. This time it should work because you removed the offending line.
2. Permission Denied
This most likely occurred because you don’t have root access to it or you didn’t create the file yourself.
Here is the process I’d take to resolve this issue:
- Go to your terminal
- Add the execute permission:
sudo chmod u+x /boot/config.txt- Open the file again
But from my experience, you can just rely on this command and skip that extra step:
sudo nano /boot/config.txtIf you want to learn more about permissions and how to add or remove them from files, then you’ll need to check out my permissions guide.
3. Can’t Make Changes
If you still can’t make changes to that file even by using the technique mentioned above, I’d suggest restarting or rebooting your Raspberry Pi.
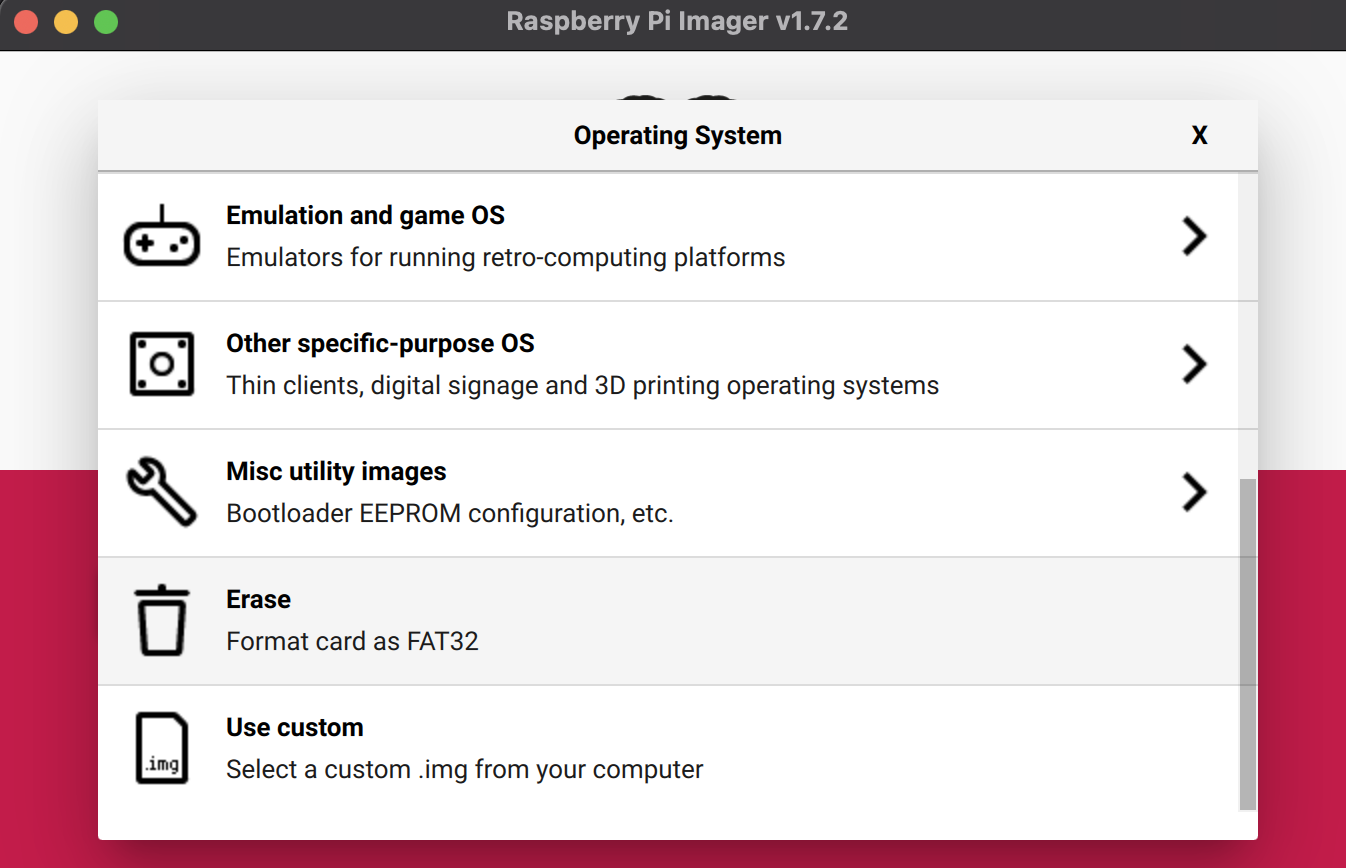
If this is still the case, then that means your SD card is corrupted. I’d recommend replacing the SD card, but if you don’t want to spend money on a new one, I would erase the SD card with the Raspberry Pi Imager and reflashing the Raspberry Pi OS on it by doing the following:
- Remove your SD card and plug it into your laptop
- Open your Raspberry Pi Imager
- If you haven’t installed it yet, you should install it with this link: https://www.raspberrypi.com/software/
- Click “Choose OS”
- Scroll down and click “Erase”
- Select your SD card in “Choose Storage”
- Click “Write”
- Now reflash your SD card with Raspberry Pi OS
In the future, to prevent SD card corruption again, you need to shutdown your Raspberry Pi properly instead of just pulling the plug on it.
One way to do that is by using the shutdown command:
sudo shutdown nowSummary – tl;dr (Too Long; Didn’t Read)
Here are the key takeaway points you should keep in mind after reading this article:
- The config.txt file is located in the boot folder
- Raspberry Pi reads this file when booting up
- You can edit the config.txt file by using:
- Raspberry Pi’s terminal
- Raspberry Pi’s file
- SSH
- VNC
- SD card
I hope you had a great time learning how to open your config.txt file and found a way to reconfigure the specifications to your liking!