Can You Install Discord On Raspberry Pi? Here Are 4 Easy Ways!
I first heard about Discord from my friends who were avid gamers. We were in a computer science class and were deciding on a messaging platform to collaborate on our coding projects. From then on, I was hooked on this text chat app, and it became deeply ingrained in my life.
As a result, when I got into Raspberry Pi, I wanted continue using Discord. Yet, I pondered, researched, and experimented the different ways I could install Discord on it.
There are 4 ways to use Discord on Raspberry Pi. The easiest way is to access it through the web browser. Other ways you can do this is by installing Pi-Apps and then installing Discord, installing Webcord, and installing nativefier.
If you don’t know how to implement these methods, don’t worry! I’ll describe each way in as much detail as possible in addition to providing pictures to help you better understand what I mean.
1. Using Desktop Shortcut
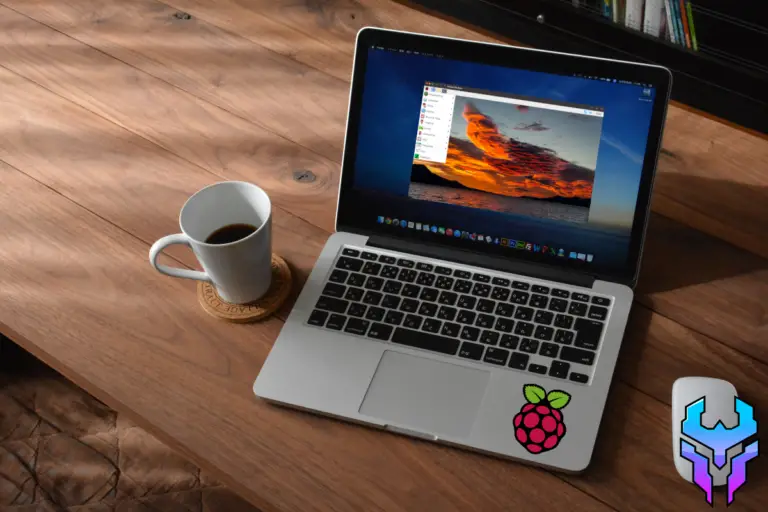
Everyone should know that they can easily access Discord on Raspberry Pi (or any other laptop, phone, etc.) using its website link: www.discord.com.
But this guide is about installing Discord on your Raspberry Pi, and that’s what I’m going to do. I’ll show you how to create a shortcut on your Raspberry Pi to Discord in your browser. This will give the illusion that you installed Discord.
The first step you’ll need to take is open your favorite browser or you default browser. It can be the preinstalled one (which is Chromium) or something fun like Firefox.
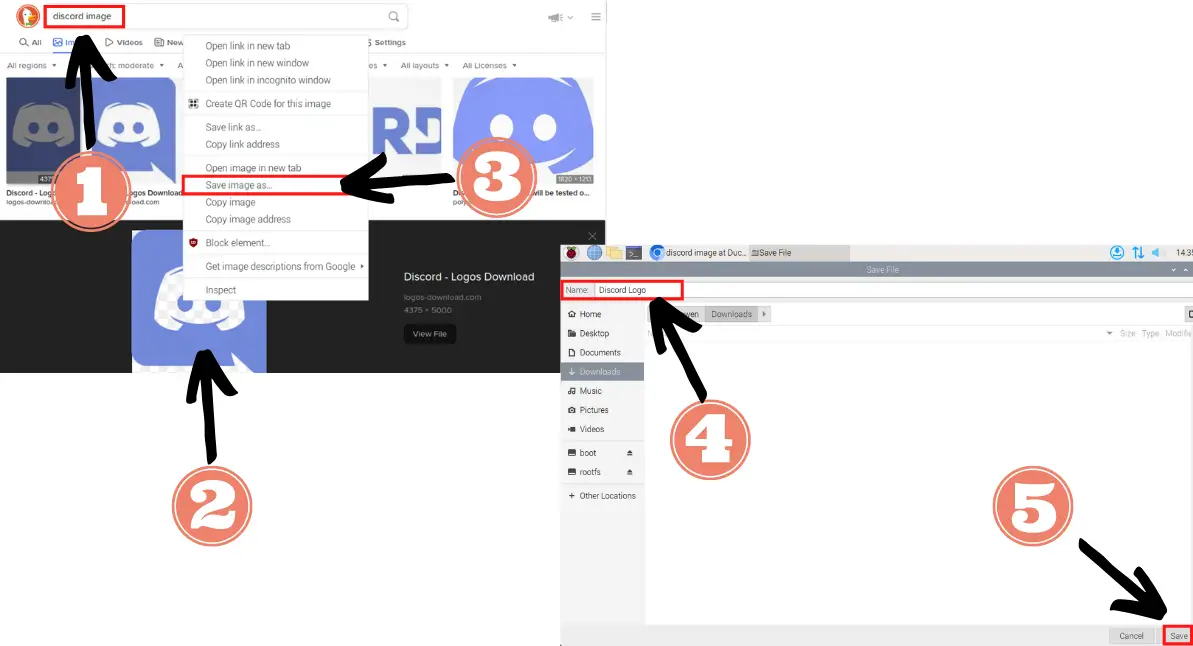
Either way, you want to get onto a search engine like DuckDuckGo and search “discord image” (or logo). Find an image you like since this will be the image of the desktop shortcut you’ll be creating.
Click on the image and then right-click on the image to see additional options. Now, you’ll need to click on “Save image as … ” to save it. This will open a new tab in which you’ll need to name it and then save it by pressing the “Save” button near the bottom right corner of the window.
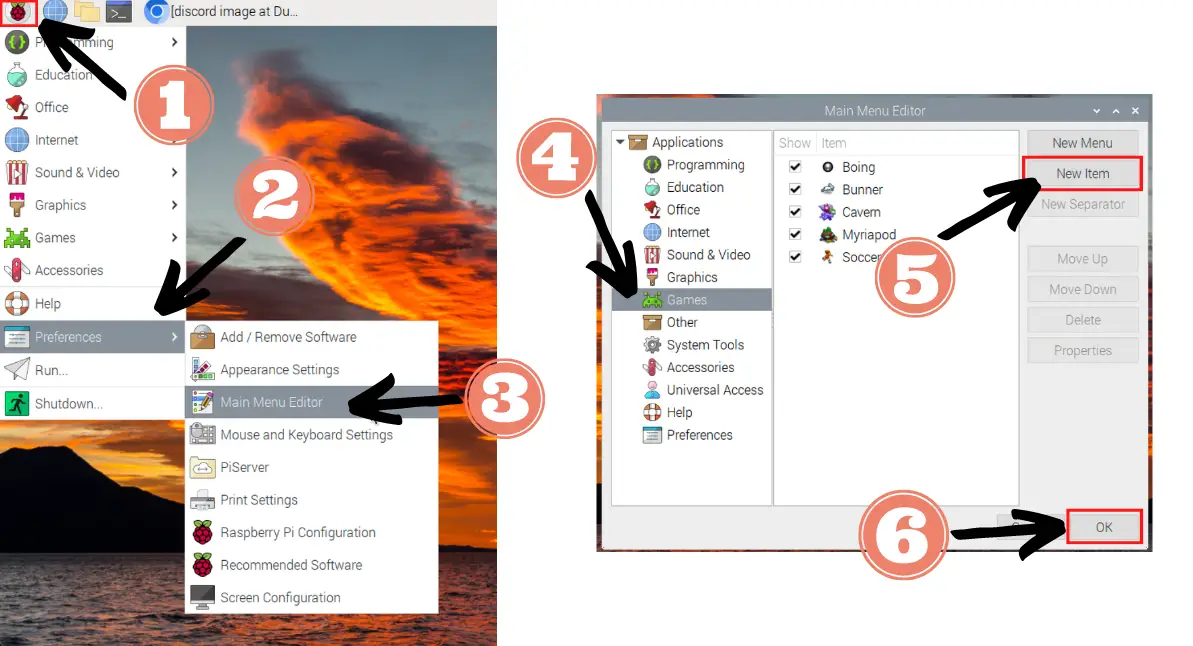
Now, you’ll want to click on the Raspberry Pi icon near the top left corner of your screen. This should display a drop down menu (also known as the start menu).
Next, you’ll need to click on “Preferences” and then “Main Menu Editor”.
Because Discord is a messaging service that’s used mainly by gamers, I decided to put this shortcut under the “Games” section. Of course, if you have a better idea or preference on which section Discord should go, you can perform this process there too (since it’s the same).
Anyways, I’ll click on the “Games” tab and then click on “New Item” near the top right. Now, we can click on “OK” to finish creating a new item.
Once you’ve hit “OK”, you’ll see a new window pop up. This is the “Launcher Properties” window and it’s where you’ll handle the functionality of the shortcut when you click on it later.
First, you should pick an image. Click on the empty image icon and choose the Discord image you saved earlier.
Secondly, you’ll need to give it a name. This will show up underneath the image as the desktop shortcut.
Thirdly, you’ll need to type in a command. Because we want to open a browser, we’ll need to type:
sensible-browser www.discord.comYou can open any other browser from your terminal if you replace www.discord.com with a different browser link.
Fourthly, check the box next to “Launch in Terminal?” because this is a terminal command. Then, you can click on “OK” to save all that information.
After that, you’ll need to go back to the start menu again (click on the Raspberry Pi icon near the top left corner of the screen) and click on the “Games” tab.
Now, you’ll need to right-click (or double-click if you’re using a mouse pad) on the “Discord” and select “Add to desktop”.
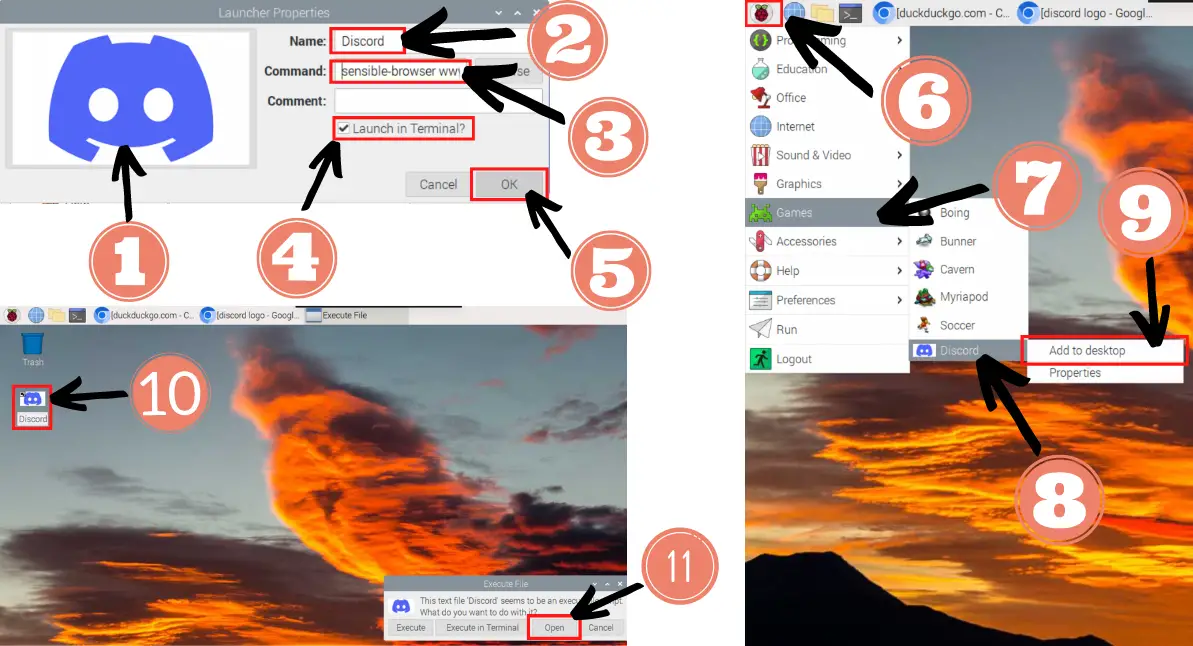
Congratulations! You’ve now successfully created a desktop shortcut to Discord! To actually use it, you’ll need to click on the icon twice and a new window will pop up. In the “Execute File” window, select the “Open” button.
Finally, a browser will appear and take you to Discord.
If this isn’t the installation you imagined, don’t worry, the next few methods will satisfy your needs!
2. Using Pi-Apps
Pi-Apps is a collection of apps that you can install and run quickly thanks to the installation scripts it possesses.
You can think of it as a Play Store for Android phones or the App Store for Apple devices (like Macbook, iPad, or iPhone).
Consequently, to install Discord, you’ll first need to install Pi-Apps on your Raspberry Pi if you don’t have it already. Here are the steps:
- Open up your terminal. You can do this by using the keyboard shortcut CTRL + WINDOWS KEY + T (or CTRL + COMMAND + T if you’re a Macbook user).
- Alternatively, you can click on the terminal icon near the top left corner of the screen. It looks like a blackboard and it’s near the Raspberry Pi icon (which is the start menu).
- You’ll need to update your Raspberry Pi:
sudo apt update- Install Pi-Apps on your Raspberry Pi:
wget -qO- https://raw.githubusercontent.com/Botspot/pi-apps/master/install | bashNote: if you’re getting errors when installing Pi-Apps, then you’ll need to restart your system. If that still doesn’t work, then you’ll need to flash your Raspberry Pi’s SD card again and set it up from the start. This last method worked for me.
If you forgot how to flash your SD card with Raspberry Pi Imager or want to see how I approach it, take a look at my guide on a headless Raspberry Pi setup.
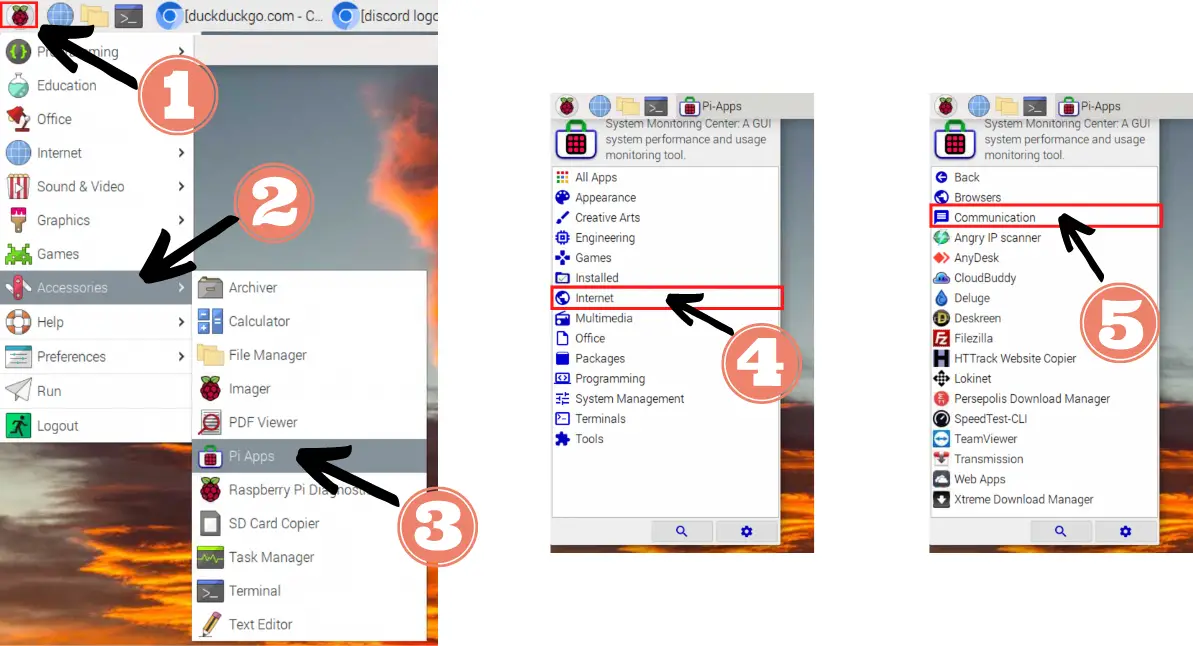
- Open up Pi-Apps. To do this, click on the Raspberry Pi icon (the start menu), Accessories, and Pi-Apps.
- After that, click “Internet”, “Communication”, and then “Discord”.
- A new window will pop up and ask if you want to install Discord (although it’s not the official version, so use at your own risk). Click “Install”.
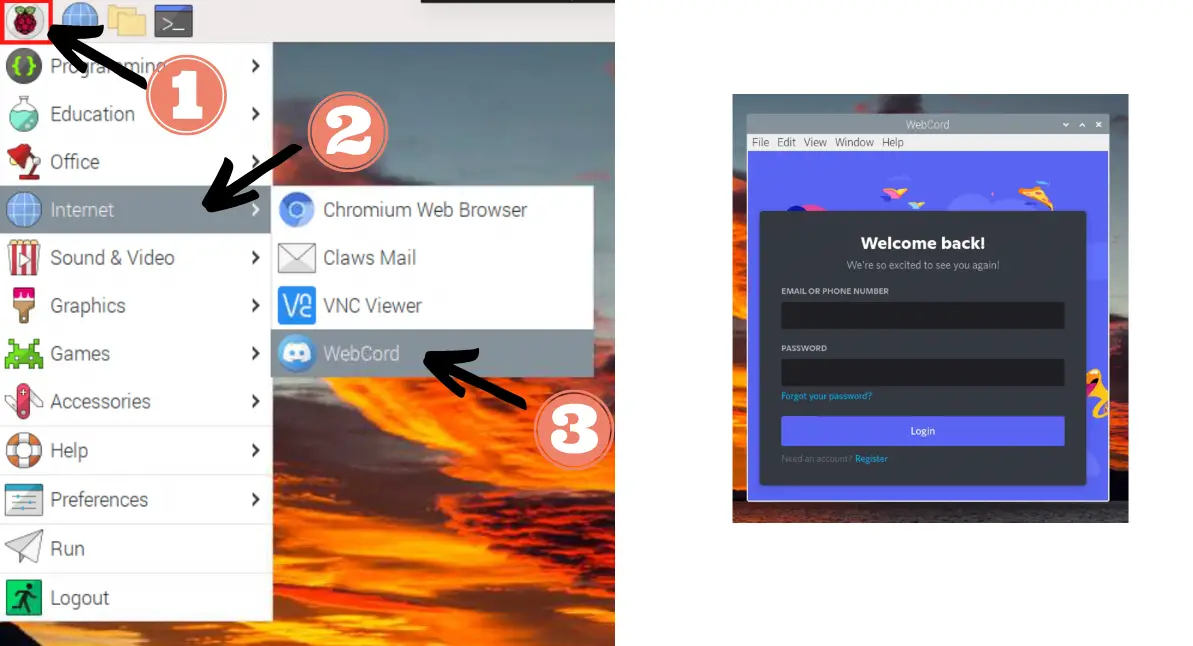
- Now, you’ll need to click on the start menu (Raspberry Pi logo) again. Then, click on Internet, and you should see Discord. Because it’s not supported by the official company, it’ll be called “Webcord”
Still, if you’re having trouble installing Webcord through Pi-Apps, then we can go directly to the source and cut out the middleman in the third method.
3. Using Webcord
Webcord is a Discord client that brings the browser experience of Discord into a desktop for a lightweight experience. Since Discord doesn’t have an application for Raspberry Pi, we’ll use this to obtain access to it. You can think of this as a shortcut, similar to my first method, but it has a more sleek design and better user experience.
If you want to learn more about this, you can visit its Github: https://github.com/iamtraction/WebCord
An easier method to obtain Webcord is to install it directly from its Github repository. Perform the following steps to download and execute it:
- Open up your terminal. You can do this by using the keyboard shortcut CTRL + WINDOWS KEY + T (or CTRL + COMMAND + T if you’re a Macbook user).
- Alternatively, you can click on the terminal icon near the top left corner of the screen. It looks like a blackboard and it’s near the Raspberry Pi icon (which is the start menu).
- Update the terminal to make sure we pull the most recent and up to date .deb files:
sudo apt update- Change your directory and head into the “Downloads” folder so we know where to find it later in the next steps:
cd Downloads- Download the files:
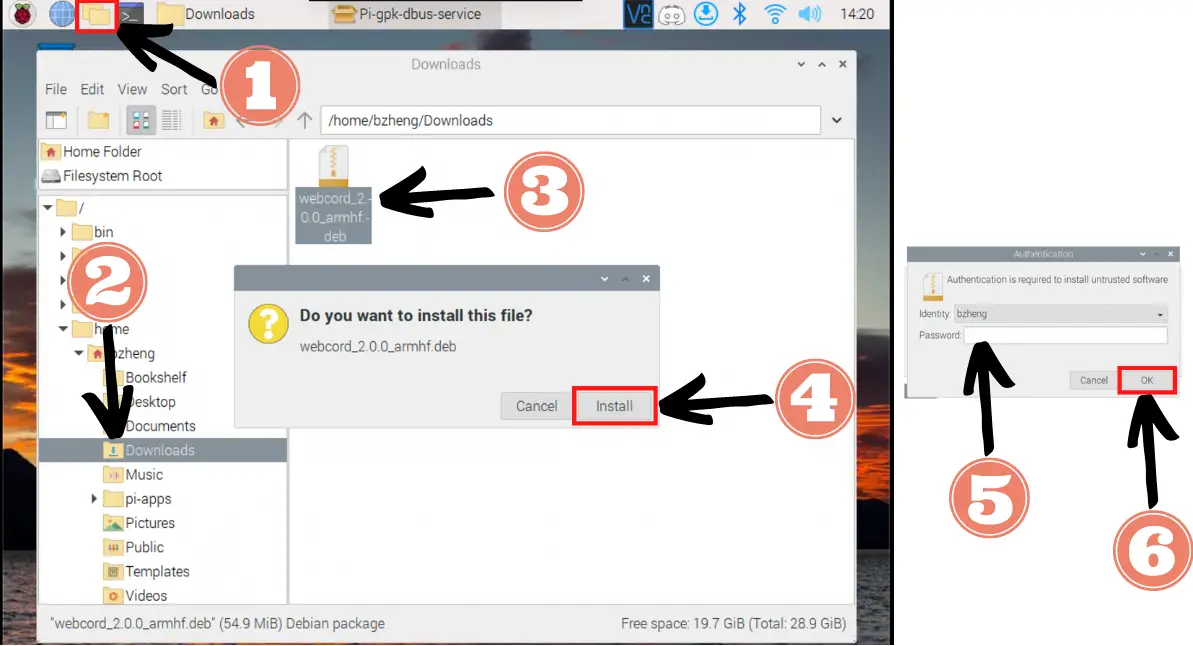
wget https://github.com/SpacingBat3/WebCord/releases/download/v2.0.0/webcord_2.0.0_armhf.deb- Now, open up your files by clicking on the File icon near the top left corner of your screen. It should be to the right of the Raspberry Pi icon and to the left of the terminal icon
- Click on the Downloads folder
- Double-click on the file you downloaded (meaning you should rapidly click on the file twice)
- A window will pop up, prompting you to click on the “Install” button to download Webcord. Do so accordingly
- Another window will open prompting you to type in your password because Raspberry Pi doesn’t trust this software. If you trust it, type in your password and click the “OK” button
- Now, to see and open Webcord, open the start menu (Raspberry Pi icon) again and click on “Other”. Webcord should now show up. Clicking on it will open Discord!

Another way you can access Webcord is by opening up your terminal and typing in:
webcord4. Using Nativefier
Nativefier is a command line tool that can create a desktop app (thanks to Electron, which is a framework for creating native applications) for any website with minimal effort on your part.
The original method isn’t compatible with Raspberry Pi, so I did a lot of researching and extensive testing to come up with the best, simplest way possible.
So if you want to use this method, perform the following steps:
- Open up your terminal. You can do this by using the keyboard shortcut CTRL + WINDOWS KEY + T (or CTRL + COMMAND + T if you’re a Macbook user).
- Alternatively, you can click on the terminal icon near the top left corner of the screen. It looks like a blackboard and it’s near the Raspberry Pi icon (which is the start menu).
- Update the terminal to make sure we pull the most recent and up to date files:
sudo apt update- You’ll first need to switch to root to become a super user (since many of the following commands require this power):
sudo su- Enable NodeSource Repository because you want to install Node.js in the next step to make this work:
curl -fsSL https://deb.nodesource.com/setup_17.x | bash -- Install Node.js:
sudo apt install nodejs- Install corepack with npm (this stands for Node Package Manager and comes installed with Node.js since it manages packages):
npm i -g corepack- Enable corepack since it acts as a bridge between npm and Node.js:
corepack enable- Now you can install nativefier:
npm install nativefier -g- Change directory into the Downloads folder. This is where we want to store the app that nativefier builds when we run the command in step 10:
cd Downloads- Finally, you can start converting the website into an app with nativefier:
nativefier --arch="armv7l" -n discord www.discord.comFrom my research, nativefier doesn’t support the current Raspberry Pi architecture, which is why we needed to add the code --arch="armv7l". This changes the architecture, which makes it possible to use nativefier.
Now, if you want to use the discord app you downloaded, you’ll need to run a few more commands back in the terminal:
- If you haven’t already exited root, type the command to exit:
exit- Change directory into the folder you created in Downloads:
cd Downloads/discord-linux-armv7lNote: If you get an error with this command, that means the name of the folder in Downloads isn’t the same. Consequently, you’ll need to find the name. To do that, go into your Downloads folder:
cd Downloads
Run the list command to find the name of all the files and folders in the directory. You should be able to locate the folder because it should have the word “discord” in it:
ls
Copy and paste the name when you change directory again with the cd command
- Change the execution permission so you can run the app:
sudo chmod +x *- Now you can finally run the app!
./discordSummary – tl;dr (Too Long; Didn’t Read)
Here are the key takeaway points you should keep in mind after reading this article:
- It is possible to install Discord on Raspberry Pi even though Discord doesn’t have any application made specifically for Raspberry Pi.
- In fact, there are 4 different ways to do so:
- 2 methods utilize the installation of Webcord, which is like a lightweight bridge that takes you to Discord.
- 1 method creates a neat little shortcut
- The last method is a little long since it’s through nativefier.
- Even if you don’t use this method, it’s good to know that you can use this on your own laptop (like a Macbook or a Windows laptop) create your own apps that’ll take to websites you want to quickly get to, but they don’t have an app built.
Hopefully, these 4 ways aren’t discord-ant with the results you obtain! If there are problems you are running into, email me at bz.chargedwarrior@gmail.com so we can sort it out!