Can’t See Menu Bar On Raspberry Pi? Top 3 Ways To Fix It!
I’ve become reliant on the taskbar on my Raspberry Pi. It’s my go-to spot for opening the start menu, accessing the terminal, and even editing the Wi-fi. However, if you accidentally removed some shortcuts from there or are using a used Raspberry Pi that doesn’t show a menu bar, then you may be wondering: “How do I get the menu bar back on my Raspberry Pi?”
To get your menu bar back you’ll need to remove the lxpanel folder, which contains the instructions for creating that taskbar, and rebooting your system to make sure these changes go into effect. The easiest way to do this is by opening the Raspberry Pi’s terminal and typing in these 2 commands:
rm -r ~/.config/lxpanelsudo rebootIf you want to learn more about what these 2 commands mean or other ways you can get your menu bar back if this method didn’t work for you, then you’ll need to read the rest of this guide as I’ll go into much more detail. I’ll also include a visual aid when necessary so you have a better understanding.
How To Get Menu Bar Back On Raspberry Pi
1. Using The Terminal
You can implement this method using either SSH or the terminal on your Raspberry Pi since the following commands will work with either technique. Regardless, I’ll go through both ways in case one doesn’t work out.
Raspberry Pi Terminal
Normally, the terminal is the blackboard icon that sits near the top left corner of your screen on your menu (or taskbar). Even though it might not be there because these shortcuts have somehow disappeared from there, you can always use the keyboard shortcut to open it: CTRL + ALT + T (for Windows machine) or CTRL + COMMAND + T (for laptops running on macOS).
If you are running Raspberry Pi OS on a virtual machine (like Oracle VM VirtualBox), then the keyboard shortcuts might not work for you. Regardless, I’ll show you a method that’ll will let you open the terminal regardless of the platform you’re using (unless it’s SSH because you need to see the Raspberry Pi’s screen):
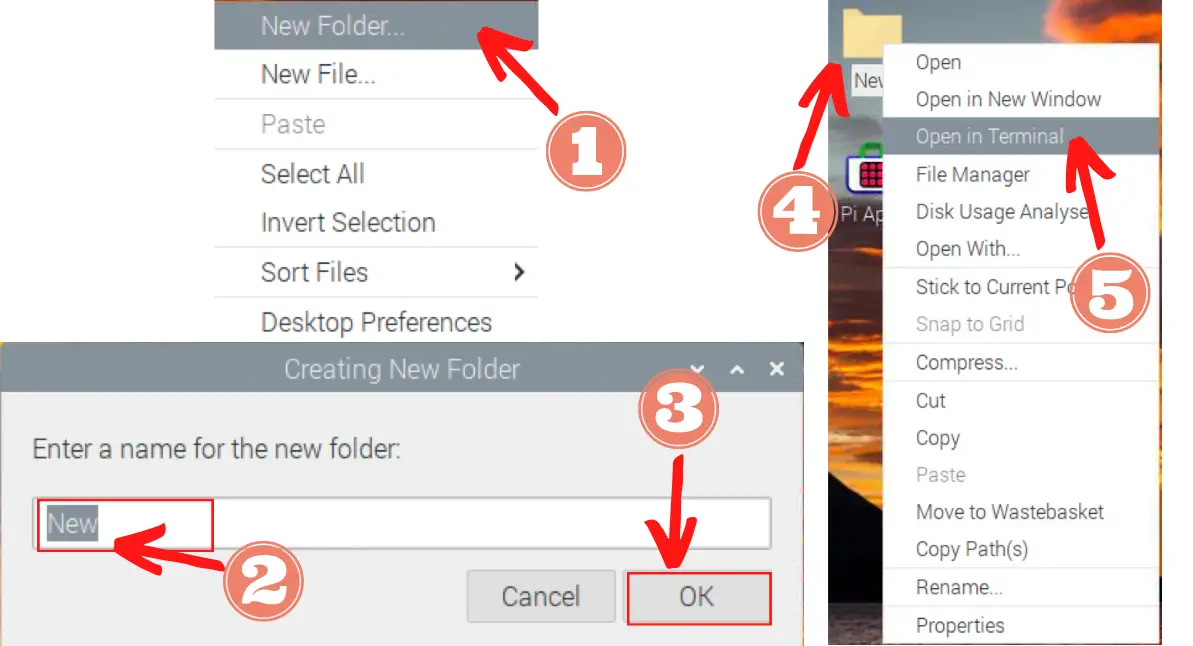
- Right-click anywhere on the desktop
- A small window will open. Click “New Folder”.
- The name can be whatever, but in my example, it’s “New”. Click “OK” to confirm the name you want.
- A new folder will be created and its shortcut will be shown on the desktop. Right-click on it.
- A new window will open. Select “Open in terminal”.
Once you have access to the terminal, run these two commands:
rm -r ~/.config/lxpanel/sudo rebootLet’s break down each command:
- The first command is essentially removing the lxpanel folder that’s hidden in your .config folder. We’re doing this because lxpanel handles the menu bar being displayed on your Raspberry Pi desktop screen. If we were to remove it, then when the system is booting up again, it will automatically add in a lxpanel folder, which will restore the menu bar
- Notice how the path to the lxpanel directory starts with ‘~/’. This tilda and forward slash denotes the user’s home directory (since the .config file is stored in there).
- The second command is rebooting your Raspberry Pi so that your menu bar can be seen once again.
SSH
If you lack access to a display to connect your Raspberry Pi, don’t worry. We can use SSH (Secure SHell), which lets you access the terminal of the Raspberry Pi.
It’s similar to the first method, but you’ll need to perform these steps:
- Open your computer’s terminal.
- On macOS, you can use the keyboard shortcut Command + Spacebar and type in ‘terminal’ to find it
- On Windows, you can type in ‘command prompt’ in the start menu
- Find your Raspberry Pi’s IP address
- On macOS, you can run this command: ping raspberrypi
- On Windows, you can run this command: nslookup raspberrypi
- If these methods don’t work for you, you can install a tool to search for the IP address like Angry IP Scanner.
- Use SSH
- Type this in your computer’s terminal, making sure to replace the parentheses and what’s inside them: ssh (username of your Raspberry Pi)@(IP address)
- Now, run those 2 commands:
rm -r ~/.config/lxpanel/sudo reboot2. Using The GUI
Once again, you can implement this method using either VNC (Virtual Network Computing) or your Raspberry Pi’s GUI. GUI stands for Graphical User Interface, and it’s the stuff you see on your screen.
Regardless, I’ll go through both ways in case one doesn’t work out.
Raspberry Pi GUI
If you can connect your Raspberry Pi to a monitor and see it, then this method is for you. If not, then you’ll need to use VNC to see and manipulate the screen.
Here is the process for doing what we did in the first method, but in a graphical way:
- Right-click anywhere on the desktop
- A small window will open. Click “New Folder”.
- The name can be whatever, but in my example, it’s “New”. Click “OK” to confirm the name you want.
- A new folder will be created and its shortcut will be shown on the desktop. Click on it.
- Click on the home folder
- Click on the folder with your username (mine is bzheng)
- Press CTRL + H to see the hidden folders since the .config folder is hidden
- Click on the .config folder
- Right-click on the lxpanel folder
- Click on the “Move to Wastebasket” option in the new window that popped up
- Click “Yes” to verify on the confirmation window
- Open a pseudo-terminal by using the keyboard shortcut: WINDOWS (key) + F2
- You can also try COMMAND + fn + F2 for Macbooks
- Alternatively, you can try CTRL + F2 if none of these work
- Type in the following command to reboot:
sudo reboot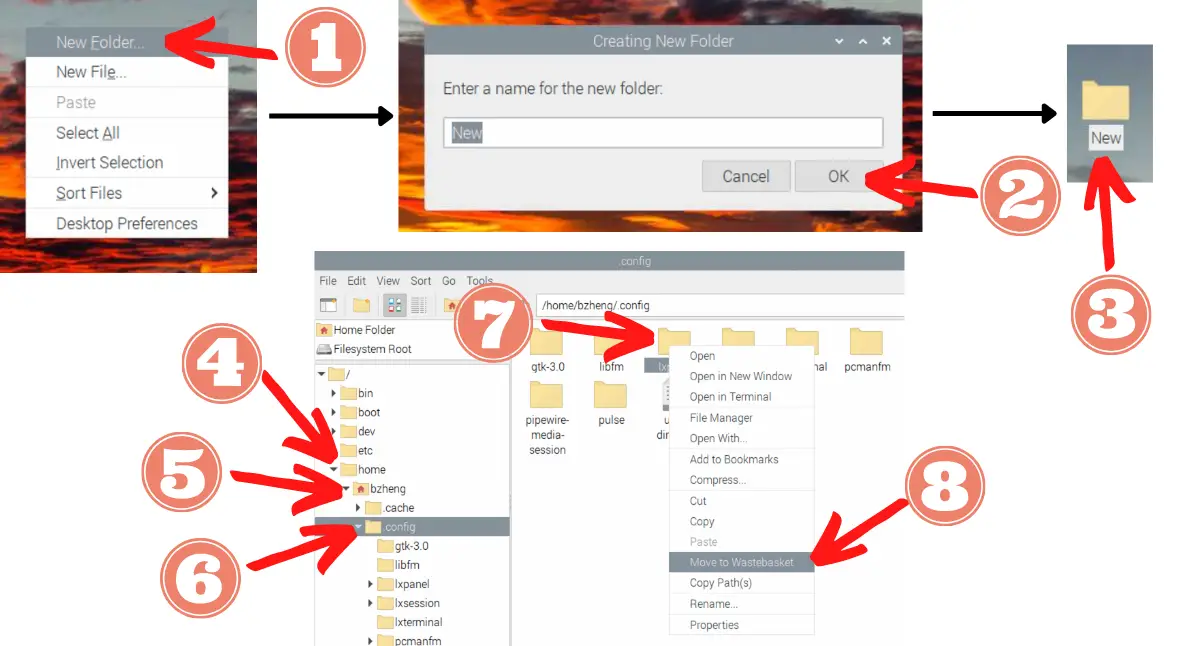
VNC
I’ll show you how to install and run VNC, but then the steps to remove the lxpanel folder will be the same from before:
- Install RealVNC on your laptop: https://www.realvnc.com/en/connect/download/viewer/windows/
- Open your computer’s terminal.
- Find your Raspberry Pi’s IP address
- Use SSH
- Type this in your computer’s terminal, making sure to replace the parentheses and what’s inside them: ssh (username of your Raspberry Pi)@(IP address)
- Open Raspberry Pi Configuration
- Type in the command: sudo raspi-config
- Enable VNC:
- Select ‘3 Interface Options’
- Select ‘I3 VNC’
- Select ‘Yes’
- Select ‘OK’
- Select ‘Finish’
- Open your RealVNC app on your laptop
- Type in the IP address
- Type in the username and password
- Start with step 1 (under the Raspberry Pi GUI section since these steps apply here as well)
3. Panel Settings
If you only have a few things missing from your menu bar like the start menu or the terminal and you don’t want to reboot your Raspberry Pi, then you need to edit the Panel Settings.
Here is the process to do it:
- Right-click on the task bar
- Select Panel Settings
- A new window called Panel Preferences should appear. Click on the Panel Applets tab
- Click “Add’ to add the plugins
- Select the plugins you want
- For example, the folder’s icon (which is the file manager) is called “Directory Menu”
- The start menu is called “Menu”.
- However, for this, you’ll need to click on “Preferences” and rename it “start-here” and change the padding to 4 if you want to see its icon.
- The terminal, folder, and web browser are all under “Application Launch Bar”
- Then, you can move the icons on the taskbar by clicking on either the “Up” or “Down” button
- Once, you’re done, click the “Close” button to exit
Summary – tl;dr (Too Long; Didn’t Read)
Here are the key takeaway points you should keep in mind after reading this article:
- To see your menu bar again, you’ll need to remove your lxpanel folder and reboot your Raspberry Pi.
- That’s because the lxpanel contains the instructions for creating this taskbar
- There are several ways you can do that:
- Remove it from your terminal
- Remove it from the GUI
- If you want to add an icon to the menu bar, then you can just use the Panel Settings
I hope this article was helpful as you em-bar-k on your journey to fix your menu bar issue!