How Do You Take Notes On Raspberry Pi? Here Are 5 Easy Ways!
Imagine you are working on your Raspberry Pi and thought of something important, like remembering to buy some pizza for dinner tonight. You want to make note of it quickly before you forget it, so you start looking for a place to write the notes so you won’t forget it later. But don’t look too far since you can easily make note of it on your Raspberry Pi.
There are 5 simple ways you can quickly and easily take notes and save it for later. You can open a terminal and write in the text file or install note-taking applications on your Raspberry Pi such as NixNote2, SimpleNote, Tomboy NG, and even Notion.
The rest of this article will break down how you can install each one and my preferred way of using it, so you can quickly incorporate it into your Raspberry Pi workflow!
1. Use A Text File
If you’re really in a rush and don’t have any note taking apps installed, then the first place I’d go to is a terminal. From there, I can just open up a text file and wrote my thoughts in there.
If you really need to send this to your computer or phone, you can just use SnapDrop, which is an app you can install in Pi-Apps. This lets you share files to devices on your local network.
If you want to learn how to use this or learn other cools ways to share your files (like with the scp command), then you’ll need to check out my guide on transferring files between your laptop and Raspberry Pi.
To create a text file, do the following:
- Open up your terminal. You can do this by using the keyboard shortcut CTRL + WINDOWS KEY + T (or CTRL + COMMAND + T if you’re a Macbook user).
- Alternatively, you can click on the terminal icon near the top left corner of the screen. It looks like a blackboard and it’s near the Raspberry Pi icon (which is the start menu).
- Type in the following command to create a text file:
touch file.txtNote: this will create a file called file.txt in your current directory. To see if it’s successfully created, type the command ls (this consists of the letter ‘l’ and ‘s’), which stands for list.
You can always name it something different by replacing the name ‘file.txt’. But in this example, I’ll refer to the file as file.txt.
- Open up the file:
sudo nano file.txtNow you can start writing in it. Here are some notes about this command:
- Sudo is a command that grants you root access. It stands for ‘superuser do’, and you need it every time you’re making changes to a file, directory, or system.
- Nano is a command-line text editor. Simply put, it lets you edit files in your terminal. You can use other text editors in your terminal like vim (but it’s not pre-installed on your Raspberry Pi).
- Once you finish making changes, you can do the following steps to save and exit:
- Press CTRL + X (to save)
- Press the ‘y’ key (to confirm)
- Press the enter key (to exit)
- Once you finish making changes, you can do the following steps to save and exit:
2. Use NixNote2
NixNote2 is a great note-taking app you should install because it not only lets you take notes, but also lets you organize your schedule and save websites offline.
I highly recommend NixNote2 since you can sync your Evernote account to it. Before how I show you how to do that, I’ll go over how you can install NixNote2 on your Raspberry Pi!
Here is the general process:
- Because NixNote2 can be installed on Pi-Apps, we’ll need to first install Pi-Apps!
- Open up your terminal.
- You’ll need to update your Raspberry Pi so that any application you install will be the latest version:
sudo apt update- Install Pi-Apps on your Raspberry Pi:
wget -qO- https://raw.githubusercontent.com/Botspot/pi-apps/master/install | bashNote: if you’re getting errors when installing Pi-Apps, then you’ll need to restart your system. If that still doesn’t work, then you’ll need to flash your Raspberry Pi’s SD card again and set it up from the start. This last method worked for me.
If you forgot how to flash your SD card with Raspberry Pi Imager or want to see how I approach it, take a look at my guide on a headless Raspberry Pi setup.
- Open up Pi-Apps. To do this, click on the Raspberry Pi icon (the start menu), Accessories, and Pi-Apps.
- Alternatively, open your terminal and type in this command: pi-apps
- After that, click “Office” and “NixNote2”.
- A new window will pop up and ask if you want to install NixNote2. Click “Install”.
- Open up the app. There are 2 ways to do this:
- Open the start menu, click on “Internet”, and click on “NixNote2”.
- Open the terminal and type in the following command:
nixnote2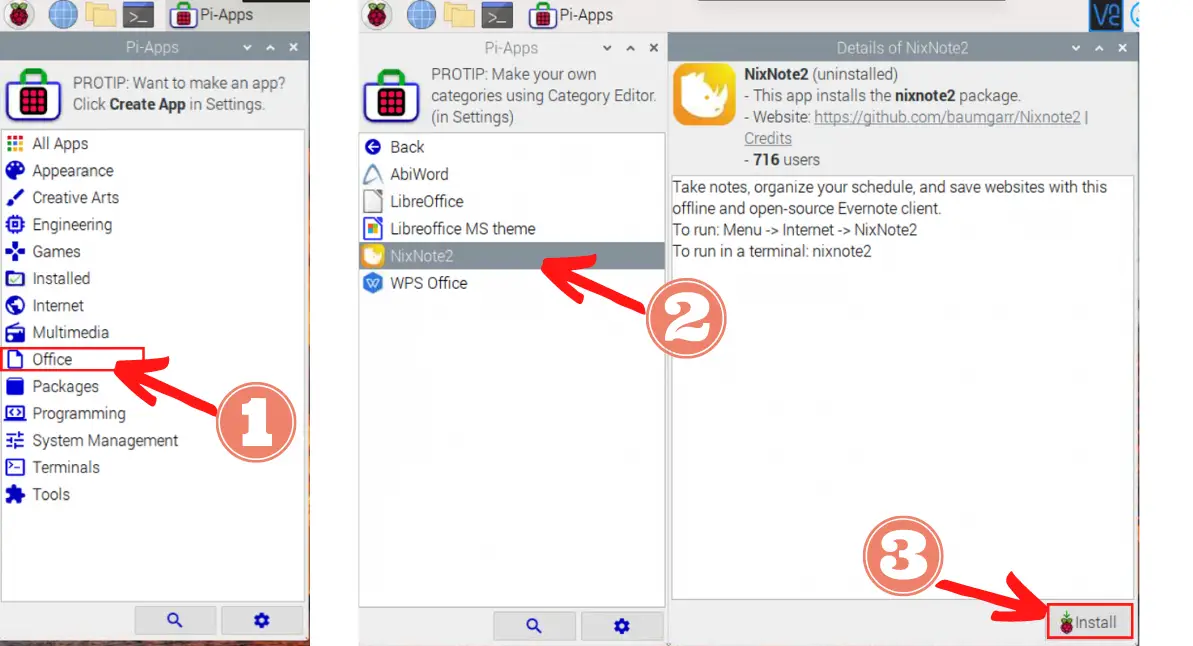
Now, you can create notes and as many as you please.
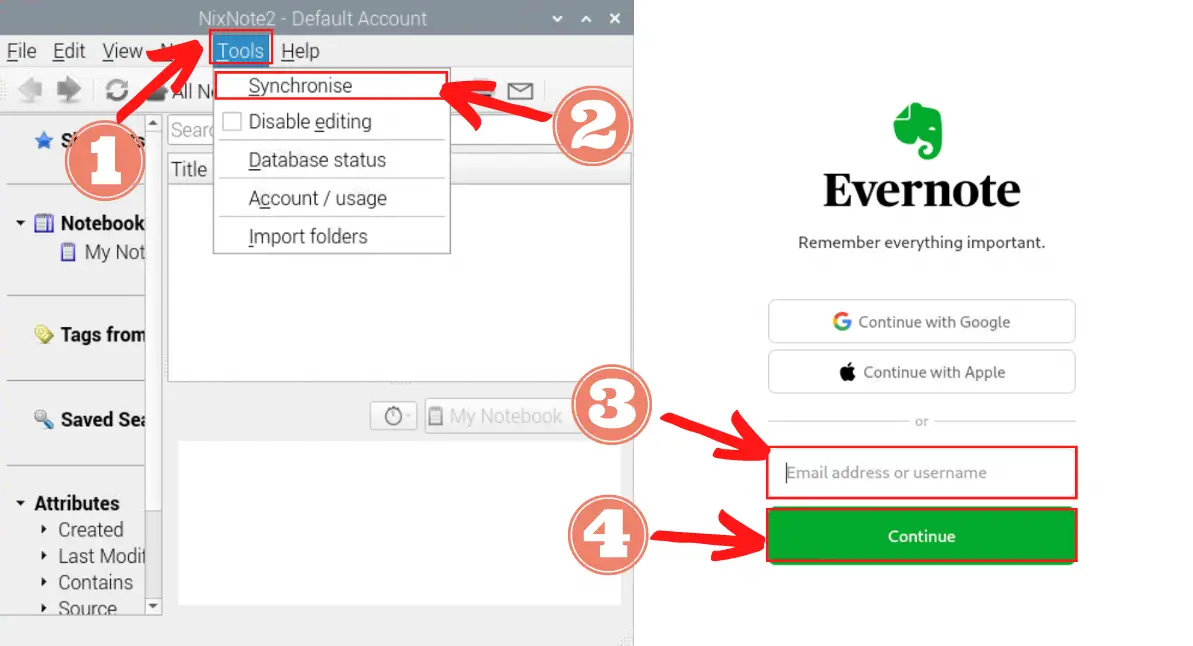
If you want to synchronize your account to Evernote, here are the steps you should take:
- Open up NixNote2
- Click on “Tools”. which is near the top
- Click on “Synchronize”, which should appear in the drop-down menu
- A new window will open and take you to Evernote.com. Log into Evernote
3. Use SimpleNote
SimpleNote is a free and open source note taking app. It was created by Automattic, who also created WordPress. They have mobile app versions of this, so it’s another easy way to sync your notes together on your Raspberry Pi and phone.
Moreover, they support other operating systems (OS) like Android, iOS, macOS, Linux, and even Windows.
Like the name suggests, this program doesn’t have much bells and whistles, so taking notes on it is straightforward. On the bright side, you’ll at least be able to add tags to your notes for better organization!
Here is the process for installing SimpleNote:
- Open up your terminal
- Type in the following command to download the file:
git clone https://github.com/Automattic/simplenote-electron.git- Move into the downloaded file
cd simplenote-electron- Install it with Node Package Manager (npm):
npm install- Run the application:
npm run dev4. Use Tomboy Next Generation (NG)
Tomboy NG is another great, free, and open-source note taking app that’s simple to use. You can synchronize it between Github, macOS, Linux, and Windows.
It’s a great place to take down notes from ‘spur-of-the-moment’ thoughts, but it won’t show to-do lists or let you link one note to another. The upside is that it’s crazy fast.
Here is the way I’d install it on my Raspberry Pi:
- Open your terminal
- Figure out what bit Raspberry Pi OS you have. This will determine which .deb file you should install. If you get it wrong, then you’ll get errors in your terminal and you can’t run Tomboy NG. Run this command to see if you have a 32 or 64 bit Raspberry Pi OS installed:
uname -mIf you get ‘armv71’ in the terminal, that means you’re running on 32-bit OS. If you get ‘aarch64’, that means you’re running on 64-bit OS.
- If you have a 32-bit OS, then run this code in your terminal to install the .deb file:
wget https://github.com/tomboy-notes/tomboy-ng/releases/download/v0.34/tomboy-ng_0.34-0_armhf.deb- If you have a 64-bit OS, then you can’t install this as there is no version created for a 64-bit OS (as of this writing). Of course, you can always try since there’s always a chance it will work. However, if you encounter errors doing so, you can always reflash your SD card to a 32-bit OS if you really want to use this app.
- Install the app:
sudo apt install ./tomboy-ng_0.34-0_armhf.deb -yIf you get an error, that means the name of the deb file is wrong. Use the ls command to list the files in your current directory, find the name, copy it, and paste it after “./”.
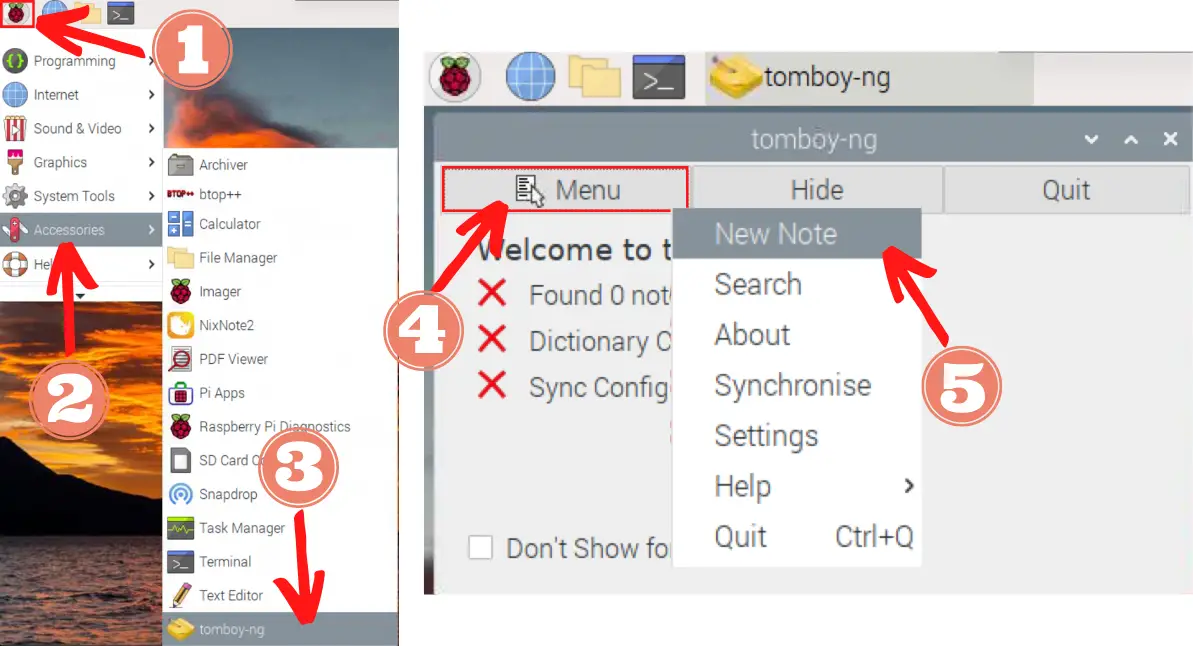
To open and use Tomboy NG, do the following:
- Open the start menu, which should be the Raspberry Pi icon near the top left corner of your screen
- Click on “Accessories”
- Click on “tomboy-ng”
- A new window will appear. Click on “Menu”
- Select “New Note” to start writing down your ideas!
5. Use Notion
Notion is my favorite productivity tool that I use in my daily life. You can take notes on it as well as managing projects and deadlines.
There are so many cool features and designs you can implement, and you can install it on your laptop or mobile phone.
If you’re a college student or have an email ending in .edu, you can upgrade to a Personal Pro plan for free. You should take advantage of this like I did because you can get unlimited uploads, have unlimited guests, and see your history for up to 30 days.
Sadly, Notion didn’t create any software to be compatible with Raspberry Pi. Despite this, I’ll show you how to create a desktop shortcut so that you can easily and quickly access it.
Here are the steps you should follow:
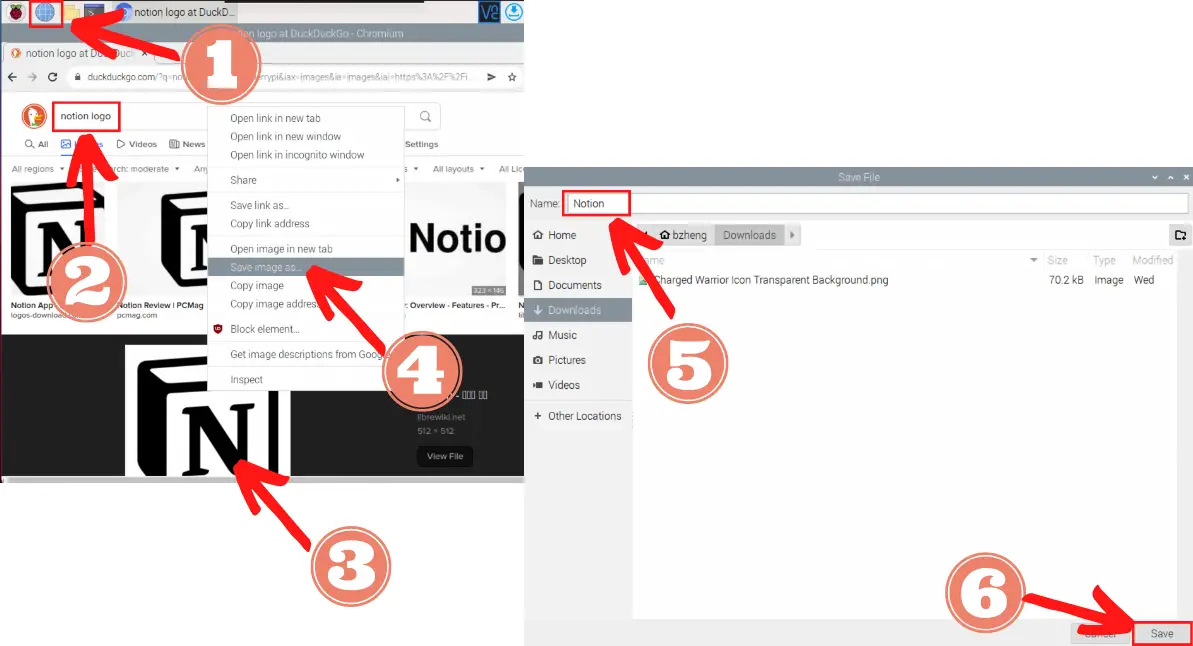
- The first step you’ll need to take is open your favorite browser or you default browser. It can be the preinstalled one (which is Chromium) or something fun like Firefox.
- Either way, you want to get onto a search engine like DuckDuckGo and search “notion image” (or logo). Find an image you like since this will be the image of the desktop shortcut you’ll be creating.
- Click on the image you want
- Right-click on the image to see additional options.
- Click on “Save image as … ” to save it.
- This will open a new tab in which you’ll need to name it
- Save it by pressing the “Save” button near the bottom right corner of the window.
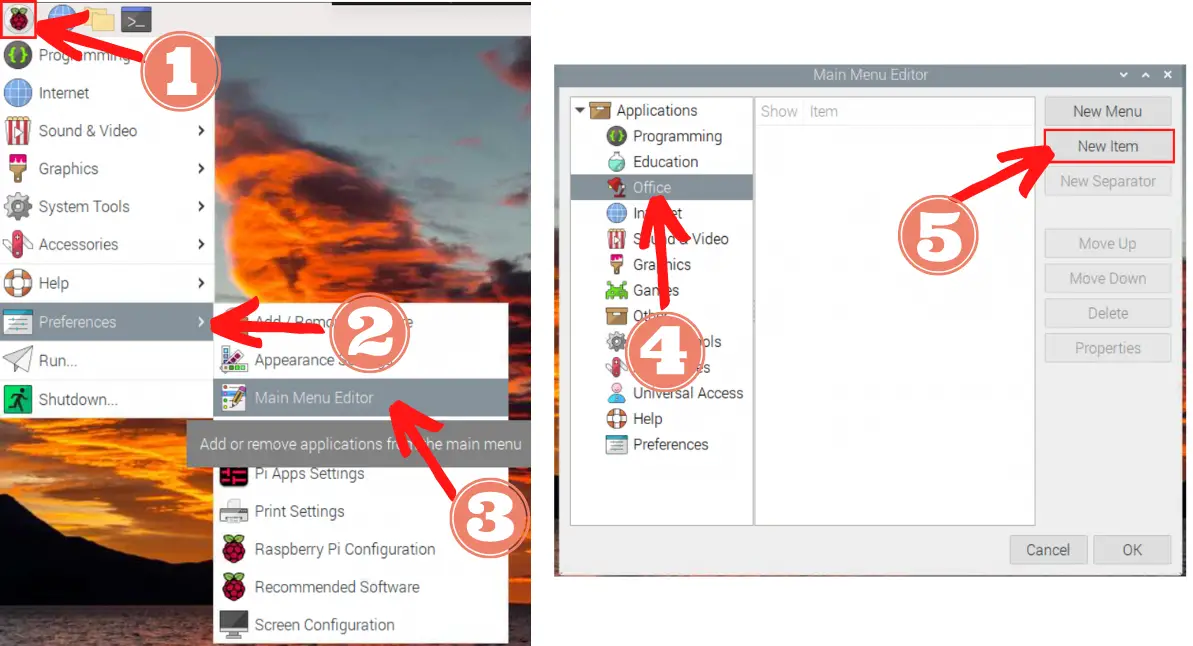
- Now, you’ll want to click on the Raspberry Pi icon near the top left corner of your screen. This should display a drop down menu (also known as the start menu).
- Next, you’ll need to click on “Preferences”
- Click on “Main Menu Editor”
Because Notion is a note-taking platform, I decided to put this shortcut under the “Office” section. Of course, if you have a better idea or preference on which section Notion should go, you can perform this process there too (since it’s the same).
- Click on the “Office” tab
- Click on “New Item” near the top right
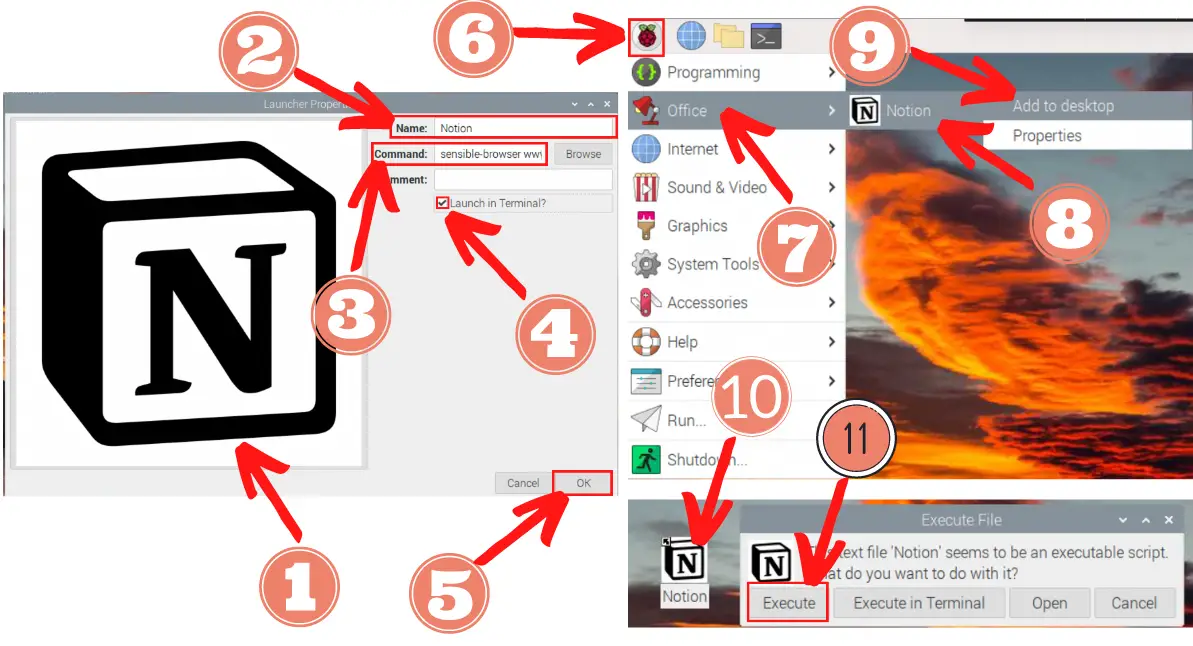
- You’ll see a new window pop up. This is the “Launcher Properties” window and it’s where you’ll handle the functionality of the shortcut when you click on it later.
- First, you should pick an image. Click on the empty image icon and choose the Notion image you saved earlier.
- You’ll need to give it a name. This will show up underneath the image as the desktop shortcut.
- You’ll need to type in a command. Because we want to open a browser, we’ll need to type:
sensible-browser www.notion.soYou can open any other browser from your terminal if you replace www.notion.so with a different browser link.
- Check the box next to “Launch in Terminal?” because this is a terminal command.
- You can click on “OK” to save all that information.
- Go back to the start menu again (click on the Raspberry Pi icon near the top left corner of the screen) and click on the “Office” tab.
- Now, you’ll need to right-click (or double-click if you’re using a mouse pad) on the “Notion” and select “Add to desktop”.
- Congratulations! You’ve now successfully created a desktop shortcut to Notion! To actually use it, you’ll need to click on the icon twice and a new window will pop up. In the “Execute File” window, select the “Open” button.
- Finally, a browser will appear and take you to Notion.
Summary – tl;dr (Too Long; Didn’t Read)
Here are the key takeaway points you should keep in mind after reading this article:
- There are 5 ways you can take notes in your Raspberry Pi:
- Use a text editor
- Use Notion
- Use NixNote2
- Use SimpleNotes
- Use Tomboy NG
After reading these different note-taking methods, I hope you note-iced at least one method you want to integrate in your Raspberry Pi workflow.