Wi-Fi Won’t Start On Raspberry Pi? (3 Easy Ways To Fix It)
When I first started using VNC and SSH to remotely access my Raspberry Pi, I used the ping command to try to find its IP address. Sadly, I encountered error messages like “host is down”. I knew there wasn’t anything wrong with my router, so I wanted to figure out why wouldn’t the Wi-Fi start on my Raspberry Pi.
One major reason why your Raspberry Pi won’t connect to the network is because the wpa_supplicant.conf file is not configured properly. There are 3 ways you can edit it: using the terminal and nano text editor, using Raspberry Pi configurations, and using the Raspberry Pi Imager.
The rest of this guide will break down how you can implement these methods. On top of that, I’ll provide a bonus tip just in case you come across error messages like “Could not communicate with wpa_supplicant”.
But first, let’s break down:
What Is wpa_supplicant?
Wpa_supplicant is a daemon process that’s meant to be run in the background. In essence, it controls the wireless connection and authenticates your device to be connected to the network.
How To Fix wpa_supplicant Error?
1. Edit The wpa_supplicant.conf File
There are 2 ways you can access this file: from the SD card on another computer or through your Raspberry Pi’s terminal.
But before you start using one of the following methods to edit your wpa_supplicant, I highly suggest creating backup for it. This is a precaution just in case you mess up. Otherwise, you’ll need to create a wpa_supplicant file with its original code or reflash your SD card with the Raspberry Pi Imager and start all over again.
In order to create a backup, type the following command in your terminal:
sudo cp /etc/wpa_supplicant/wpa_supplicant.conf Downloads/wpa_supplicant_backup.confWhat this command essentially does is copy the contents of config.txt and paste it in a new file the system created called wpa_supplicant_backup.conf and stores it in the Downloads folder.
Now, whenever you need to fix your mistake in the actual file, just copy the contents from wpa_supplicant_backup.conf into the original file.
Once you’re done using one of the methods listed below, make sure to restart your device to make sure the changes go into effect.
One way to do that is by typing this in the terminal:
sudo rebootAdditionally, this is what your wpa_supplicant.conf file should have (if you’re connecting to a Wi-Fi that requires password):
country=US # Your 2-digit country code
ctrl_interface=DIR=/var/run/wpa_supplicant GROUP=netdev
network={
    ssid="INSERT NAME OF YOUR NETWORK HERE"
    psk="INSERT YOUR PASSWORD HERE"
    key_mgmt=WPA-PSK
}
Make sure to replace everything inside the double quotes!
On the other hand, if your Wi-Fi doesn’t require a password, then this is the code you should have:
country=US # Your 2-digit country code
ctrl_interface=DIR=/var/run/wpa_supplicant GROUP=netdev # Include this line for Stretch
network={
    ssid="INSERT NAME OF YOUR NETWORK HERE"
    key_mgmt=NONE
}
Use Raspberry Pi’s Terminal
If you have access to your Raspberry Pi and can connect to a display or monitor, then this method is the one for you.
There are only 2 steps involved:
- Open the terminal
- You can do this by clicking on the blackboard icon near the top left corner of the screen (to the right of the Raspberry Pi icon) or by using a keyboard shortcut CTRL + WINDOWS KEY + T (or CTRL + COMMAND + T if you’re a Macbook user).
- Type in the following command to open it:
sudo nano /etc/wpa_supplicant/wpa_supplicant.confHere are some notes about the command:
- Sudo is a command that grants you root access. It stands for ‘superuser do’, and you need it every time you’re making changes to a file, directory, or system.
- Nano is a command-line text editor. Simply put, it lets you edit files in your terminal.
- Once you finish making changes, you can do the following steps to save and exit:
- Press CTRL + X (to save)
- Press the ‘y’ key (to confirm)
- Press the enter key (to exit)
- Once you finish making changes, you can do the following steps to save and exit:
Using SD Card
If you have access to your Raspberry Pi but not a display, then you can use this method:
- Remove the SD card from your Raspberry Pi and plug it into your laptop
- Note: you may need a dongle to do so if your laptop doesn’t come with an SD card reader (like a Macbook)
- Open the file manager on your laptop
- This can be the Finder on Macbook, File Explorer in Windows, or Files on Linux-based laptops like Chromebooks.
- Click on the SD card, which should show its name in the left menu
- Right-click on the wpa_supplicant.conf file
- If there isn’t one, you can always create one elsewhere (like in TextEdit in Macbook) and drag it into the SD card.
- Select something along the lines of “Open With”
- Select a text editor
- It can be the default one if you don’t have it installed, like TextEdit on Macbook
- Once you’re done, save the file (based on how your text editor works) and exit
- Go back to your file manager and eject the SD card by clicking on the little triangle icon that’s pointing it. It should be to the right of the name of the SD card.
- Reinsert it back into your Raspberry Pi and power it on.
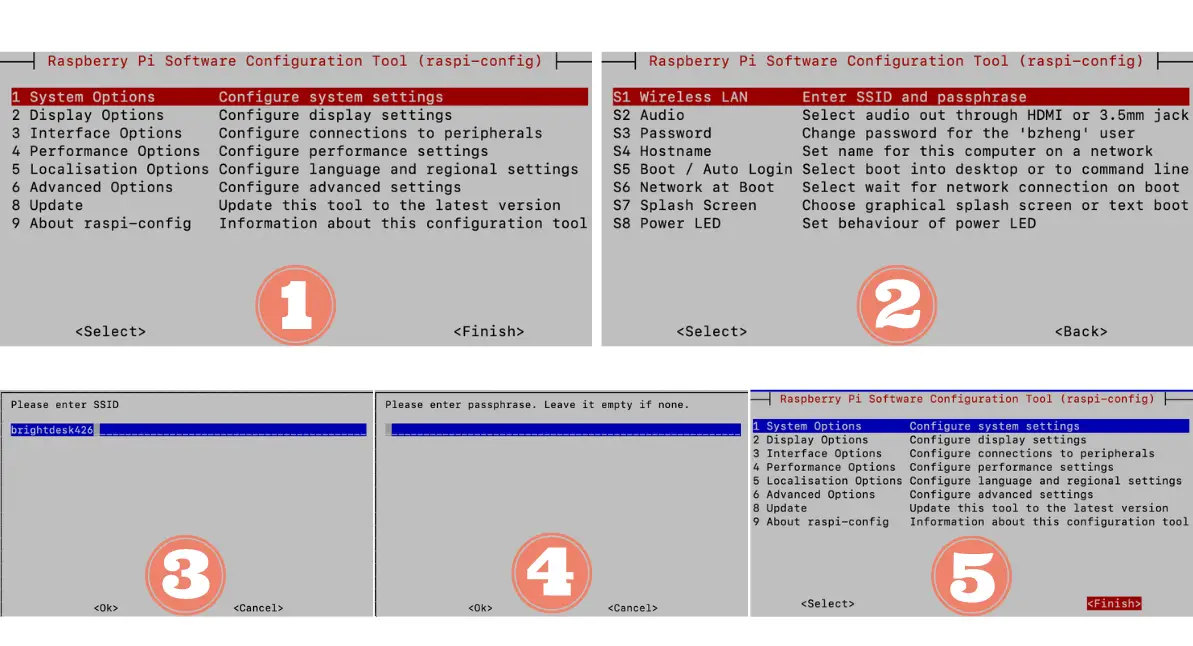
2. Use Raspberry Pi Configuration
Assuming that you have access to the Raspberry Pi terminal, you can easily just configure the SSID and password by using raspi-config.
Perform the following steps to do so:
- Open the terminal
- Type in the following command:
sudo raspi-config
- Select the first option (1. System Options)
- Select the first option again (S1 Wireless LAN)
- Enter your SSID (which is the name of the wireless network you’re connecting to)
- Select OK to continue
- Enter the password. If there isn’t any, then you can just press the “enter” key and skip it altogether
- Select OK to continue
- Select Finish to exit the Raspberry Pi Configuration
3. Set It Up In Raspberry Pi Imager
If you are still encountering this error, I’d suggest flashing your SD card again with the Raspberry Pi Imager.
If you don’t have the Raspberry Pi Imager, you can always install it with this link: https://www.raspberrypi.com/software/
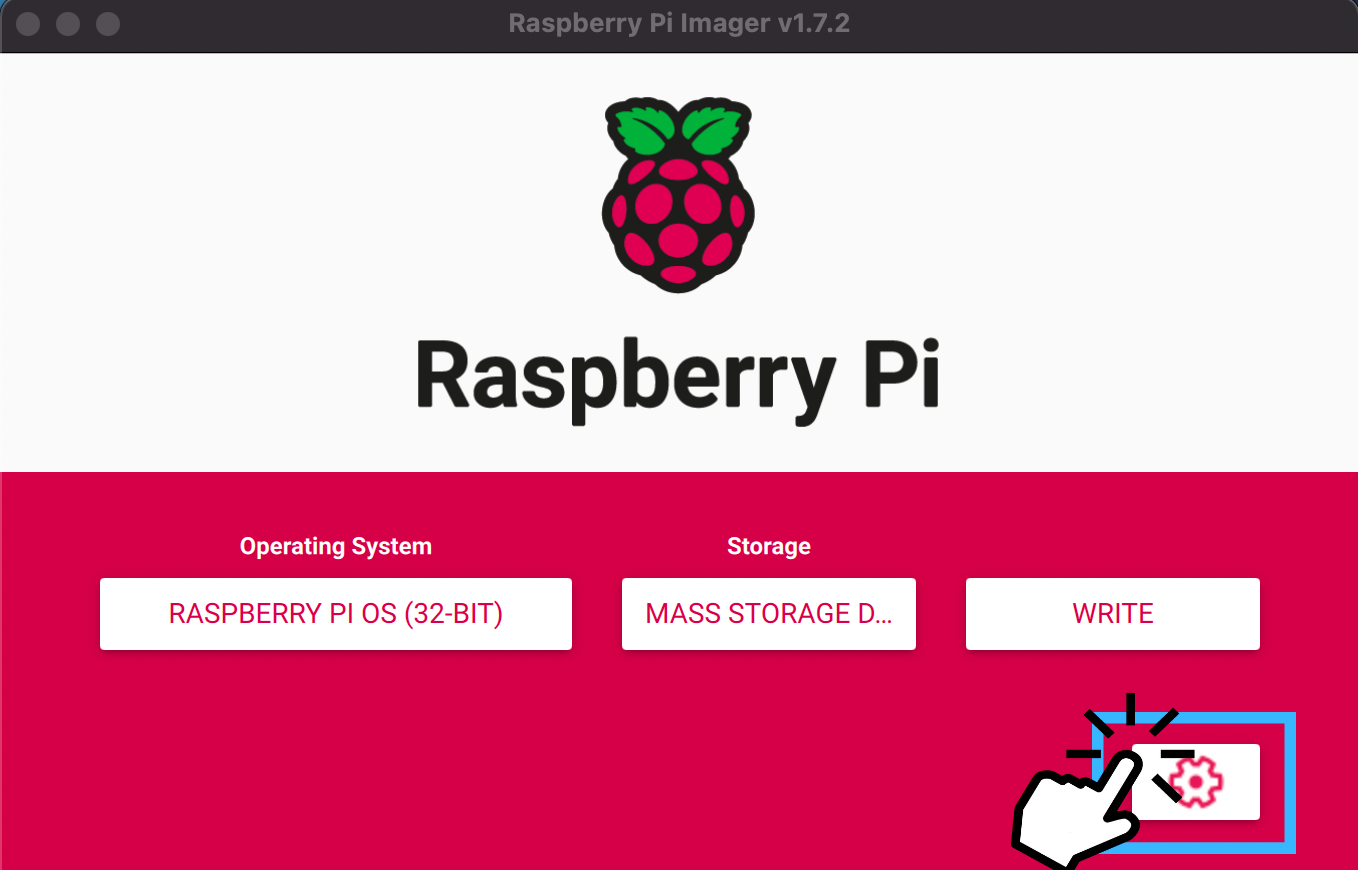
However, after you choose your operating system (OS) and the storage, you’ll need to click on the settings before you click “Write”.
The settings is represented by the gear icon, which is near the bottom right corner of the Raspberry Pi Imager screen
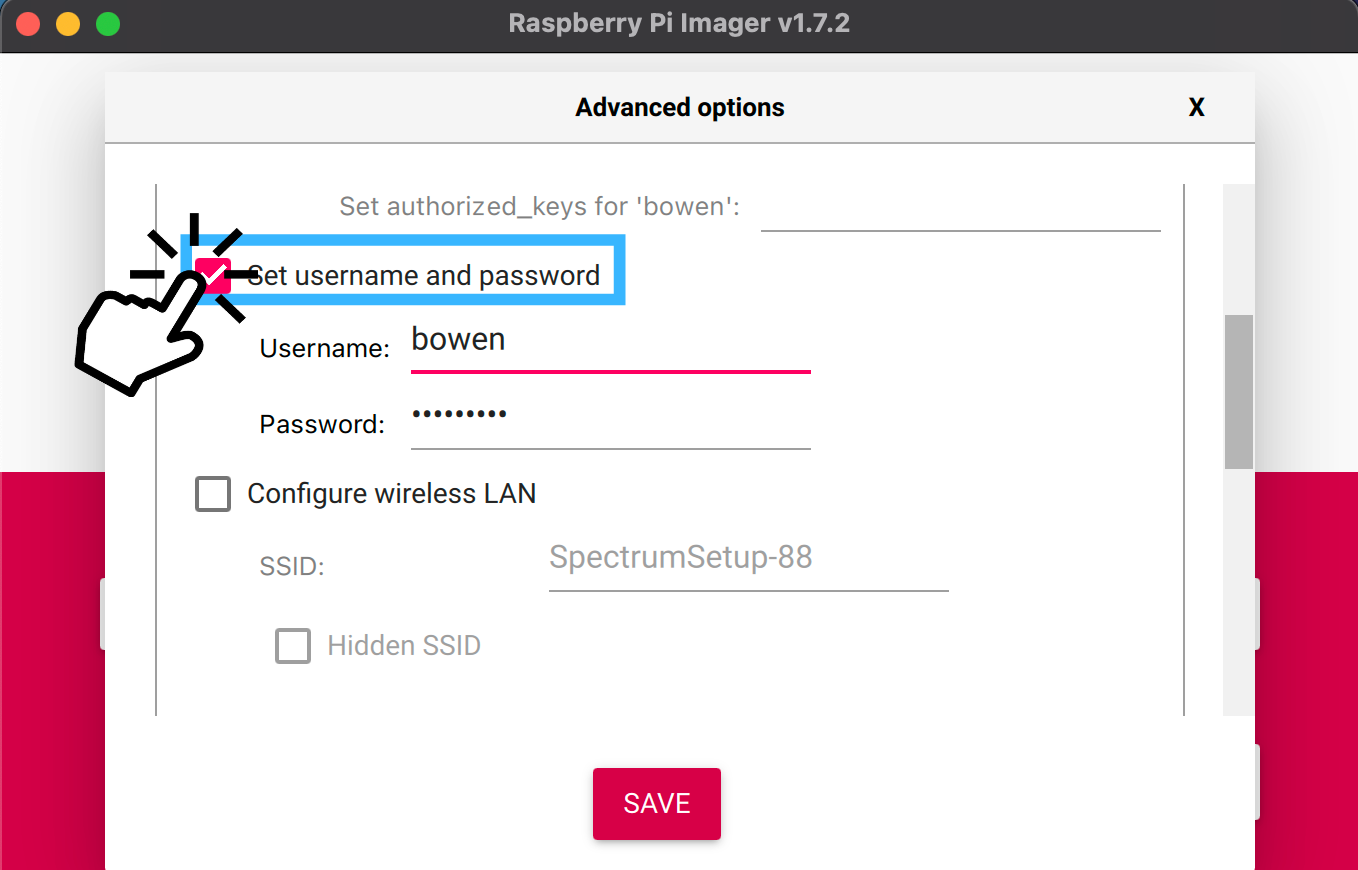
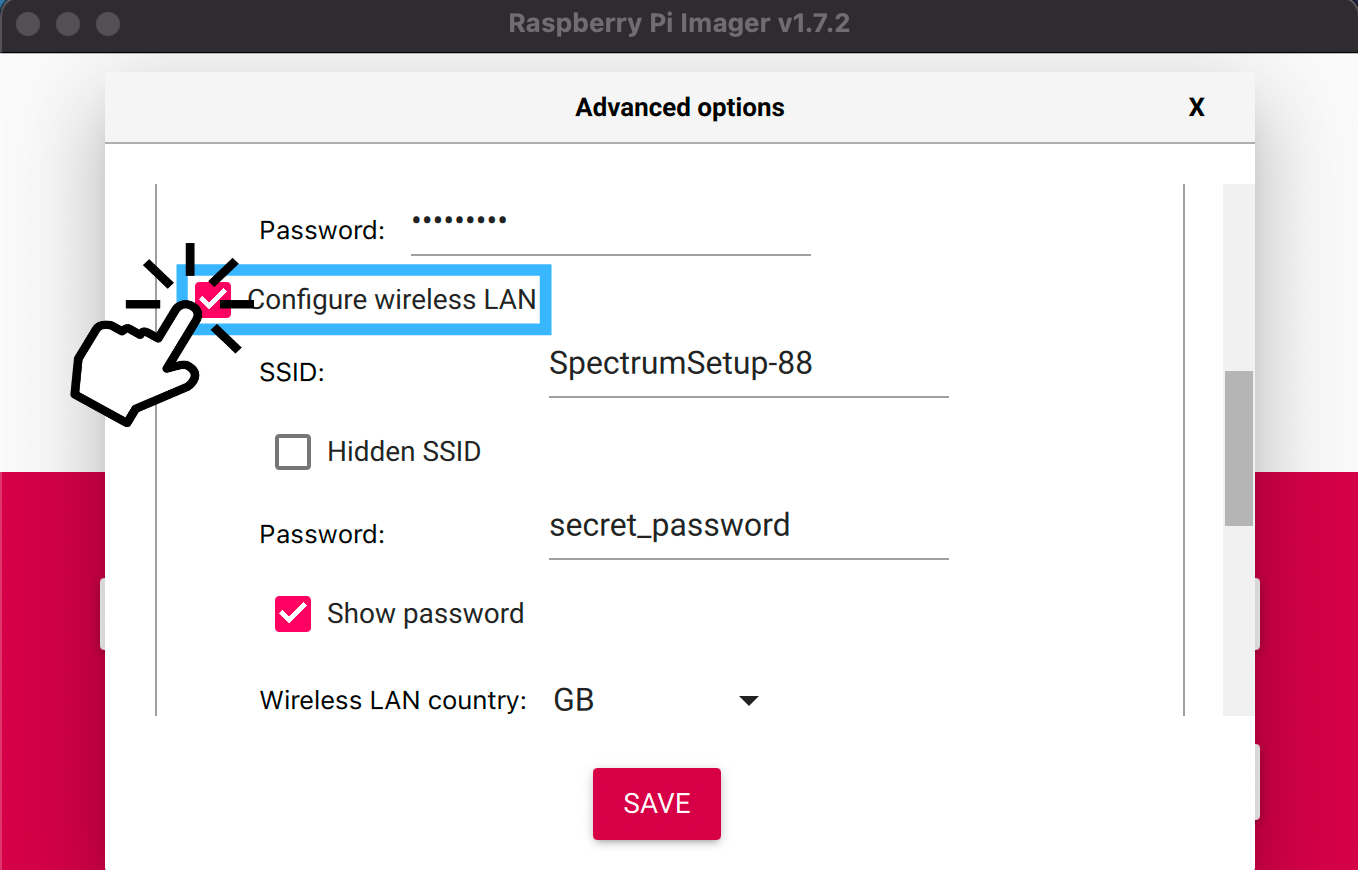
Then, you can scroll through the settings, enter your router’s name and password, and enable other features as well. For instance, besides setting up the Wi-Fi, you can also set up your username, password, and time zone.

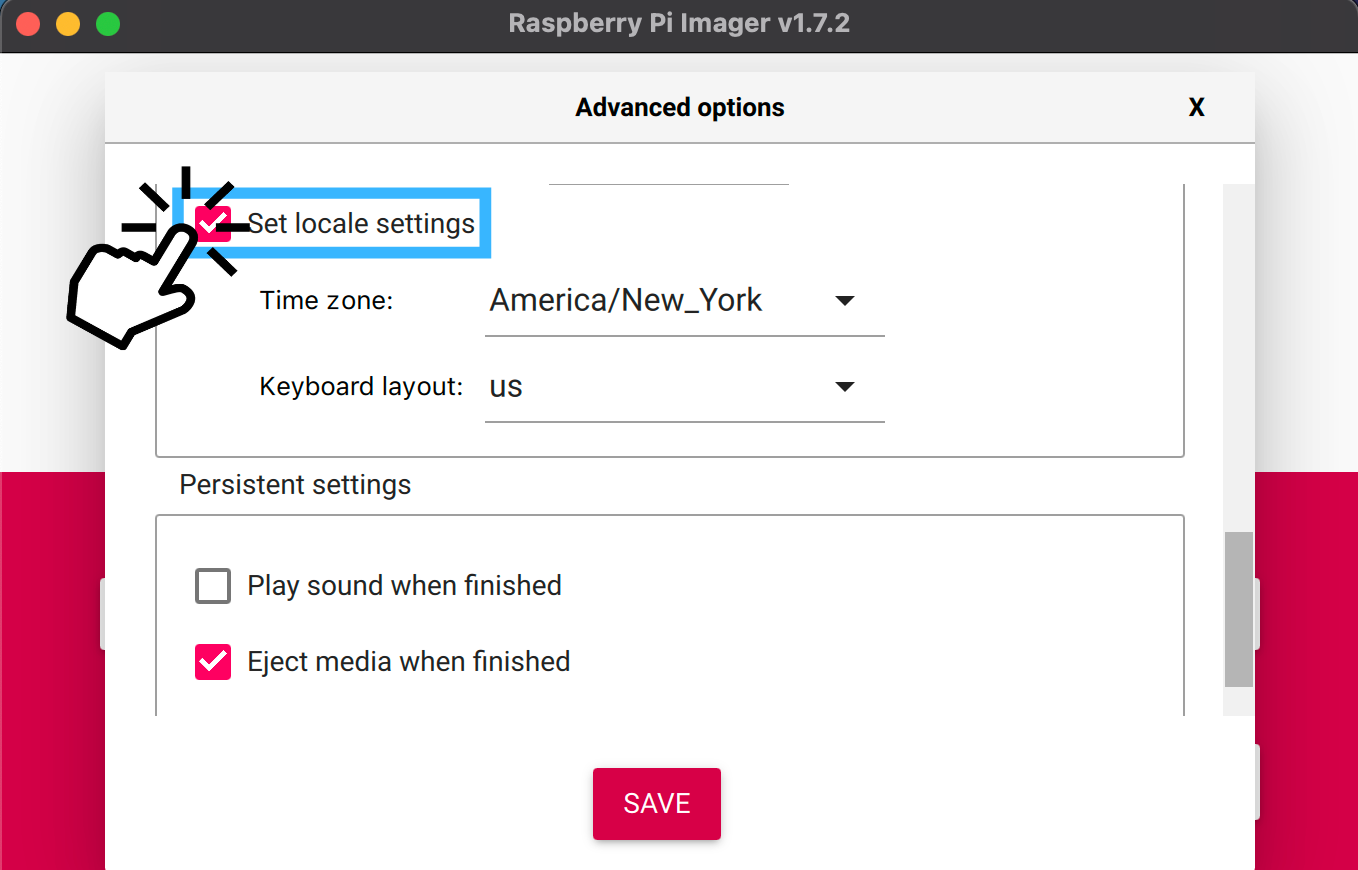
You can click “Save” once you’re done (which is the red button near the bottom center of your screen).
Now, you can write to your SD card and then insert it back to your Raspberry Pi.
I’d prefer using this method when setting up my Raspberry Pi because I don’t have a screen to hook it up to. That means I can just use SSH and VNC to log into my Raspberry Pi and see its display on my computer!
If you want to learn how to use SSH and VNC to use your Raspberry Pi, then you need to check out my guide on a headless Raspberry Pi setup.
Bonus Tip
Just in case you run into a “Could not communicate with wpa_supplicant” error, I’ll show you a simple, quick way to fix it. Follow these steps:
- Open your terminal
- Open up interfaces in your network folder by typing this command:
sudo nano /etc/network/interfaces- Paste in the following code at the end of the file to allow communication:
allow-hotplug wlan0
iface wlan0 inet manual
wpa-conf /etc/wpa_supplicant/wpa_supplicant.conf
This will now grant permission for wlan0 (which is the wireless connection interface) when you boot up your Raspberry Pi.
- You’ll need to enable the wpa_supplicant service:
sudo systemctl enable wpa_supplicant.service- Restart it:
restart wpa_supplicant- Reboot your Raspberry Pi to see these changes go into effect:
sudo rebootIf you’re still running into this issue, then I hate to break it to you, but you’ll need to do some manual debugging.
First, you’ll need to stop the wpa_supplicant process:
sudo killall wpa_supplicantNow, you’ll need to run this command to force the system to print out a message for each step they’re taking:
sudo wpa_supplicant -c /etc/wpa_supplicant/wpa_supplicant.conf -d -iwlan0Follow along with the messages printed in the terminal and when you see any errors displayed, I’d suggest copying and pasting it in a search engine like Google to search for a solution.
Summary – tl;dr (Too Long; Didn’t Read)
Here are the key takeaway points you should keep in mind after reading this article:
- If you’re having Wi-Fi connectivity issues and you know it’s not due to your router, then you’ll want to check your wpa_supplicant.conf file
- There are 3 ways to do so: use raspi-config, edit the file, or use Raspberry Pi Imager
- If you are receiving error messages that you can’t communicate with the file, then you need to either edit the interfaces file in the network folder or manually debug the issue.
In the end, I hope this solution guide brought more ba-LAN-ce to your Raspberry Pi workflow!