How To Increase Memory On Raspberry Pi (Increase Swap Size!)
I always want things done quickly, so when I found out that I could increase the memory on my Raspberry Pi in order to handle more memory intensive tasks, I jumped at the chance.
You can increase the memory on your Raspberry Pi by increasing the size of the swap file, which is ‘virtual’ memory. You would first turn off your swap file, edit its configuration file, turn it back on, and reboot your Raspberry Pi.
Admittedly, these steps aren’t the most detailed, so the rest of this guide will dive deeper into each one.
But first, to make sure we’re on the same page, let’s define:
What Is The Swap File?
Swap file is also known as virtual memory because it’s the space on a hard disk that can be used as a substitute for physical memory like RAM (Random Access Memory).
By default, Raspberry Pi OS (also known as Raspbian) have a default swap size of approximately 100 megabytes (MB) give or take.
You can check out how much you currently have on your device by typing the following command in your terminal:
free --megaHere is some information about this command and the result you should get:
- The free command displays the amount of free and used memory in your system
- The –mega option will display the size in megabytes
- For the output in the terminal, you should see:
- 2 rows and 6 columns
- You should focus on the last row since that will give you all the information about your swap file

If you want to learn more about the free command and the other options you can use, just use the man command in your terminal like this:
man free
Once you’re done perusing it, press the ‘q’ key to exit.
Why Increase Swap Space?
Since swap file can be used as virtual memory, that means it can increase the memory capacity of the hard drive you’re connecting to your Raspberry Pi beyond its physical memory limits.
Simply put, if you’re running out of memory on your hard drive, the Raspberry Pi can tag in the swap file for that extra memory boost.
This is great since more memory allows you to avoid memory issues you could encounter when running tasks or processes that demand a lot of memory. It’s appreciated when you don’t have to shut down or remove packages because there are memory problems with your SD card.
Moreover, with more memory, you can compile your packages much faster.
With that said, increasing the swap size can have its downsides too.
For starters, accessing that file can be a slow process because the read and write speeds for the swap file is less than that of the physical memory built in.
Plus, you’ll need to make room for swap space, and as I mentioned before, it doesn’t possess the fastest speeds.
On top of that, increasing the swap file can lower the lifespan of your SD card, which means you’ll need to buy a new one sooner rather than later.
Thankfully, the Raspberry Pi 4 comes with 4 gigabytes (GB), which means you don’t necessarily need to increase your swap file.
How To Increase Swap Space On Raspberry Pi
Here are the steps you should take to increase (or even decrease) the swap size on your Raspberry Pi:
- Open up your terminal. You can do this by using the keyboard shortcut CTRL + WINDOWS KEY + T (or CTRL + COMMAND + T if you’re a Macbook user).
- Alternatively, you can click on the terminal icon near the top left corner of the screen. It looks like a blackboard and it’s near the Raspberry Pi icon (which is the start menu).
- Type in the following command to turn off your swap file because we can’t edit it if it’s still in use:
sudo dphys-swapfile swapoff- Open the swap file configuration file, which is located in the /etc/ directory:
sudo nano /etc/dphys-swapfile- Look for the line:
CONF_SWAPSIZE=100It should be the only line with white-colored code since it’s the only one left uncommented. You can tell the code is commented because it’s in blue and there’s a hashtag symbol at the beginning of each line.
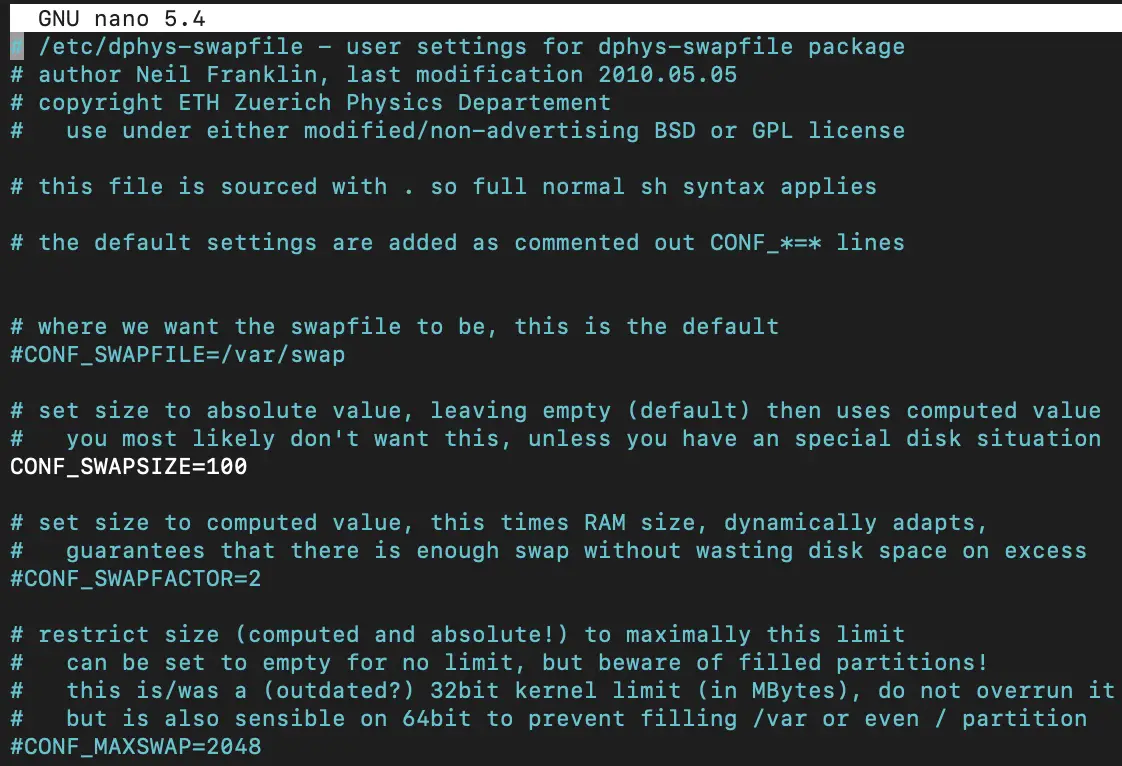
You can change it to any number other than the default programmed number, but don’t choose a number that will exceed the amount of space available on your SD card. Remember that the number is in megabytes!
- When you are done making changes, you can save and quit the following by performing these keyboard shortcuts:
- Press CTRL + X to save
- Press the ‘y’ key to confirm
- Press the enter key to exit
- Turn the swap file back on again:
sudo dphys-swapfile swapon- Reboot your Raspberry Pi to make sure these changes go into effect:
sudo rebootYou should check to make sure these changes are good with the command:
free --megaAlternative Way To Increase Swap Size
As I mentioned previously, it’s best not to increase the swap size on the SD card used by your Raspberry Pi. Instead, I’d suggest buying and using another device like a USB stick to add the swap size.
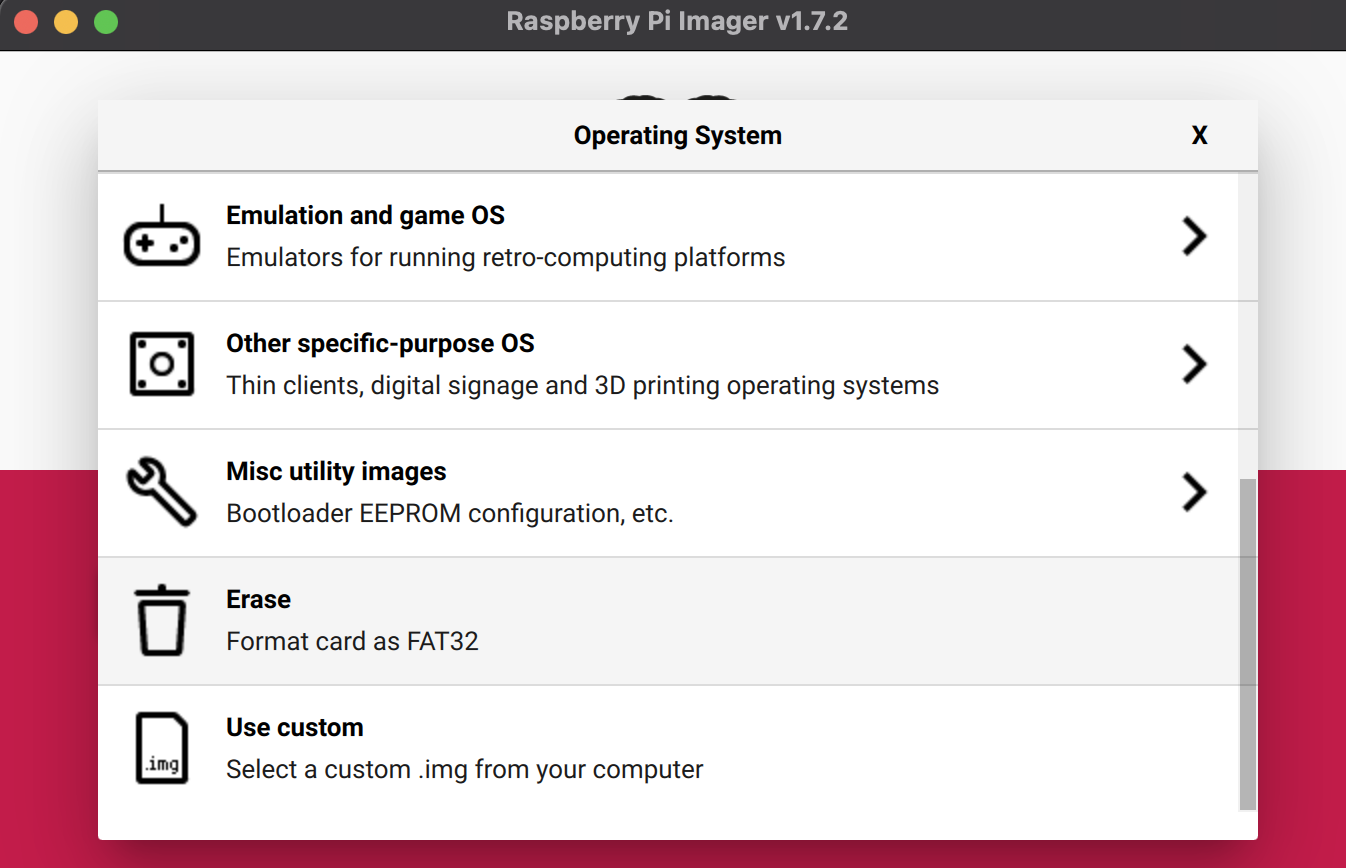
If you’re using a USB drive will stuff already written on it, I’d suggest erasing it with the Raspberry Pi Imager. The “Erase” feature is pre-programmed into the application and should be the second to last option in “Choose OS”:
Here are the steps to format and use it:
- Plug in your USB stick to your Raspberry Pi
- Check to make sure it’s in with this command in the terminal
sudo fdisk -lYour USB stick should be the last item you see in the output since you just inserted it. It should have the /dev/sda label since that’s where all mounted devices should appear.
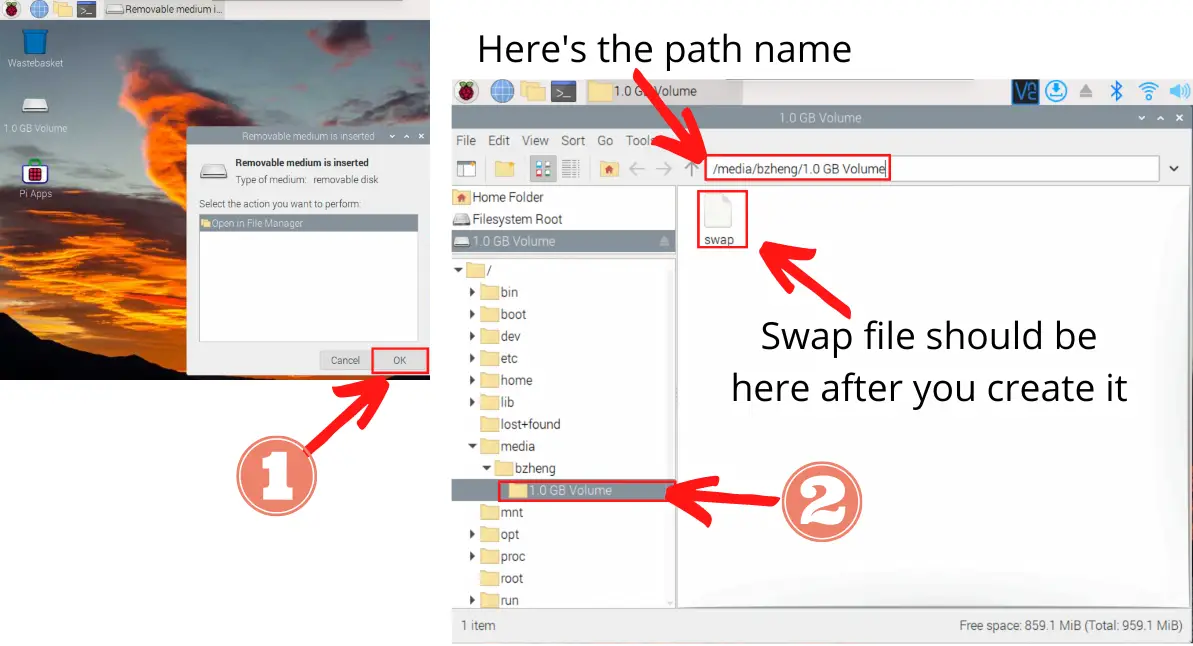
However, from my experience, if you want to access its content, you’ll need to look in the /media folder. This can be checked since when you plug in a USB drive and it connects to the Raspberry Pi, a new window will appear. This will take you to the file manager if you press “OK”. Then, you can see the path file near the top:
With all that in mind, here is the simple process you should use to enable swap file usage on your USB drive:
- Open your Raspberry Pi’s terminal.
- Enable executable permissions for your swap file, which is located in /var. This is because we want to be able to make a copy of that to our USB drive:
sudo +x /var/swap- Before you perform the copy command, we first have to make sure that the name of the USB drive correct. I’d say just copy the path you’d find in the file manager, but there’s always a possibility that the USB drive isn’t named that in the terminal.
- To locate the name, just copy the first two words in the path. For example, I’d copy /media/bzheng. Then, I’ll paste it in the terminal after the ls command to see what folder is listed there like this: cd /media/bzheng
- For me, the name of my directory in that folder was “90A4-1507“. Your directory name should have a blue color.
- Remember the absolute path to your USB drive is the combination of what you found. For example, my path is /media/bzheng/90A4-1507
- Now, copy the file over to this directory. Keep in mind this will take a few minutes:
cp /var/swap /media/bzheng/90A4-1507Remember to replace my “/media/bzheng/90A4-1507” with your path!
You can check to make sure that the swap file is in the USB drive by going back to the file manager and looking in that folder (as shown in the image above):
- Enable read and write permissions for that swap file:
sudo chmod 0600 path_to_your_swap_file- Create swap space on your USB drive:
sudo mkswap path_to_your_swap_file- Turn it on:
sudo swapon path_to_your_swap_fileNow your Raspberry Pi should be using the swap file on your USB stick!
Do keep in mind that your Raspberry Pi might get a little warmer. An easy solution is to use a heatsink or a small fan.
If you don’t know what I mean by heatsink or small fan for your Raspberry Pi, consider checking out my guide on handling Raspberry Pi overheating!
Once you’re done using the extra swap space, you’ll want to turn it off:
swapoff path_to_swap_fileThis will prevent any potential problems like a system crash.
Summary – tl;dr (Too Long; Didn’t Read)
Here are the key takeaway points you should keep in mind after reading this article:
- You can increase your memory on your Raspberry Pi by increasing the swap file
- To do this, you’ll need to:
- Disable the swap file so you can modify it
- Open its configuration file
- Increase the number
- Save and exit the file
- Enable the swap file
- Reboot to see these changes
- It’s not recommended to increase the swap size on your Raspberry Pi 4 since it has enough memory to handle most of your tasks and doing so could harm your SD card’s life. That’s why you can do it on a separate device like a USB stick.
I hoped you added extra swap space to your Raspberry Pi by swapping in a USB drive to do all the heavy lifting!