How To Check & Free Disk Space On Raspberry Pi (5 Easy Ways)
The space on your SD card is finite, like many of the resources in the world. Consequently, I do a monthly check-up on my Raspberry Pi to see how much space I have left on there, so I can avoid any disk space related issues. That’s why I wanted to create a guide to help others understand how they can check and free up disk space on their own Raspberry Pis.
You can check your Raspberry Pi’s disk space with the df command, the du command, GParted and Btop++. On top of that, you can install applications like Disk Usage Analyzer to let you check and remove files to free up disk space. Other ways you can clean it up is by using the Raspberry Pi’s GUI and terminal, or you can clear the apt cache and edit the Raspberry Pi Configurations for extra space.
I just threw a lot of information at you, so the rest of the guide will break down each method.
How To Check How Much Disk Space Is On Raspberry Pi
The first 2 methods will require the use of a terminal whereas the last 3 will require you to install some applications. You can pick whichever is the easiest for you!
1. Use The df Command
The df command (which stands for ‘disk free’) will report file system disk space usage. You can specify a file to analyze its disk usage, but if you just type in the command df, you will see information about all the currently mounted file systems.
Additionally, the size will be displayed in 1,000 (1K) chunks by default so that the information is more digestible. You can change the size to a different number by using the -B option (which allows you to change the block size)
I’d prefer adding the -h option to make the results more human readable:
df -h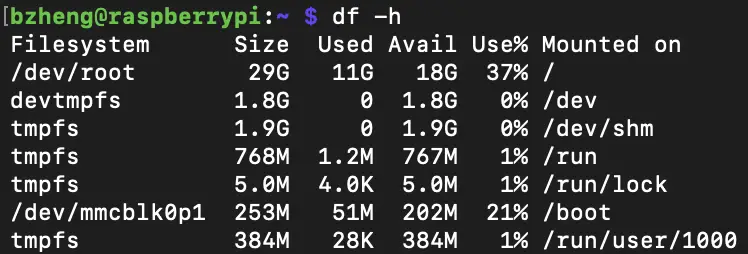
Here are some pointers about the output in the terminal:
- There will be a total of 6 columns and some number of rows depending on your file systems.
- Filesystem: This is the first column, and it will tell you the name of the partitions, which are different sections on your hard drive (this should be the SD card).
- Size: This tells you the size of the filesystem. It can be displayed in megabytes (M), kilobytes (K), or gigabytes (G).
- Used: This tells you the amount of disk space currently being used
- Avail: This tells you the amount of available (free) disk space you have left on each partition
- Used%: This hows you the percentage of the disk space being used. The system calculates this by dividing the numbers in the “Used” column by the numbers in the “Size” column.
- Mounted on: This tells you the location of where the filesystem can be found
2. Use The du Command
The du command (which stands for disk usage) estimates the amount of file space used. If you type in the command by itself, it’ll output a long list of directories and their disk usage with no human readability in mind.
Consequently, the way I’d recommend you approach this is by sorting the list with the sort command and looking at only the first 10 commands so you don’t get overwhelmed. That’s the gist of this command:
du -ah | sort -nr | head -10Here are some more information about this command:
- For the du command:
- The -a option (which stands for all) includes the disk usage for files in addition to directories. Otherwise, only the information regarding the directories would show.
- The -h option (which stands for human-readable) formats the number in human-friendly formats like 1K, 2M, or 3G.
- For the sort command:
- The -n option (which is short for numeric) will sort the list that the du command outputs by size. It will first list the smallest sizes and the last few files or directories will have the largest sizes.
- The -r option (which is short for reverse) will reverse the order of the list. We use this in conjunction with the numeric option because we want to see the largest files or directories so we know what to delete first later on.
- For the head command:
- The -10 argument will only list the first 10 results of the sorted, reversed list from the previous commands. You can always see more or less by increasing or decreasing the number.
- Notice that these commands are separated by pipes (|). This technique is called piping, and it allows us to take the output of the first command, use it as an input for the second command, which will give an output. Later on, this will be used as an input and so on until we approach the last command, which will just give an output in the terminal.
If you want a full list without having it clog up your terminal, use this command instead:
du -ah | sort -nr >> output.txtThis command is unique in that it uses double greater than signs to redirect the output of the sorted list to a file named output.txt in the directory you’re currently in. To access it, type this command:
sudo nano output.txtOnce you’re done looking at it, exit with the shortcut CTRL + X.
If you want to learn more about these commands, use the man command to see each one’s manual. For example, if I wanted to check out df, I’d do:
man df
Once you’re done perusing it, you can exit the page by pressing the ‘q’ key.
3. Use Disk Usage Analyzer
Disk Usage Analyzer is an application you can install on your Raspberry Pi, and it uses Baobab, which is a software that will display the files in different sizes in a neat, colorful pie chart. This is a great way of finding large files because it will always be the largest part of the graph.
Before you can use it, you need to install it since Raspbian doesn’t come with this pre-installed. The way I’d do it is by installing it with Pi-Apps, which is free for everyone to use. However, you’ll also need to install Pi-Apps, but I’d say this is a worthwhile investment since there are loads of other useful programs you can install from there.
Here is how I’d install Pi-Apps if you don’t have it already.
- Open up your terminal. You can do this by using the keyboard shortcut CTRL + WINDOWS KEY + T (or CTRL + COMMAND + T if you’re a Macbook user).
- Alternatively, you can click on the terminal icon near the top left corner of the screen. It looks like a blackboard and it’s near the Raspberry Pi icon (which is the start menu).
- You’ll need to update your Raspberry Pi so that any application you install will be the latest version:
sudo apt update- Install Pi-Apps on your Raspberry Pi:
wget -qO- https://raw.githubusercontent.com/Botspot/pi-apps/master/install | bashNote: if you’re getting errors when installing Pi-Apps, then you’ll need to restart your system. If that still doesn’t work, then you’ll need to flash your Raspberry Pi’s SD card again and set it up from the start. This last method worked for me.
If you forgot how to flash your SD card with Raspberry Pi Imager or want to see how I approach it, take a look at my guide on a headless Raspberry Pi setup.
Now, to install Disk Usage Analyzer, follow these steps:
- Open up Pi-Apps. To do this, click on the Raspberry Pi icon (the start menu), Accessories, and Pi-Apps.
- Alternatively, just type this in your terminal: pi-apps
- Moreover, there should be a desktop shortcut you can just click on to run Pi-Apps
- After that, click “System Management” and “Disk Usage Analyzer”.
- A new window will pop up and ask if you want to install it. Click “Install”.
- Open up the app. To do this, open the start menu, click on “System Tools”, and click on “Disk Usage Analyzer”.
- Alternatively, you can just open up your terminal and type in this command: baobab.
- A new window will appear called “Devices and Locations”. Choose “raspberry-pi” to see the disk usage for the whole system. Collecting the information and creating the pie chart will take a few minutes to load.
- After that, you can just hover over and click on the pie chart on the right half of the window while the text information will appear on the left.
Another reason why I recommend using this is because it’s an easy tool to remove files to free up disk space. I’ll talk more about in the next section!
4. Use GParted
GParted (which stands for GNOME partitioning system) is great for checking, creating, moving, removing, or resizing partitions and file systems.
There are 2 ways you can install it.
The first way is by opening up your terminal and typing in these 2 commands:
sudo apt updatesudo apt install gpartedThe first command is necessary since we want the latest version of GParted. The second one is for installing it.
To open up the application, just type in the terminal:
sudo gpartedThe other way you can install GParted is by using Pi-Apps:
- Assuming you install Pi-Apps (if you haven’t, look at the previous method), you should open it up:
- Go to Start menu, “Accessories”, “Pi-Apps”
- Click on “System Management”
- Click on “GParted”
- Click on “Install”
- Open up GParted
- Go to Start menu, “System Tools”, and “GParted”
- You might have to type in a password to authenticate that you have permission to use it
- Now you can see the total disk usage near the top
For more information about a partition, click on the listed ones twice.
5. Use Btop ++
Btop++ is another great tool you can install with Pi-Apps that will show you not only the disk usage, but the CPU (Central Processing Unit), network, memory, and task manager.
It’s very user friendly, which means that you can customize it with different layouts and how the information surrounding the disk usage, CPU, network, memory, or task manager should appear.
Assuming that you have Pi-Apps installed, follow these steps:
- Open up Pi-Apps
- Type this in the terminal: pi-apps
- Click on “System Management”
- Click on “Btop++”
- Click on “Install”
- Open up Btop++
- Go to Start menu, “Accessories”, and “Btop++”
- Alternatively, open your terminal and type in this command: btop
- The disk usage information should be near the middle of the window (a little bit to the left)
How To Free Up Disk Space On Raspberry Pi
Now that you’ve identified how your disk space is being allocated on your Raspberry Pi, the next thing you might want to do is remove them so you can free up some disk space. Before I show you those 4 ways, an easier method you can use to free up disk space is if you:
1. Edit The Raspberry Pi Configurations
What we’re trying to do here is expanding the root partition so we can obtain and use some of that unused space.
The easiest way is by going to your terminal and typing in these commands:
sudo raspi-config --expand-rootfssudo rebootThe first command will expand the partition while the second one will reboot your computer so that the changes will go into effect.
Another approach you can try if you want to spice it up is:
- Go to terminal
- Open raspi-config
sudo raspi-config- Pick the sixth option (Advanced Options)
- Select “Expand Filesystem”
- Select “OK”
- Select “Finish”
- Reboot your system:
sudo reboot2. Use Raspberry Pi GUI
The GUI stands for Graphical User Interface, and it’s the stuff you see on the monitor you hook up to your Raspberry Pi.
You can easily remove files by
- Clicking on File Manager, which is the folders icon near the top left corner of the screen
- Selecting a folder that the files you want to remove are in
- Right-clicking on a folder, and
- Selecting “Move to Wastebasket”
3. Clear APT Cache
When you install packages, your local repository will have retrieved package files that are left in the /var/cache directory. That means unused files are taking up valuable space on your Raspberry Pi. Thus, a great way to maximize your disk space is by removing those files.
This method is very simple. Just go to your terminal and type in this command:
sudo apt-get clean4. Disk Usage Analyzer
The removal process to clean up your disk space with Disk Usage Analyzer is also pretty simple.
- Open up the app.
- To do this, open the start menu, click on “System Tools”, and click on “Disk Usage Analyzer”.
- Alternatively, you can just open up your terminal and type in this command: baobab.
- Select a folder or file you want to remove in the left half of the window
- Right-click on it
- Select “Move to Wastebasket”
5. Remove Files Manually
This method requires a little more experience with the terminal, but it’s should be easy to pick up.
All you need is to use the rm command in the terminal.
If you want to remove files, use this syntax:
rm file_nameIf you want to remove directories, use this syntax:
rm -rf directory_nameMake sure to replace the file_name and directory_name.
If you want to uninstall packages, use this syntax:
sudo apt remove program_nameNote: for all these remove commands, make sure you’re in the same directory as the locations of the files. Otherwise, you’ll need to use an absolute path or else the system won’t know where to look for these files.
If you ever encounter permission errors, that means you either need to add the sudo command before the rm command or modify the file’s executable permission with chmod, like this:
chmod +x file_nameIf you want to learn more about permissions and how you can create or remove them for files or folders you want to keep secret or open on your Raspberry Pi, then I highly suggest you check out my full permissions guide for Raspberry Pi!
Alternatives For Increasing Storage On Raspberry Pi
If you want to go above and beyond for getting most disk space possible, then you should follow these tips:
- Buy and connect an additional storage device like a hard disk drive, SSD, or a USB stick to your Raspberry Pi.
- There are 4 USB ports on your Raspberry Pi so you can use as many as you want!
- You might need 2 out of the 4 ports for connecting your mouse and keyboard to the Raspberry Pi. However, you can use all of them if you use VNC or SSH, which lets you access the Raspberry Pi from your computer.
- There are 4 USB ports on your Raspberry Pi so you can use as many as you want!
If you want to learn how to use VNC and SSH so you won’t need to hook up your Raspberry Pi to a monitor every time you want to use it, then you need to check out my guide on a headless Raspberry Pi setup.
- Switch to a lightweight distribution software like Raspbian Lite. You can flash your SD card again in the Raspberry Pi Imager, which has this Lite version ready to go.
- Buy an SD card with larger storage if you’re in desperate need of disk space
Summary – tl;dr (Too Long; Didn’t Read)
Here are the key takeaway points you should keep in mind after reading this article:
- You can check how much disk space you have left or have used by:
- Using the df command
- Using the du command
- Using GParted
- Using Disk Space Analyzer
- Using Btop++
- You can add more space to your disk space by:
- Clearing your apt cache
- Removing files with GUI
- Removing files in the terminal
- Removing files with Disk Space Analyzer
- Editing the Raspberry Pi Configuration
I hope this article helped clear things up for you as well as your Raspberry Pi’s disk space!