How To Find, Set, & Change DNS Server On Raspberry Pi
When I was changing my IP address to become static, I noticed that I could also change the DNS server since doing so has some benefits like better security and faster download times. Consequently, I created this guide for those wondering how they can change their DNS server.
You can change your DNS server’s address by either editing the dhcpcd.conf file in the terminal or by configuring the Wired & Wireless Settings in the Raspberry Pi’s GUI (Graphical User Interface).
If you don’t know where to start, don’t worry. The rest of this guide will take you step-by-step through these 2 techniques as well as providing any images when necessary.
What Is A DNS Server?
DNS server stands for Domain Name System server, and it converts the domain names to a numeric IP (Internet Protocol) address.
For example, users who use Google as their search engine will see this: www.google.com. However, your computer won’t be able to understand that. That’s why the DNS server is useful – it serves as a translator for you and your computer by converting the website link to something your computer understands, which are IP addresses.
In this case, www.google.com would have the IP address 8.8.8.8 or 8.8.4.4 (these are for their public DNS servers only). Once your computer sees this, it will know where to find what you’re looking for and direct you to that site.
Why Change Your DNS Server?
There are some reasons why some people choose to change their DNS server.
- Your downloads could begin sooner.
- When you change your DNS server, you’re basically changing where you’re getting your information from. Let’s say your Internet Service Provider (ISP) like Spectrum has their DNS server 200 miles away from you, but another ISP (let’s say Xfinity) has their DNS server only 15 miles away. Changing to Xfinity would lower the transfer time and you’d get your information quicker.
- Could provide better security
- There are some DNS services that can filter spammy sites or take you to redirect pages from established bad sites.
- You could access blocked content.
- Some countries use DNS services that block their people from accessing banned sites like YouTube or Netflix. Of course, there are special DNS services that will help you bypass this by using network tunneling in order to scramble your geographical location.
How To Find The DNS Server On Raspberry Pi?
Knowing how to find your DNS server can be very useful because after you change it, you’ll want to check to make sure the DNS server is actually changed.
Your DNS server information can be found in the resolv.conf file, which is located in the /etc directory. Consequently, the easiest way to get a list of only the DNS information is by running the following command in the terminal:
cat /etc/resolv.confHow To Change DNS Server On Raspberry Pi?
1. Edit The DHCP File
This method is great for those who can only access the terminal (for instance, SSH). All you need to do is edit the dhcpcd.conf file.
The DHCP file gets information from the DHCP server, such as the IP address, and it can automatically handle the network interface configuration.
- Open your terminal
- Open the dhcpcd.conf file:
sudo nano /etc/dhcpcd.conf- Copy (CTRL + C) the following code and paste it (CTRL + V) at the very beginning of the file. Make sure to replace “IP Address” with the IP address you want.
interface wlan0
static domain_name_servers=8.8.8.8
Of course, you can have more than 1 DNS, but the system will only use the primary DNS (which is the first DNS listed).
- Now, save and exit the file. To do that, press CTRL + X, hit the ‘y’ key, and press enter.
- To make sure this goes into effect, reboot your system:
sudo reboot2. Use The Desktop Graphical User Interface (GUI)
If you have access to the Raspberry Pi’s desktop (either through VNC or through another monitor), then you should use this method as it’s more user friendly.
If you want to learn how to use VNC on your Raspberry Pi, then you should check out my guide on a headless Raspberry Pi setup
Here is the process:
- Right-click on the Network icon. It should be near the top right corner of the screen
- Select ‘Wireless & Wired Network Settings”
- A new window will open called “Network Preferences”. Make sure the “interface” option is selected.
- Choose either eth0 or wlan0.
- eth0 is wired and you would choose it if you have an Ethernet cable connected to your Raspberry Pi
- wlan0 is wireless and you would choose this option if you have your Raspberry Pi connected to a router
- OPTIONAL: Type an IP address if you want to also make your IP address static.
- OPTIONAL: Type in the Router IP address (which should be 192.168.1.1) if you want to make your IP address static.
- Type in the DNS IP address.
- You can write more than 1 DNS IP address in this space by using a space-separated list. For example, you can use Google’s first and secondary public DNS IP address and then add OpenDNS’s DNS server:
- 8.8.8.8 8.8.4.4 208.67.222.222
- In reality, you only need 1 DNS server’s address. However, you can always add more because if the first listed address doesn’t work, the system will move on to the second one (and so on).
- The DNS can be internal (like pointing to your own router at home) or external (like pointing to Google)
- You can write more than 1 DNS IP address in this space by using a space-separated list. For example, you can use Google’s first and secondary public DNS IP address and then add OpenDNS’s DNS server:
- Click the “Apply” button
- Restart the system to make sure this change goes into effect. You can go to the terminal and type:
sudo rebootIf you want to be more precise, the DNS IP address won’t be changed until the DHCP client daemon is restarted. One way to do that is to restart the computer, but if you have something important displayed or don’t want to deal with the hassle of restarting your computer, you can always run this command in the terminal instead:
sudo service dhcpcd restart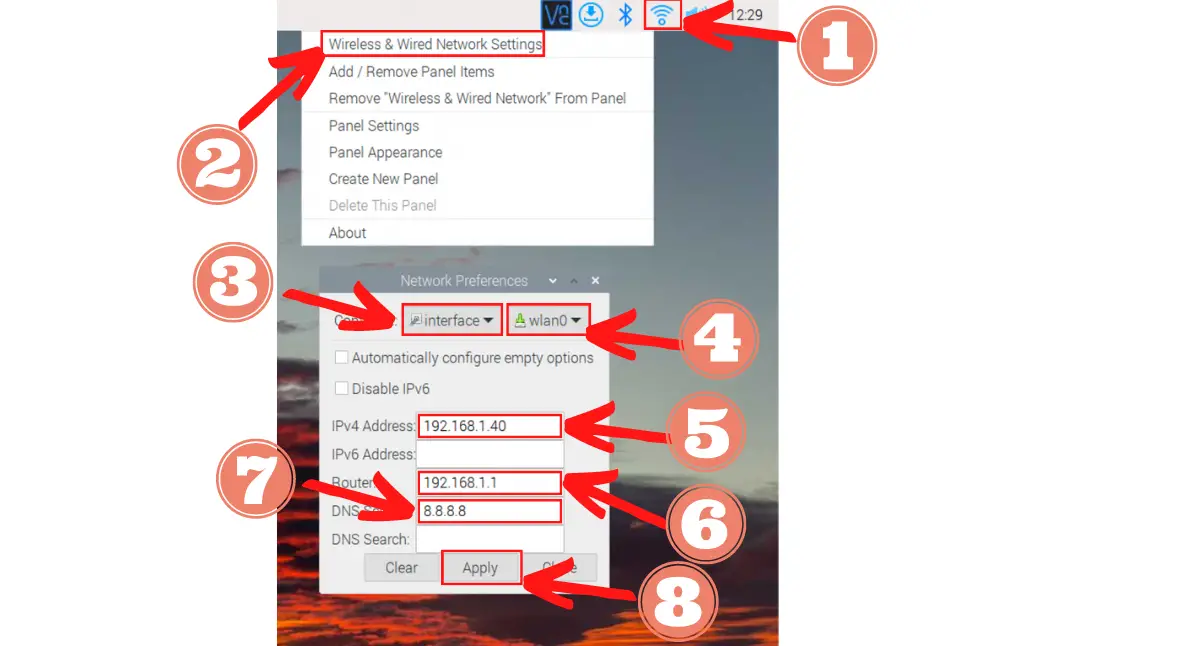
Note: If you’re not the administrator making these changes, then this method won’t work and you’ll get an error.
Summary – tl;dr (Too Long; Didn’t Read)
Here are the key takeaway points you should keep in mind after reading this article:
- You can think of a DNS server as a translator to help your computer understand and locate the sites you want to get to.
- People would want to change their DNS server to:
- Access blocked content
- Begin downloading sooner
- Acquire an extra layer of protection
- Run cat /etc/resolv.conf to get a list of DNS server’s addresses
- You can change the DNS server by using the terminal and editing the dhcpcd.conf file or by using the GUI and editing the Wired & Wireless Network Settings
In the end, I hope this post served all the information you needed to know about finding, setting, and changing your DNS server on your Raspberry Pi!