Can Raspberry Pi Multitask? Let Me Show You How It’s Done!
Multitasking is something I do constantly. When I’m doing work, I’m usually jamming out to some tunes over my headphones. When I’m cooking, I’m constantly monitoring the food that’s cooking while chopping my vegetables. I feel like multitasking lets me get more stuff done, so I started figuring out how to multitask on the Raspberry Pi.
Raspberry Pis can multitask thanks to the 4 CPU (Central Processing Unit) cores they possess. That makes these credit-card sized computers a multiprocessor. Just like a regular laptop, the Raspberry Pi can run multiple programs, which allows you to check your emails, use a search engine, or even watch a YouTube video!
If you want to learn more about how a Raspberry Pi multitasks and how you can multitask in the Raspberry Pi’s terminal, then I’ll dive deeper into each of these topics for the rest of this article.
How Does Raspberry Pi Multitask?
As I’ve mentioned before, Raspberry Pis have 4 CPU cores. To be more specific, the Raspberry Pi 4 Model B is powered by the Broadcom BCM2711B0 processor. You can think of this as the brains of the operations. In essence, the CPU will orchestrate everything and control the flow of certain tasks.
You can run multiple programs at once on a Raspberry Pi. A few of the previous examples are checking emails or watching YouTube videos.
But even if you’re not using all the programs you have open at the same time, that doesn’t mean they’re not running.
In fact, you could receive a Slack notification while you’re programming in a text editor like Geany. This notification is only possible because you have Slack open on your Raspberry Pi.
However, multitasking doesn’t mean that your CPU is running all the programs you have open at the same time. It just runs chunks of a program really fast one after the other so that you can’t tell the difference when the CPU is switching tasks.
For example, the CPU could be running LibreOffice for 0.01 second, then switch to Chromium for another 0.01 second, and revert back to LibreOffice for 0.01 seconds.
As you can see, you’ll feel like your Raspberry Pi is running everything smoothly and simultaneously.
How To Multitask In Raspberry Pi’s Terminal
Since Raspberry Pi uses Raspbian (which means Raspberry Pi operating system), it’s considered a Debian-based system. That means it uses a Unix-like kernel, which is Linux. Consequently, the following ideas can be applied to not only Raspberry Pis, but also other Linux systems like Ubuntu.
Process Management
Before I go into how you can multitask in the terminal, I want to define some terms and concepts first.
We’re going to be using, running, terminating, and looking up processes in this section.
A process is a running instance of a program, and it runs its own memory space. For example, each time you execute a command in the terminal, a new process will start.
A process is an active entity as opposed to a program, which is considered to be a passive entity.
A new process is created only when running an executable file (not when running built-in shell commands).
You can easily tell if a command is executable by running the which command:
which <command>Finding Running Processes
To find a running process in the terminal, you can choose between 4 different commands.
Running the ps, pgrep, and pstree commands will give you a static view of the running processes, while the top command will give you a dynamic view. This type of view lets you see a list of running processes that’s updated constantly.
Let’s break down each one so you know how they work:
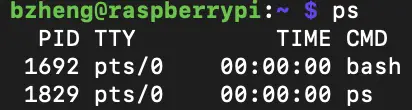
- The ps command stands for process status, and it displays the processes running in the current terminal. It has 4 columns:
- PID: this stands for Process ID, and it is automatically assigned by the kernel to uniquely identify each process
- TTY: this represents the. name of the controlling terminal for the process
- TIME: this is the cumulative CPU time of the process, which is shown in minutes and seconds
- CMD: this is the name of the command used to start the process
- Keep in mind this list doesn’t show all the information. If you want to see a full detailed information of the running processes, add the -f option, like this: ps -f.
- The pgrep command looks up processes using their names and lists their process ID. It can also look for partial name when indicated.
- For example, I could run: pgrep ls
- This will output the number 630 for me, which is its process ID.
- For example, I could run: pgrep ls
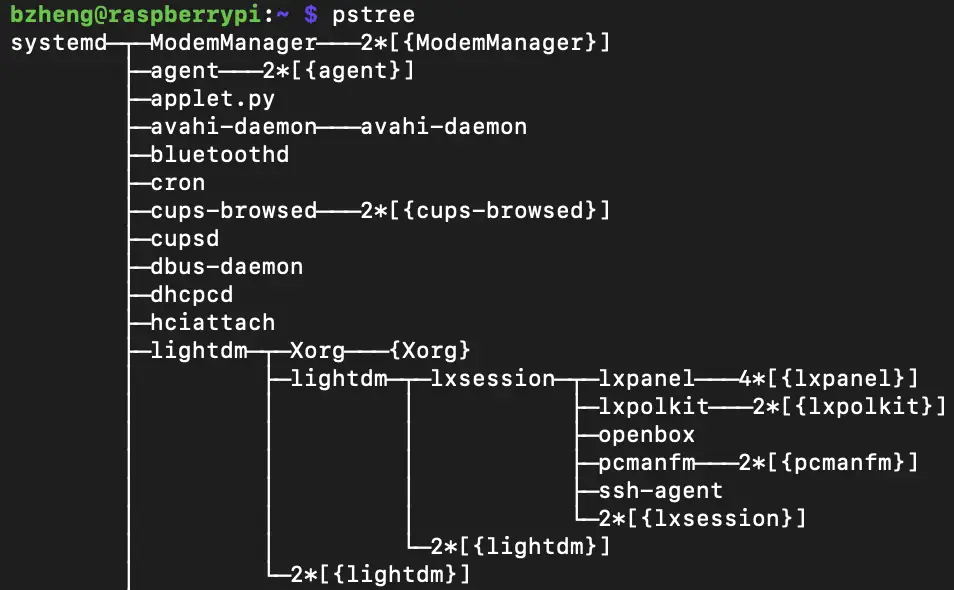
- The pstree command displays a hierarchical structure of all the processes that are running.
- It will merge identical branches by putting them between square brackets ([]) and prefacing them with an integer that represents the number of branches.
- The threads of the processes are shown under their parent processes and are inserted between curly braces ({}).
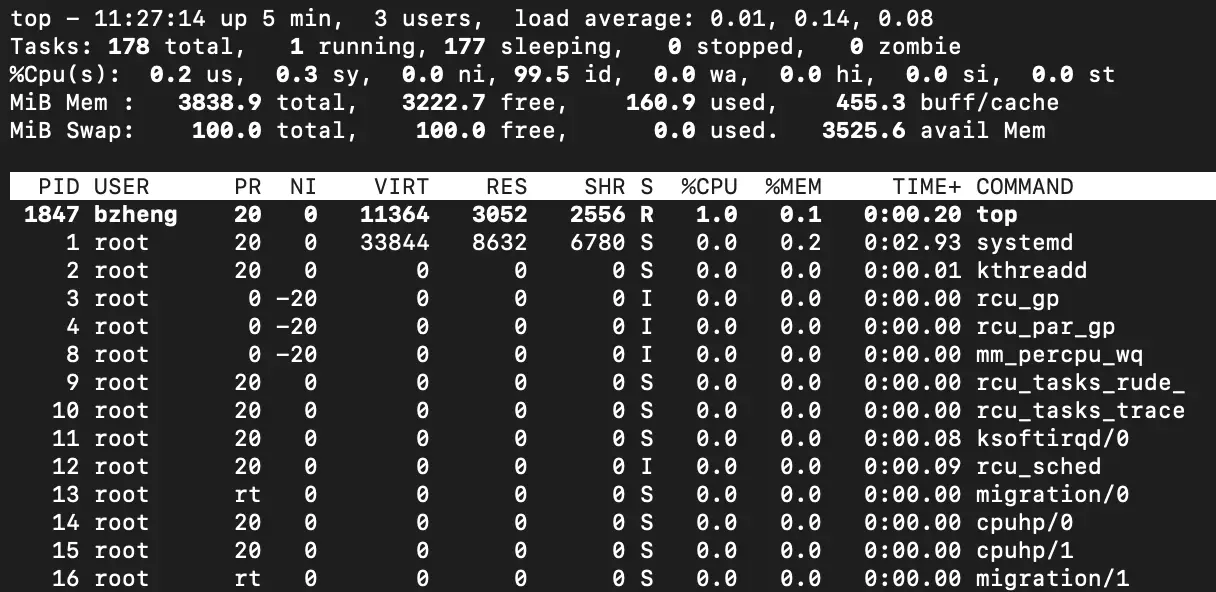
- The top command gives you a dynamic view of the running processes.
- It shows two main areas: the summary area and the task area (which looks like a table and will automatically update itself every 3 seconds.
- Here are some of the controls to navigate it:
- Press the ‘q’ key to exit
- Press ‘1’ to change the display and see individual statistics. Pressing it again will leave the screen and go back to the top main screen.
- Press the ‘t’ key to change CPU displays to a simple ASCII graphs and to show the percentage of the CPU usage. You can press this multiple times to see different views.
- Press the ‘m’ key to change the memory and swap lines to different display options
- Press the ‘d’ key to change the refresh rate
- Press the space bar to manually refresh the screen
Interrupting Processes
To terminate a process, you can use the kill command. This will send a signal, which is a notification sent to a process that determines how that process should behave, to a process or a group of processes. When the signal isn’t specified, it defaults to 15 or SIGTERM.
Note: you can get a list of all available signal runs by using this command:
kill -l
There are 3 ways you can kill a process.
The first way is as follows:
- Find the process ID (you can use one of the methods I mentioned previously like pgrep)
- Identify the signal number you want to send. Use the command kill -l to find one you like.
- Kill the process with this command (making sure to replace the parentheses and what’s in it):
kill -(signal number) (process ID)The second method is as follows:
- Find the process ID but with the pidof command: pidof (process name)
- Identify the signal name you want to send. Use the command kill -l to find one you like.
- Kill the process with this command (making sure to replace the parentheses and what’s in it):
kill -(signal name) (process ID)
The last method is as follows:
- Identify the signal name you want to send. Use the command kill -l to find one you like.
- Just run the kill command with substitution (replace the greater than and less than signs and what’s in them):
kill -<signal name> $(pidof <process name>)Lastly, you can kill all processes with either the killall command or the pkill command. The former will kill all the processes with the name you specified and the latter will kill all processes with the partial name (since killall requires the full name).
For example:
killall -15 sleepForeground and Background Processes
In your terminal, there are two types of processes that can be run: background and foreground.
Foreground processes are started by the user and not by the system. While they are running, the user cannot start another one in the same terminal.
Background processes are non-interactive and are started by either the system services or by the users. While they are running, you can start other processes in the same terminal.
You can force your foreground processes to be ran as background processes. All you need to do is add an ampersand (&) to the end of the command.
For example, say I wanted to run sleep 20 (which is a foreground process that will make the terminal pause for 20 seconds) in the background. Then, I’d do this:
sleep 20 &If you have background processes that you want to bring into the foreground, then you’ll need to perform the following steps:
- Find the job ID of the background process that’s running:
- jobs
- This will display the ID in the first column and the name of the corresponding processes in the second column.
- jobs
- Bring the background process to the foreground:
- fg %<job ID>
- Make sure to replace the greater than and less than signs and the stuff inside it
- fg %<job ID>
Other Useful Tips
If you want to pause a process, you can use the keyboard shortcut: CTRL + z.
To resume the paused process, you’ll need to find the job ID with the jobs command.
Then, you’ll need to run bg %<job ID> if it’s a background process or fg %<job ID> if it’s a foreground process.
You should be aware that if your connection drops, if you log out, or if you close the terminal, all the running processes will be killed regardless if they’re in the foreground or in the background.
To prevent this from happening and keep the process running, then you’ll need to use the nohup command:
nohup <process or command> & A file called nohup.out will be created when you use the nohup command, so you can always monitor the status of your process by checking there.
Now that you know how to handle background and foreground processes, you can make use of Raspberry Pi’s multitasking abilities by running as many background processes as you want without having to constantly open new terminals to run them!
Summary – tl;dr (Too Long; Didn’t Read)
Here are the key takeaway points you should keep in mind after reading this article:
- Raspberry Pi can multitask thanks to the 4 CPU cores it possesses
- You can multitask on there by opening up different programs like Chromium or a text editor
- You can multitask in its terminal by running multiple processes in the background
I hope this article gave you some good background information on multitasking and a good overview of the process you can use to multitask in your terminal!
If you want to learn more about coding in your Raspberry Pi, consider checking out my guide on the levels of programming I recommend in the Raspberry Pi!