3 Easy Ways To Transfer Files Between Laptop & Raspberry Pi
Transferring files can be tricky when you’re getting started. At least, that was the situation for me when I started learning Linux. Consequently, I created a comprehensive guide to help Raspberry Pi users answer the question: “How do you transfer files between a Raspberry Pi and a laptop?”
There are 3 easy ways you can start transferring files between your computer and Raspberry Pi. You should use the scp command if you don’t want to install any applications. If you want a more graphical approach then you should use either Snapdrop and FileZilla, both of which requires an installation.
I’ll go over each method more thoroughly for the rest of the post.
1. Use SCP
If you want to copy files over the network without installing any applications whatsoever, then you need to use the scp command.
Scp (which stands for Secure, Contain and Protect) essentially copies files between hosts on a network by utilizing SSH (which stands for Secure Shell and is a way to remotely access the terminal of a different device).
There are 3 different ways you can use this command:
- You can copy from local to remote
- You can copy from remote to local
- You can copy from remote to remote (you need to have access to both remote places in order to do so)
Transferring Files From Local To Remote
In order to copy from a local device to remote one, you’ll need to run this command:
scp -P port_number file_name destination_username@destination_ip_address:~ Here are some pointers about the command:
- You should replace port_number with 22 since it’s the default port number. However, if you changed it to a different number, then you need to use that instead
- You should replace file_name with the name of your file. You need to use the absolute (full) path if you’re not in the same directory as the file you want to transfer or else your device can’t find it.
- Note: you can use the tab key to autocomplete the file name. This is great for verifying that the system can locate your file. Plus, it reduces the chances of you messing up the name. Make sure you type out enough letters because the system won’t know which file you want if you only type out the letter ‘a’ and there are multiple files with that initial letter.
- You should replace destination_username with the username of the device you want to remotely access. You can identify this by looking at the first word before the @ symbol in your device’s terminal.
- You should replace destination_ip_address with the IP address of the laptop you want to remotely access.
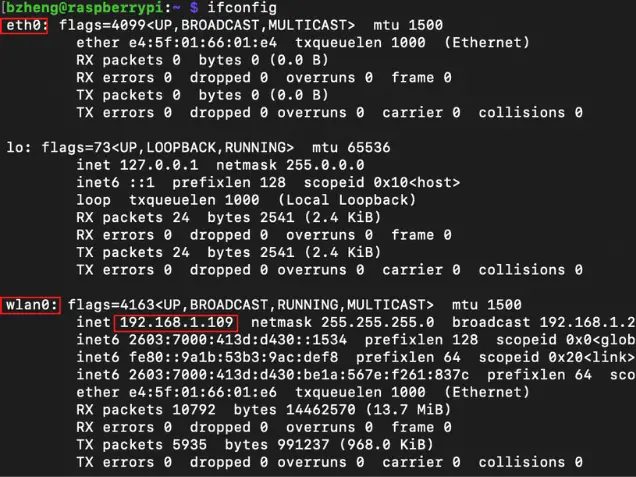
- If you don’t know your IP address, just type this in your Raspberry Pi terminal: ifconfig
- If ifconfig doesn’t work, then you’ll need to install the package that contains it with this command: sudo apt install net-tools
- The IP address will be next to wlan0 if your Internet connection is wireless or next to eth0 if you’re using an Ethernet cable to connect it to the Internet.
- If ifconfig doesn’t work, then you’ll need to install the package that contains it with this command: sudo apt install net-tools
- If you don’t know your IP address, just type this in your Raspberry Pi terminal: ifconfig
If you want to copy a directory, then use the -r option. Look at the following command (making sure to replace the necessary parts) for more information:
scp -r -P port_number directory_name destination_username@destination_ip_address:~ If you want to preserve the modification and access times for the directory you’re copying over, then make sure to add the -p option.
scp -rp -P port_number directory_name destination_username@destination_ip_address:~ Transferring Files From Remote To Local
In order to copy from remote device to local one, you’ll need to run this command:
scp remote_username@remote_ip_address:path_to_file destination_directoryMake sure to replace parts of the command with the appropriate names for your situation.
Here’s an example if I were to use this command:
scp bzheng@192.168.1.109:/etc/passwd Downloads/This is what my command is saying:
- My remote machine (Raspberry Pi) has a username that’s bzheng
- Its IP address is 192.168.1.109
- The file I want to copy into my computer is in /etc/passwd
- The location I want to find the file in on my computer is the Downloads folder
Transferring Files From Remote To Remote
In order to copy from remote device to another remote one, you’ll need to run this command:
scp username1@ip_address1:path_to_file username2@ip_address_2:destination_pathI’m distinguishing between the 2 remote devices with anything ending in 1 being the device you’re transferring files from and anything ending in 2 being the device you’re transferring files to.
2. Use Snapdrop
Snapdrop is an application you can install on your Raspberry Pi, and it lets you share files to devices on your local network. This application can be downloaded from Pi-Apps and is created by Botspot, the person who also created Pi-Apps.
Here is the process I’d use to do so:
- Open up your terminal.
- You’ll need to update your Raspberry Pi so that any application you install will be the latest version:
sudo apt update- Install Pi-Apps on your Raspberry Pi:
wget -qO- https://raw.githubusercontent.com/Botspot/pi-apps/master/install | bashNote: if you’re getting errors when installing Pi-Apps, then you’ll need to restart your system. If that still doesn’t work, then you’ll need to flash your Raspberry Pi’s SD card again and set it up from the start. This last method worked for me.
If you forgot how to flash your SD card with Raspberry Pi Imager or want to see how I approach it, take a look at my guide on a headless Raspberry Pi setup.
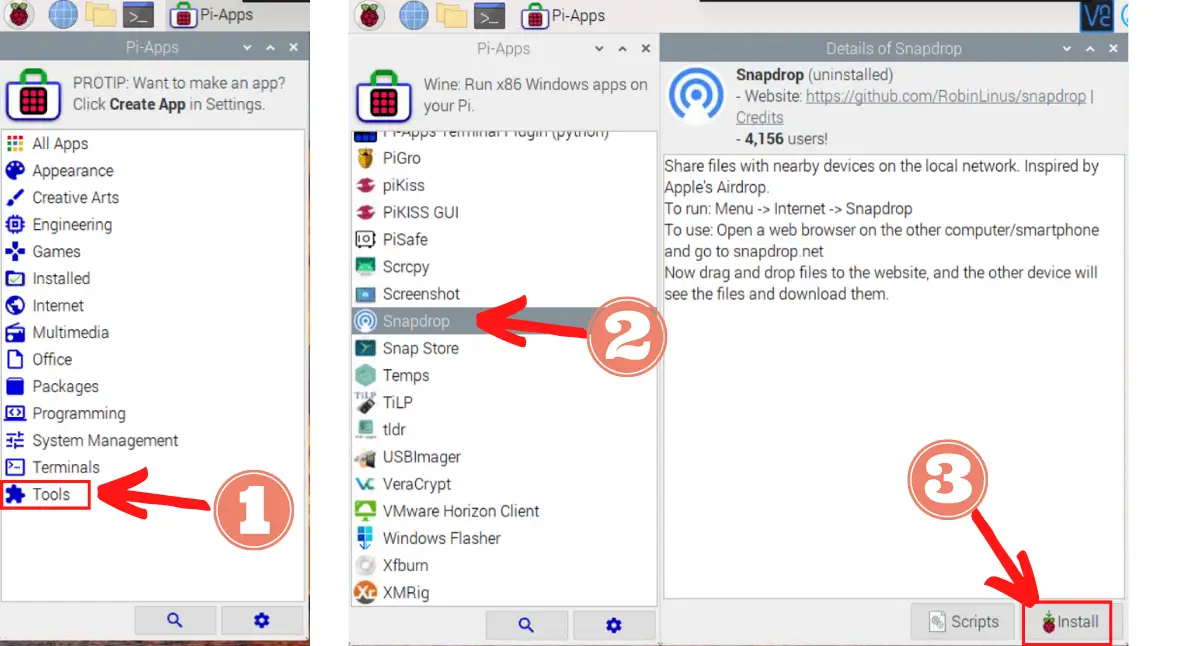
- Open up Pi-Apps. To do this, click on the Raspberry Pi icon (the start menu), Accessories, and Pi-Apps.
- Alternatively, you can run this command in the terminal to open it up: pi-apps
- After that, click “Tools” and “Snapdrop”.
- A new window will pop up and ask if you want to install Snapdrop. Click “Install”.
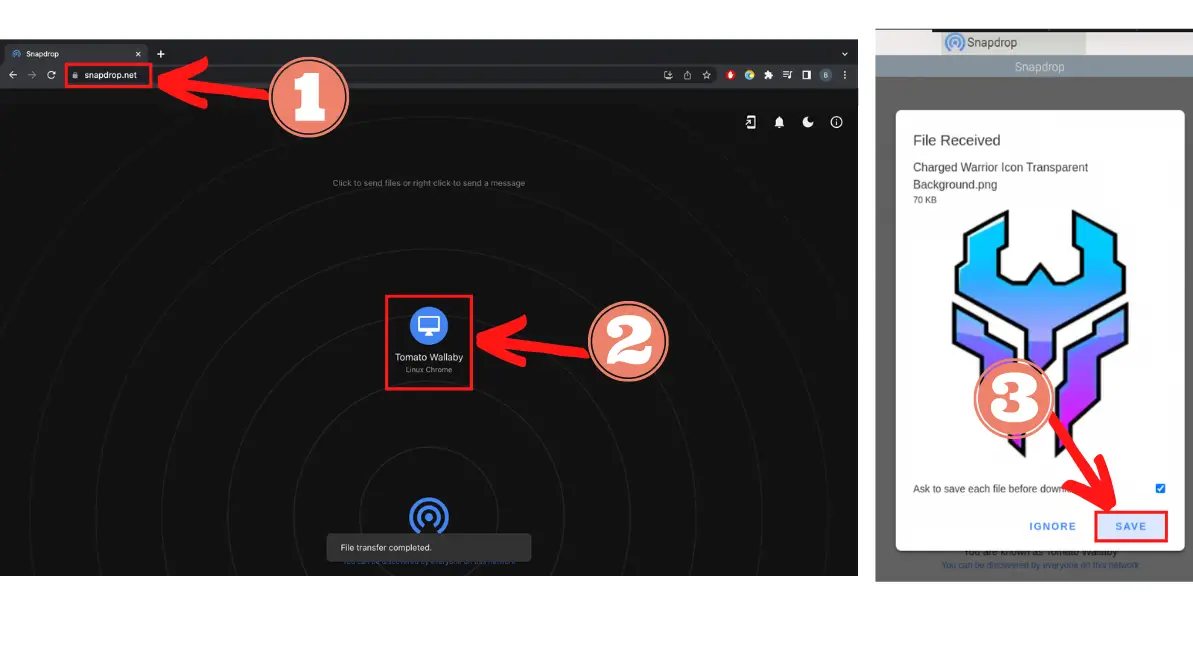
- Open up the app. To do this, open the start menu, click on “Accessories”, and click on “Snapdrop”.
- Open up a browser on your phone or laptop that you want to have the file
- Type in the following link in that browser: snapdrop.net
- Click on the blue icon with the desktop near the center of your screen
- Select a file you want to send
- Go back to your Raspberry Pi and your file should appear.
- Click the “Save” button
- You’ll most likely need to do this twice to confirm your decision
Of course, you can do it the other way around! Click blue icon on your Raspberry Pi, select a file, and you’ll see it appear on your computer!
3. Use FileZilla
FileZilla is an open source software that lets you transfer files between two devices. There are 2 ways you can use it because you can install it on either your laptop or your Raspberry Pi.
FileZilla On Laptop
Here is the process you should follow if you’re using FileZilla on your laptop:
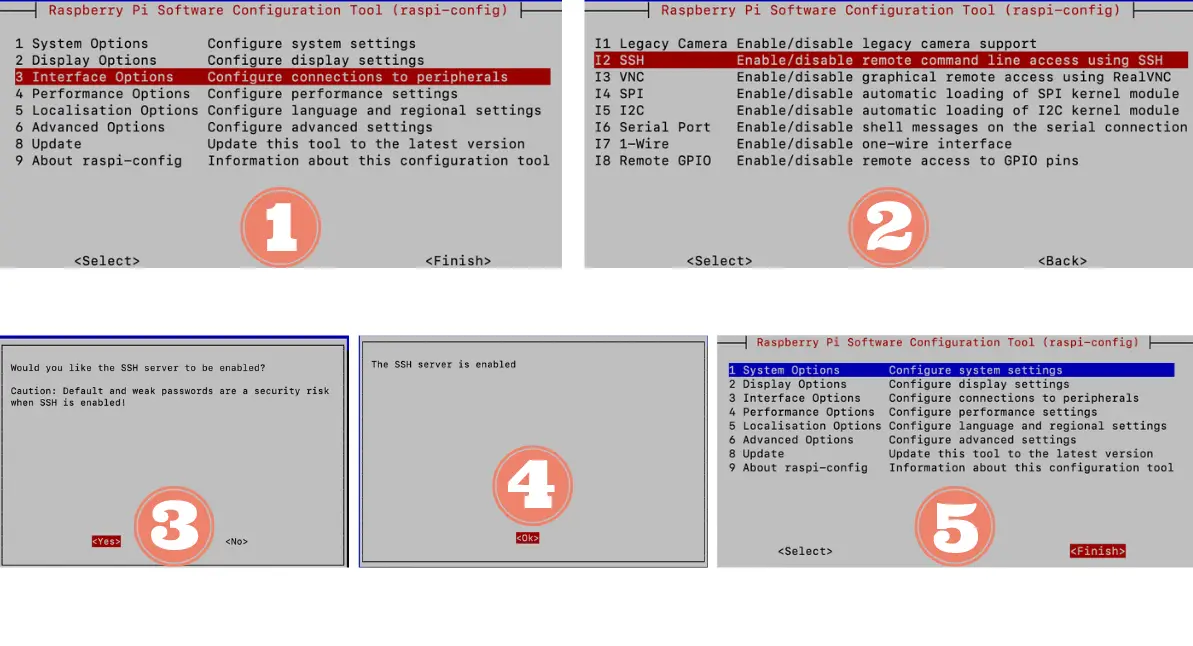
- Make sure SSH is enabled on your Raspberry Pi. To do that, follow these steps:
- Go to your terminal
- Type in the following command to open Raspberry Pi Configuration: sudo raspi-config
- Select “3 Interface Options”
- Select “I2 SSH”
- Select “Yes”
- Select “OK”
- Select “Finish” to exit
- Download FileZilla on your computer. You can install it here: https://filezilla-project.org/
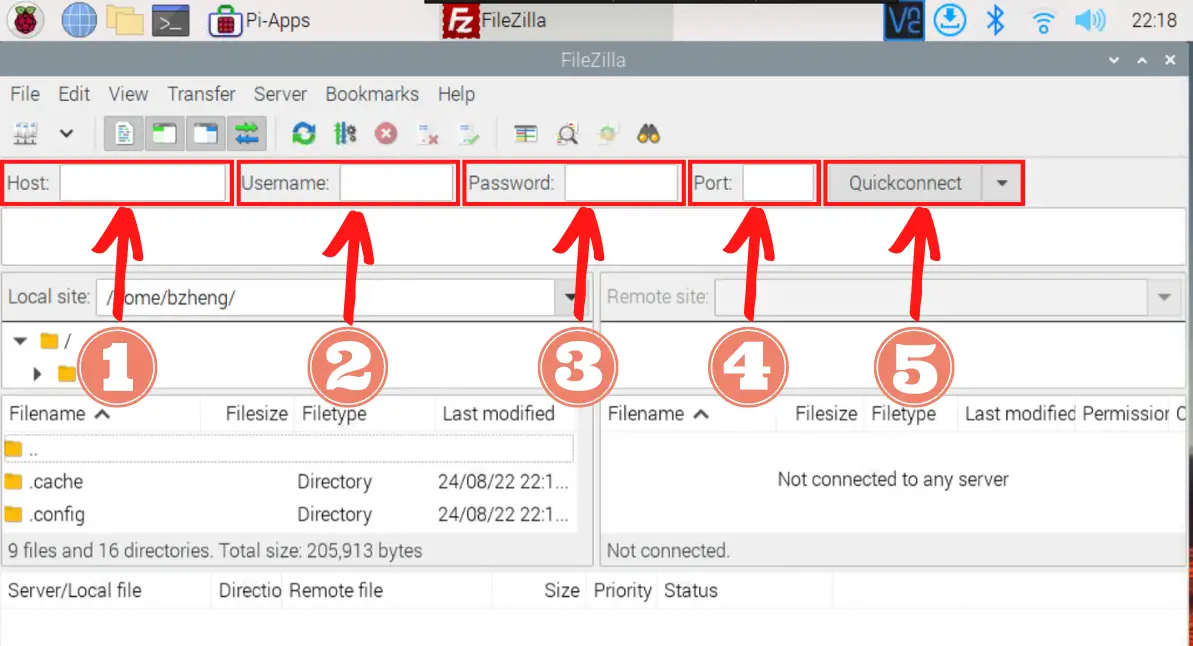
- Open FileZilla
- Type in your IP address in “Host”
- If you don’t know the IP address, you can use this command if you don’t want to search for it: hostname -I
- Note: that is a capital ‘i’ at the end of that command
- If you don’t know the IP address, you can use this command if you don’t want to search for it: hostname -I
- Type in your username in the “Username” section
- If you don’t know what it is, it’s the word before the @ sign in your Raspberry Pi terminal.
- Type in your Raspberry Pi’s password.
- If you didn’t create it, then the password will be raspberry by default.
- Type in the port number in “Port”. By default, that should be 22.
- Click the “Quick Connect” button. Now you can drag and drop files between your Raspberry Pi and your laptop!
FileZilla On Raspberry Pi
When you’re using FileZilla on your Raspberry Pi, the information you’ll need to fill in is about the device you’re going to SSH into (so the role is reversed).
To install FileZilla on your Raspberry Pi, do the following:
- Install Pi-Apps. If you haven’t already, look at the steps I mentioned previously.
- Open Pi-Apps
- You can do this by clicking on the Start Menu (which is the Raspberry Pi icon near the top left corner of your screen), then click on “Accessories”, and finally “Pi-Apps”.
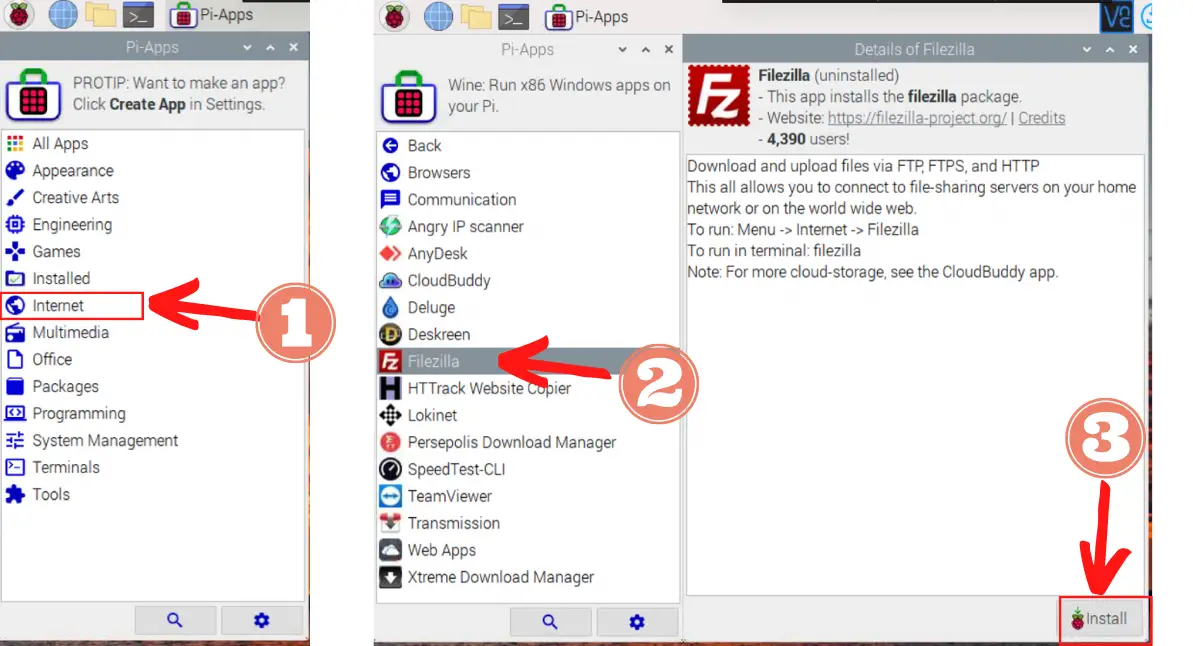
- Click on “Internet”
- Click on “FileZilla”
- Click on the “Install” button
- Now you can open it in one of two ways:
- Open your terminal and run this command: filezilla
- Open your Start Menu, click on “Internet”, and select “FileZilla”
- Fill in the information and connect
Summary – tl;dr (Too Long; Didn’t Read)
Here are the key takeaway points you should keep in mind after reading this article:
- You should use the scp command, FileZilla, or Snapdrop to transfer files
- In either of these cases, you’ll need to know the username, the IP addresses of the devices you’re remotely accessing, and even the port number.
Now that you know these techniques, you should file them away for future reference!