Getting Started With Raspberry Pi: Budget Guide
When I first started looking into Raspberry Pi, I was very naive and ran into a lot of obstacles. Consequently, this guide is directed towards those who are just starting out with Raspberry Pi and want to know what they can get. Moreover, I’ll be giving you great tips and advice on how to save money when buying Raspberry Pi and components.
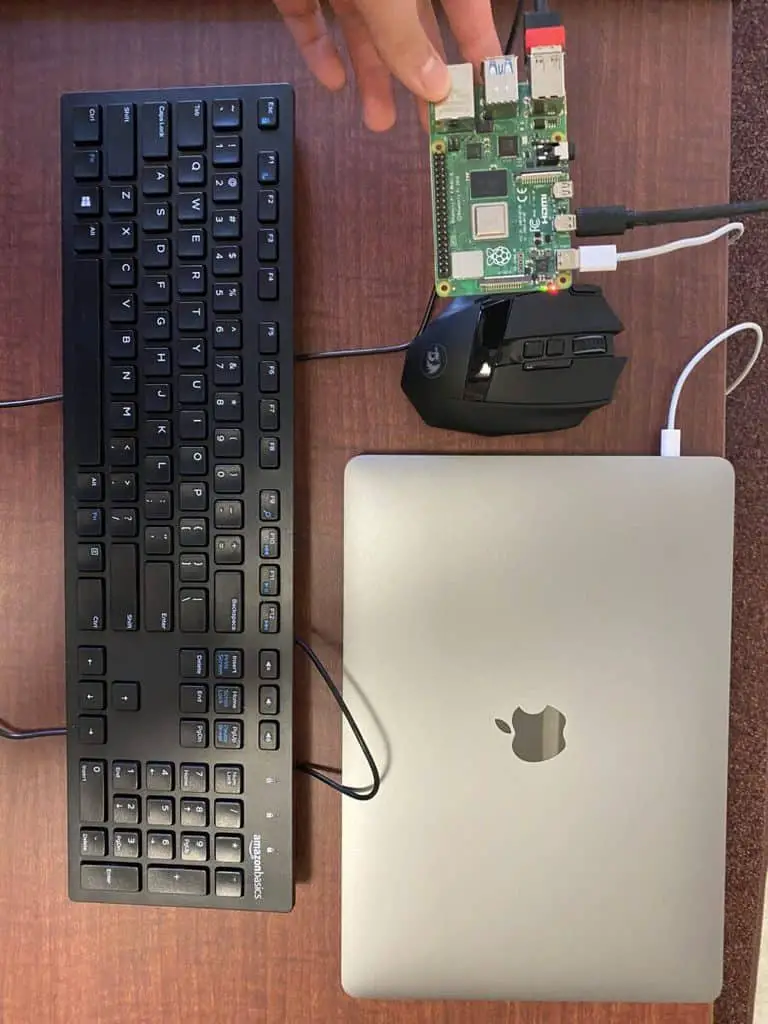
When I first started researching this, I thought all I needed to buy was the Raspberry Pi. Yet, after some more research, I found out that you needed peripherals to connect to the Raspberry Pi so that you can actually start working with it.
Consequently, you may be wondering: “What do you need to get started with Raspberry Pi?”
If you want to use a Raspberry Pi, you’ll need to buy a Raspberry Pi, a mouse, a display, a keyboard, an SD card, a cable to connect the Raspberry Pi to a display, a charger, and a case.
The case could be optional, but from what I’ve seen and heard, adding a case to your shopping cart would be a good decision because Raspberry Pis are fragile and you don’t want to let it break easily.
Raspberry Pi Starter Kit
If you want minimal work and get everything I mentioned above for just a click of a button, you can just search for a Raspberry Pi Starter Kit and buy the kit for approximately $130 (you can find one like this on CanaKit).
However, you most likely don’t need all these parts, so I’ll talk about what I did to get all my necessary components to start working with Raspberry Pi.
Supplies
Personally, I did some extra research to carefully choose the components I needed and didn’t have so that I could save as much money as possible.
Tip #1
For instance, I already had a mouse, so I didn’t need the one that came with the kit. From my experience, I’ve found that any mouse with a USB end or receiver can connect to the Raspberry Pi board, so you don’t need to waste time and go searching for a “mouse compatible with Raspberry Pi”.
Tip #2
Moreover, I didn’t need to spend more money for a charger for a Raspberry Pi since I found out that my iPad charger worked just fine. In fact, almost any charger with a USB-C end can adequately charge a Raspberry Pi.
You just need to make sure you’re powering your Raspberry Pi with at least 5.1 V or else this tip won’t work. Just like with any other device, if you don’t supply it with enough power, it won’t charge or work appropriately.
Tip #3
Another hack I used was saving money on a display by using a flat screen TV I had previously purchased. It had an HDMI port, so all I needed to buy was an USB to HDMI cable. Then, I could connect my Raspberry Pi to the TV without having to spend more money on an external display.
Tip #4
A final trick I used to save me money was 3D printing a case. The public library near me has a 3D printer open to the public, so all I needed to do was sign up for a time slot, pick a design, and print it.
I personally prefer this method because I could choose the design I liked and the color scheme rather than relying on a manufacturer.
I went to the website all3dp, which has 50 cool designs you can choose from.
I even created a little table to see how much I would save compared to buying a kit:
| Raspberry Pi Components | Price |
|---|---|
| Raspberry Pi | $34 |
| SD card | $10.95 |
| Keyboard | $10.52 |
| USB to HDMI Cable | $7.99 |
The total for buying all the necessary components to start using a Raspberry Pi is $63.46. Compared to the official Raspberry Pi kit that costs around $130, I saved approximately $67.
For those who don’t have the same resources as me, here are some of the components that you’ll need if you were to buy all your parts separately:
| Raspberry Pi Components | Price |
|---|---|
| Raspberry Pi | $34 |
| SD card | $10.95 |
| Raspberry Pi Case | $6.99 |
| Mouse | $9.98 |
| Keyboard | $10.52 |
| USB to HDMI Cable | $7.99 |
| Raspberry Pi Charger | $9.99 |
The total amount you’d need to pay for everything here is only $90.42, which is approximately $40 cheaper than the kit. You could always save more if you already have one or more of these parts.
There are some kits that include a book that teaches you how to use a Raspberry Pi. My solution to this is to go to your local library and check out some Raspberry Pi related books.
If you want a book other than guide that comes in the Raspberry Pi set, here are my top three picks:
- Programming the Raspberry Pi 2nd Edition: Getting Started With Python
- DK Workbooks: Raspberry Pi Workbook
- Raspberry Pi Cookbook
The first book is a must-have for those lacking programming experience and knowledge. It goes into more of the nitty-gritty details of programming with Python, which is easier to learn and use compared to the other programming languages.
However, even if you know another programming language that’s applicable to Raspberry Pi, you can still peruse this book to see the different types of projects they have and write the corresponding code in your preferred language.
The second book is a great tool for younger audiences like children. As the name suggests, there are a lot of projects you can go through in addition to teaching basic Raspberry Pi concepts. Moreover, every time you finish a project, you can access a testing manual at the end of each project to improve your coding knowledge.
The third book is geared more towards adults and is great for everyone regardless of their experience. When you read this book, you’ll gain experience on interfacing different boards and utilizing different software libraries. The last part can be very important if you want to learn how to use sensors, motors, or other hardware devices on your Raspberry Pi.
Summary – tl;dr (Too Long; Didn’t Read)
Here are some of the main points you should keep in mind after reading this article:
- In order to use a Raspberry Pi, you’ll need a Raspberry Pi, a USB to HDMI cable, an SD card, a charger, a mouse, a display, a keyboard, and a case.
- You can always save money by 3d printing a case.
- You can also save money by using any USB-C cable to charge your Raspberry Pi (like the one that comes with iPads or MacBook).
- My top book picks for learning Raspberry Pi are:
- Programming the Raspberry Pi 2nd Edition: Getting Started With Python
- DK Workbooks: Raspberry Pi Workbook
- Raspberry Pi Cookbook
If you want to gift a Raspberry Pi to your children or young individuals, then you should check out my guide on what age children should start working with Raspberry Pi. I also include more information on what projects they can create with a Raspberry Pi in addition to some other kid-friendly tips!
I hope you’ll be able to set up your Raspberry Pi journey after reading about my own setup.