Top 7 Ways To Install Apps On Raspberry Pi + Download Tips!
When I started using my Raspberry Pi more frequently, I realized I needed some applications that weren’t pre-installed on this mini computer. Like many other users, I needed to find a way to install programs on my Raspberry Pi.
To my dismay, I realized there wasn’t only one action I could perform to install all and any app I wanted. Therefore, through my extensive testing and repeated failures, I’ve gleamed the most comprehensive methods I could use to install most of the apps I wanted.
There are 7 methods you can follow to install an app on your Raspberry Pi:
- Download and use Pi-Apps
- Utilize the pre-installed Add/Remove Software
- Go to your terminal and use dpkg
- Use apt in your terminal
- Install a package manager (like Synaptic) to download apps
- Download from Github repositories
- Perform source code compilation
These approaches may not be the most detailed so far, so I want to dedicate the rest of this article to explaining how you can successfully perform each of them.
How Do You Install Applications On Raspberry Pi?
1. Use Pi-Apps
Raspberry Pi did attempt to make an app store for their users called Pi Store. Sadly, it was discontinued around 2015, so it’s not possible to use or install it today.
However, you can use Pi-Apps, which is an open-source collection of apps that you can install and run quickly thanks to the installation scripts it possesses. It was created by Botspot, a prominent user who also created a countless number of applications for the Raspberry Pi.
You can think of Pi-Apps as a Play Store for Android phones or the App Store for Apple devices (like Macbook, iPad, or iPhone). You can install popular apps like Discord, Arduino IDE, Minecraft, or even Zoom.
So, if you want to install these apps and more, you should follow these steps:
- Open up your terminal. You can do this by using the keyboard shortcut CTRL + WINDOWS KEY + T (or CTRL + COMMAND + T if you’re a Macbook user).
- Alternatively, you can click on the terminal icon near the top left corner of the screen. It looks like a blackboard and it’s near the Raspberry Pi icon (which is the start menu).
- You’ll need to update your Raspberry Pi:
sudo apt update- Install Pi-Apps on your Raspberry Pi:
wget -qO- https://raw.githubusercontent.com/Botspot/pi-apps/master/install | bashNote: if you’re getting errors when installing Pi-Apps, then you’ll need to restart your system. If that still doesn’t work, then you’ll need to flash your Raspberry Pi’s SD card again and set it up from the start. This last method worked for me.
If you forgot how to flash your SD card with Raspberry Pi Imager or want to see how I approach it, take a look at my guide on a headless Raspberry Pi setup.
- Open up Pi-Apps. To do this, click on the Raspberry Pi icon (the start menu), Accessories, and Pi-Apps.
- After that, choose a specific category if you have an app in mind you want to download and you know where it’s stored. If not, you can always browse around by clicking on “All Apps”.
- If you do click on an app to install, a new window will pop up and ask if you want to install it. Click “Install” to do so.
- Now, you’ll need to click on the start menu (Raspberry Pi logo) again.
Do note that some of the apps in Pi-Apps are not the official ones created by the companies themselves. For instance, when you install Discord, you’re actually installing Webcord, which is a lightweight app that will take you to the Discord interface.
If you want to see this process in action with pictures, then you should consider checking out my guide to installing Discord on a Raspberry Pi.
2. Use The Add/Remove Software
This is a software built into the Raspberry Pi, so all you need to access it is to do the following:
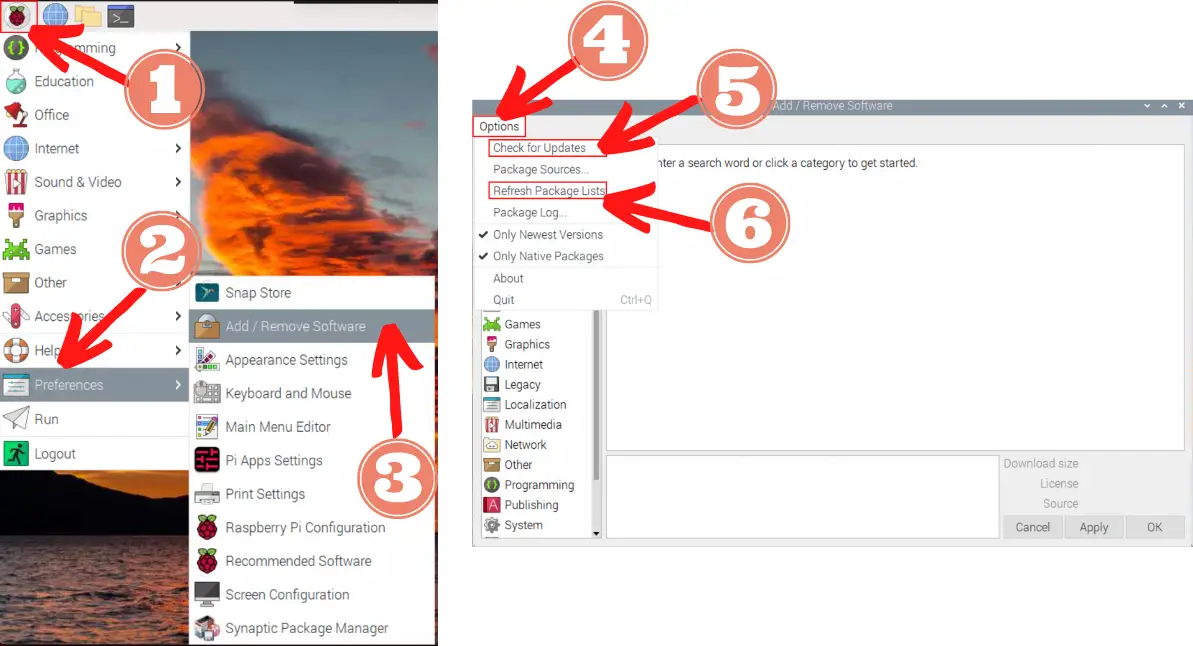
- Open the start menu (by clicking on the Raspberry Pi logo on the top left corner of the screen)
- Click on “Preferences”
- Select “Add/Remove Software”
- But before we install anything, we want to update our system. That way, we can be certain that anything we install will be the most recent. I’d highly recommend you do this every time before you install an app.
- Click on the “Options” button near the top left corner of the window.
- Select “Check For Updates”
- This will compare the app versions on your system with those in their respective repository. If the versions don’t match, that means there’s a newer version in the repository, so the system will pull that and update the applications.
- Select “Refresh Package List”
- This will sync the files in the repository with your local file (which the previous step didn’t do). The Add/Remove software checks the local file and not the online one.
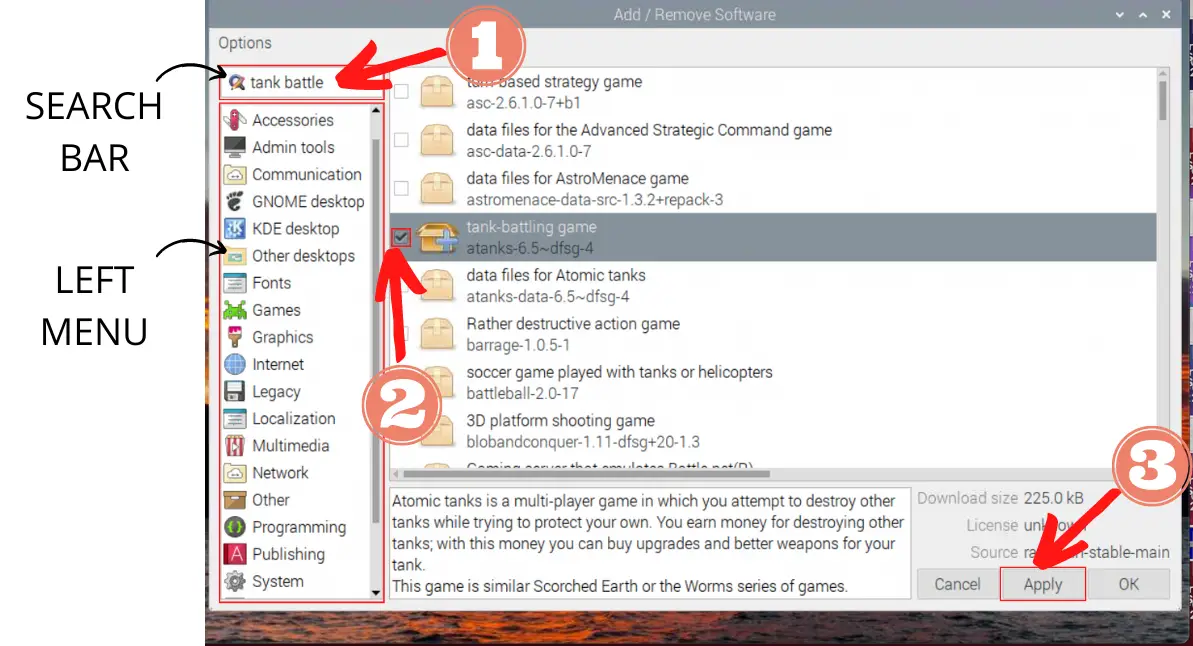
- Choose an application to install
- You can do this by clicking on the categories on the left menu. However, if you have no idea where something is located, you can always use the search function by typing in the search bar above the left menu.
- Check the box next to the application you want to install
- Click the “Apply” button, and your app will start downloading. You can always look for it in the start menu (which is the Raspberry Pi logo)
3. Use Debian Package Manager (DPKG)
Most application on Linux system are open source.
We are provided with the source file of the application, so in order to run it on our platform, we have to either compile the sources or install it from a binary package. This is an application package that contains executables, as opposed to source code.
The executables are the outcomes of the compilation process. Deb is the installation package format used by all Debian based distributions (it’s an archive that contains other files including the executable application that was already compiled).
Dpkg provides the low-level infrastructure for package manager (unlike apt, which is a high level infrastructure). Low-level means it’s more computer friendly whereas high-level means it’s more human friendly.
Consequently, if you want to install packages, you’ll need to download the .deb file from the website and follow this syntax:
sudo dpkg -i <name of .deb file>You can install more than one .deb file by using a space separated list:
sudo dpkg -i deb_file_1 deb_file_2 deb_file_34. Use Advanced Packaging Tool (APT)
An APT repository is a web server that contains a collection of packages with metadata that is readable by the apt tool. Simply put, apt is a collection of tools that can install, remove, update, and other ways you can manage software.
It’s the recommended way to manage software packages on Ubuntu and other Debian based distribution (such as Raspberry Pi).
Unlike dpkg, apt does not understand .deb files. It works with packages that are downloaded from repositories and calls dpkg directly after downloading the .deb archives.
The general syntax for apt is as follows:
apt <option> <action>The “option” is an additional feature you can add to the command and is optional. For instance, you can use the -v option to see the version of an app.
The “action” is what you want to do to the package database (like installing a program or deleting it).
Note: If you want to learn more about apt, its options, and the potential actions you can use, type in your terminal:
man apt
Most of the time, you’ll need to add the sudo command before apt because you’re writing and/or changing the package database. Sudo gives you root access, which is only granted to the superuser (also known as the person in charge of the system). In this case, you should have sudo access, if you know the password to your Raspberry Pi.
Here is the general process you should follow if you want to install an application on your Raspberry Pi:
- Open the terminal
- Update your system:
sudo apt update- Install an application with this syntax (replacing anything inside the greater than and less than signs):
sudo apt install <program name>You can install more than 1 program by using a space separated list:
sudo apt install program_1 program_2 program_35. Use Synaptic
If you want an alternative to apt, I would also recommend Synaptic. This is a program manager that has a friendly and easy to use Graphical User Interface (GUI).
In order to install it, you’ll need to do perform the following steps:
- Open up your terminal. You can do this by using the keyboard shortcut CTRL + WINDOWS KEY + T (or CTRL + COMMAND + T if you’re a Macbook user).
- Alternatively, you can click on the terminal icon near the top left corner of the screen. It looks like a blackboard and it’s near the Raspberry Pi icon (which is the start menu).
- Install Synaptic on your Raspberry Pi:
sudo apt-get install synaptic -yNote that the -y option means that whenever a yes or no prompt appears, we want the terminal to automatically answer yes for us
- Open Synaptic:
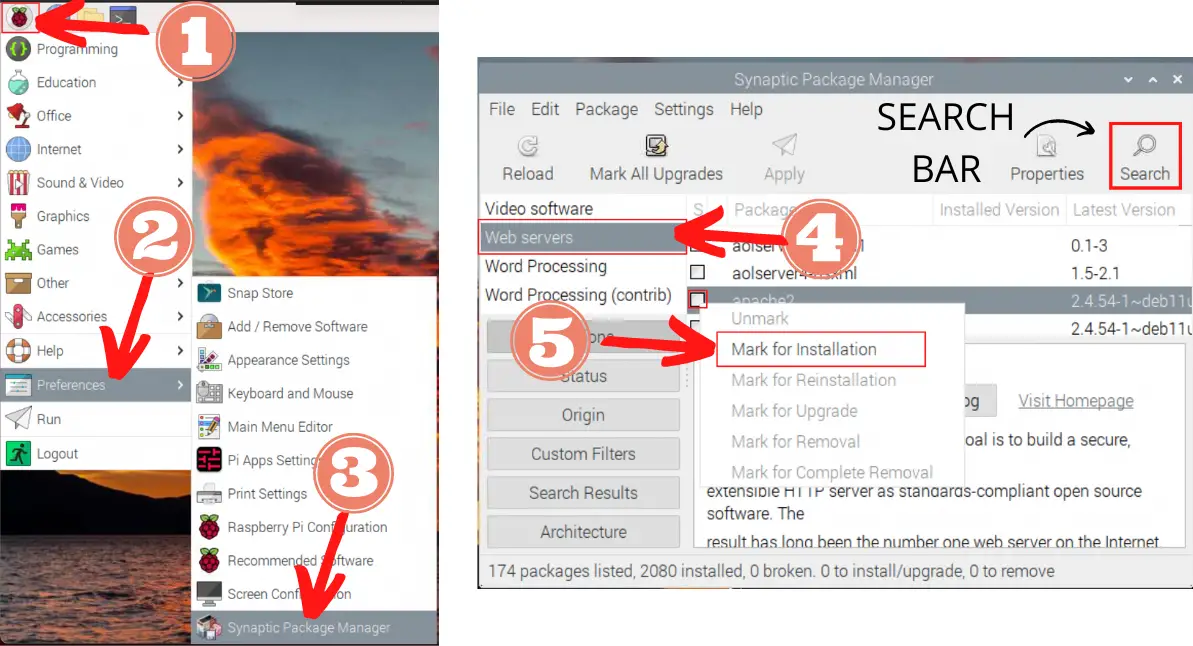
sudo synapticThe other way you can open synaptic is by opening the start menu (which you can do by clicking on the Raspberry Pi icon near the top left corner of the screen), clicking on “Preferences”, and selecting “Synaptic Package Manager”.
Moreover, if you want to store it on your desktop as a shortcut, then instead of left-clicking on “Synaptic Package Manager”, you should right-click on it. This will open a new window with options to choose from. On that window, select “Add to desktop”.
Once again, if you haven’t seen or used Synaptic before, you can always explore it by clicking on the selection on the left or searching for something particular you have in mind by clicking on the magnifying glass icon near the top right corner.
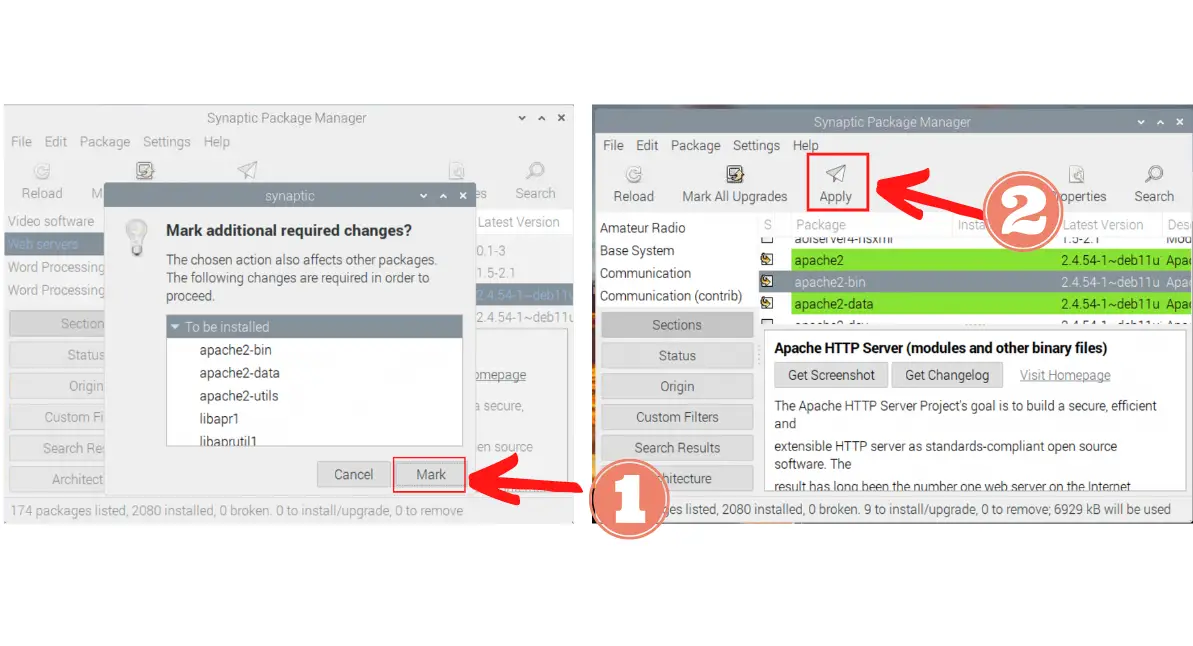
Once you have chosen something you like, you will need to check the box next to the package and choose the “Mark for installation” option.
A new window will pop up and tell you the additional changes that will need to be made to other programs if you choose to install the selected program. If you feel comfortable, press the “Mark” button.
Finally, you can click on the Apply button (which is the paper airplane icon), which will open a new window. Click “Apply” again on this window to confirm your decision.
6. Using Repositories
In the rare instances that all of the previous methods don’t work for you, you can always go to the program’s repository and install it from there.
Usually, the developers will include installation instructions in their ReadMe file, which should be near the end of their Github repository.
Thus, this is the most general advice I can give because each case can vary from repository to repository.
7. Using Source Compilation
This is neither the most common method nor the most preferred method. As a result, I’d highly recommend you install applications from package managers like Synaptic before trying this option.
Here is the fastest way (I’ve found) to compile software from source code:
- Copy the website link that contains the source code of the program you want to install
- Open a terminal
- Type in the following command (replacing anything website_link with the link you copied in step 1):
wget website_link- Extract the archive:
tar -xzvf file_name- Move into the extracted file’s directory:
cd directory_nameNote: you can find the directory name by using the command: ls. This stands for list and will list out all the names of the files and directories in your current directory. You should be able to recognize the directory you want to move into.
- Compile the code:
./configure --prefix=/opt/current_directory_name && make && sudo make installWhat Are Some Application Alternatives On Raspberry Pi?
Of course, not everything you want to be an app on the Raspberry Pi is one. Therefore, you’ll need to look to a catch-all solution that can provide you with the same fix.
When I looked into this, I found 2 great solutions: nativefier and the main menu editor. Nativefier is a software you’ll need to install whereas the main menu editor is a feature pre-installed on your Raspberry Pi.
Both will require you to input a website link, but after that, it will create an app shortcut which will take you directly to the site.
If you want to learn how to do this yourself, I created an extensive guide that you should check out, which is “Can You Create Desktop Shortcuts On Raspberry Pi? 2 Easy Ways!”
Summary – tl;dr (Too Long; Didn’t Read)
Here are the key takeaway points you should keep in mind after reading this article:
- You can install apps on your Raspberry Pi by using:
- Pi-Apps
- Add/Remove Software
- DPKG
- APT
- Synaptic
- Repositories
- Source Code
- It’s always best to update your system first to make sure that you install the latest versions of the applications you want
- If none of these methods work for the app you want to install, you can always try creating your own using nativefier or the main menu editor on your Raspberry Pi
In the end, I hope you’ve found this latest Raspberry Pi article install-ment to be helpful and detailed.