Top 3 Ways To Find & Solve Changing IP Address On Raspberry Pi
When I first started using SSH and VNC to connect to my Raspberry Pi, I was a little frustrated. If you didn’t know, SSH and VNC required an IP address to use, but I needed to identify it every time I wanted to powered on my Raspberry Pi and needed to use it.
One of the main questions I had was: “How do I find the IP address on my current Raspberry Pi?”
There are 3 easy ways you can use to find the IP address. One way is to hover your cursor over the Wi-Fi icon. The second way is to go to the terminal on your Raspberry Pi and use the ifconfig command. The last way is to use the ping command on a separate computer.
Another question I had after doing this so many times was: “How do I stop the IP address from changing on my Raspberry Pi?”
There are 3 ways you can make your IP address static. One way is to edit the dhcpcd.conf file. Another way is to change the “Wireless and Wired Network” settings. The third way is to configure your router so that it saves the IP address for a specific MAC address (namely your Raspberry Pi).
In case you feel lost on how you can implement these methods, the rest of this guide will dissect each one and provided images (if possible) to help you better understand.
What’s An IP Address?
IP address (which stands for Internet Protocol address) is a unique string of numbers separated by periods that can identify a device on the network or Internet.
You can think of it as the mailing address you’d put on an envelope. IP addresses allow computers on the network to communicate with each other, similar to how you and a pen pal can communicate through letters via mail.
There are 4 types of IP addresses: dynamic, static, private, and public. However, you should only worry about dynamic and static IP addresses for this article.
Dynamic IP addresses are temporary and will change over time. On the other hand, static IP addresses will never change once you assign it.
Why Do You Need IP Address To Be Static?
An IP address can be sought after because it makes it easier for users to use SSH (secure shell) or VNC (Virtual Network Computing). SSH lets you access the terminal of the Raspberry Pi from the terminal of a different computer and VNC lets you access its GUI (Graphical User Interface), which means the laptop becomes the ‘screen’ for the Raspberry Pi.
More generally, laptops and desktops get their IP address assigned to them by a DHCP (Dynamic Host Configuration Protocol) server.
DHCP servers can automatically set IP address, which can be the Wi-Fi router in many people’s cases. However, the server requires a static configuration to avoid the single point of failure problem of using the DHCP server.
Still, it isn’t recommended for everyone to make their IP address static since it’s easier for hackers to access.
How To Find Your Current IP Address On Raspberry Pi
I want to show you how to find your IP address so that you can check it after you changed it.
Consequently, I’ve compiled 3 easy, completely different ways you can locate the IP address on your Raspberry Pi without having to install any software or work too hard for it.
1. Hover Over Wi-Fi Icon
If you have access to your Raspberry Pi and can see its display, then the simplest way you can identify the IP address on your Raspberry Pi is by hovering your mouse over the Wi-Fi icon.
It is near the top right corner of your screen:
As you can see, there is no IP address next to eth0, but there is one next to wlan0. This happens because I don’t have an ethernet cable connected to my Raspberry Pi, but I do have it connected to a wireless network.
You can also disregard the forward slash (/) and the numbers that come after it. For instance, if someone were to ask me what my IP address was on my Raspberry Pi, I’d just saying “192.168.1.109” and ignore the “24”.
The numbers succeeding the IP address is known as the network mask (also known as the subnet mask), and its main purpose is to narrow down the location. For example, you can think of the IP address as the mailing address and the network mask as the apartment number.
2. Use Ifconfig
The ifconfig, which is short for interface configuration, is a system administration tool that can used to assign, configure, or display network interface configuration information.
It should come pre-installed with your Raspberry Pi OS (operating system), but in case it doesn’t and you get an error message, you can install it with net-tools. Here is the process for installing it:
- Open the terminal. You can do this by using the keyboard shortcut CTRL + WINDOWS KEY + T (or CTRL + COMMAND + T if you’re a Macbook user).
- Alternatively, you can click on the terminal icon near the top left corner of the screen. It looks like a blackboard and it’s near the Raspberry Pi icon (which is the start menu).
- Update your system. Doing this will make sure we pull the latest version of the net-tools package.
sudo apt update- Install net-tools:
sudo apt install net-toolsNow, to use the ifconfig command, just type this in the terminal:
ifconfigThis is what you should see:
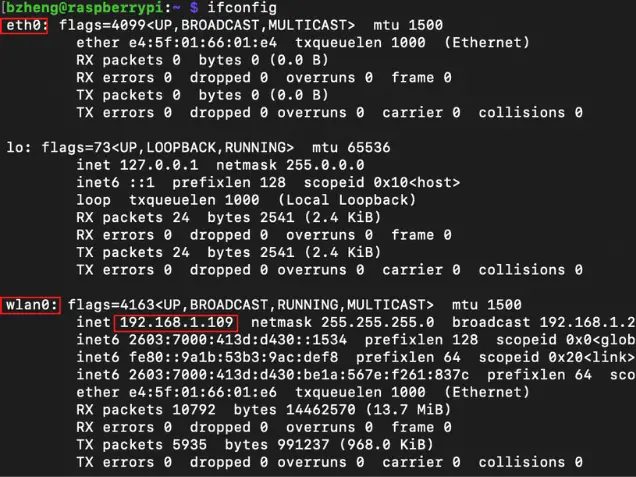
The main things you should focus on are the “eth0” section (if you have an ethernet connected to your Raspberry Pi) and the “wlan0” section. As you can see, if you are properly connected to one of these devices, the IP address should appear next to the work “inet”.
3. Use Ping
The ping command sends packets (like small chunks of data) over the network (like the Internet) to a destination. When it receives an echo request packet, the destination will respond with an ICMP (Internet Control Message Protocol, which is a network layer protocol) echo reply.
All you need to know about the ping command is that you can run the command on a different computer and still be able to find the IP address of the Raspberry Pi. This is great if you don’t have a screen set up for the Raspberry Pi and want to use SSH to access its terminal from your laptop.
Granted, this only works for computers that run on macOS (like Macbooks), so if you have a Windows laptop, don’t worry. I’ll show you the alternative command you can run.
All you have to do is go onto your Macbook and do the following:
- Open up the terminal. You can do this on the Macbook by using this keyboard shortcut: Command + Spacebar. Spotlight search should pop up, and you just need to type in the word “terminal” & hit the enter key
- Type the ping command:
ping raspberrypiThis is what you should see:

This will go on forever unless you interrupt the process. To do that, use the keyboard shortcut: CTRL + C.
Let me break down what’s happening so you can better appreciate the beauty of this command:
- 64 bytes is the package size
- icmp_seq = 1 is the number of packets. You can use this to detect issues with better routing.
- Each number means that each packet is taking a different route
- ttl is the time to leave value in the received packets. More specifically, it’s number of hops between the source and destination
- time is the roundtrip time (rtt) needed for the packet to reach the remote host and the response to return to the sender. Generally, the smaller the value, the better. Here are some guidelines:
- If the time value is less than 30 milliseconds (ms), it is excellent
- If the time value is between 30 and 50 milliseconds, it is average but ok
- If the time value is between 50 and 100 milliseconds, it is somehow slow
- If the time value is greater than 100 mililiseconds, then this is a slow response and you can’t run real time applications
- As a side note, ping waits 1 second before sending a packet
If you’re a Windows user, open up your terminal from the start menu and type in the following command:
nslookup raspberrypiHow To Set A Static IP Address On Raspberry Pi
1. Edit The DHCP File
This method is great for those who can only access the terminal (for instance, SSH). All you need to do is edit the dhcpcd.conf file.
If you want to learn how to set up SSH on your Raspberry Pi and the tips and tricks I’ve accumulated from working with it, then you need to check out my SSH guide for the Raspberry Pi!
The DHCP file gets information from the DHCP server, such as the IP address, and it can automatically handle the network interface configuration.
- Open your terminal
- Identify your IP address (so you can check later at the end to make sure it’s changed or stayed the same). You can use one of the strategies I mentioned above.
- Open the dhcpcd.conf file:
sudo nano /etc/dhcpcd.conf- Copy (CTRL + C) the following code and paste it (CTRL + V) at the very beginning of the file. Make sure to replace “IP Address” with the IP address you want.
interface wlan0
static ip_address="IP Address"
static routers=192.168.1.1
static domain_name_servers=8.8.8.8- Now, save and exit the file. To do that, press CTRL + X, hit the ‘y’ key, and press enter.
- To make sure this goes into effect, reboot your system:
sudo reboot- Now, check the IP address by using one of the aforementioned methods. It should be changed now.
From this point on, any time your Raspberry Pi connects to a Wi-Fi router, it will assign the IP address you just named.
This method will work only for those who want to change the IP address of the Wi-Fi router. If you want to change the Ethernet’s IP address, then you’ll need this code in the dhcpcd.conf file instead:
interface eth0
static ip_address="IP Address"
static routers=192.168.1.1
static domain_name_servers=8.8.8.8
2. Use The Desktop Graphical User Interface (GUI)
If you have access to the Raspberry Pi’s desktop (either through VNC or through another monitor), then you should use this method as it’s more user friendly. Here is the process:
If you want to learn more about VNC and how you can set it up for your Raspberry Pi, then you need to check out my guide on setting up a headless Raspberry Pi!
- Right-click on the Network icon. It should be near the top right corner of the screen
- Select ‘Wireless & Wired Network Settings”
- A new window will open called “Network Preferences”. Make sure the “interface” option is selected.
- Choose either eth0 (which is wired) or wlan0 (which is wireless)
- Type in the IP address you want
- Type in the Router IP address (which should be 192.168.1.1)
- Type in the DNS IP address (you can set it to Google’s public DNS IP address, which is 8.8.8.8)
- Click the “Apply” button
- Restart the system. You can go to the terminal and type:
sudo reboot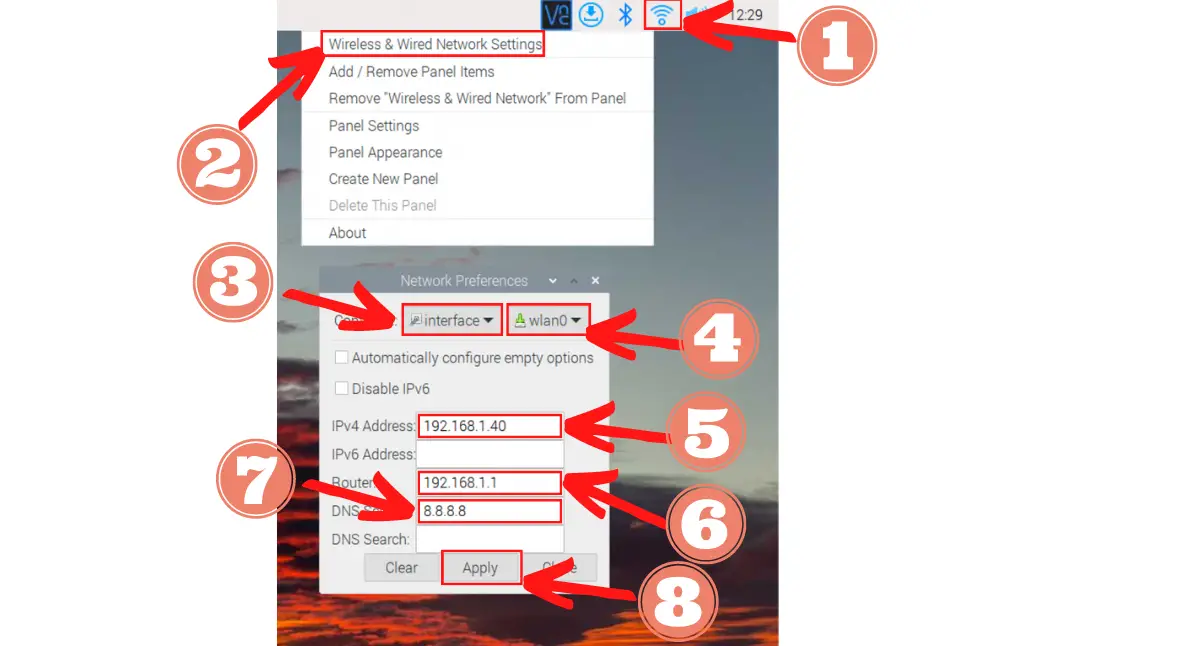
3. Configure Your Router
This method only works if you have access to your router. It is possible (and in some cases, even easier) to reserve an IP address on the router and have it only hand it out to your Raspberry Pi when it recognizes that device.
Yet, because there are many different types of router on the market, I can’t really walk you through, step-by-step, how you can configure your router to do so.
Generally speaking, you’ll need to create a reservation on your router.
To do that, you will need to know the MAC (Media Access Control) address of the Pi. Depending on how you’re connecting to the Internet, you have to decide between ether a wired or wireless version of the MAC address.
In order to find the MAC address, you can do the following:
- Open your terminal
- Type in the following command:
ip link showThe MAC address should be after the word “ether”
- Alternatively, you can type in this command and find the MAC after the word “ether” too:
ifconfigOf course, like the other methods, you’ll need to decide on an IP address that will be static and assigned to your Raspberry Pi.
Once you get that all set up, the router will always store and distribute the specified IP address to the device with the corresponding MAC address.
If you want to learn more about the MAC address, other methods to locate it, and how you can change it every time you log onto your Raspberry Pi, then you need to check out my guide on MAC addresses!
Summary – tl;dr (Too Long; Didn’t Read)
Here are the key takeaway points you should keep in mind after reading this article:
- IP addresses allow computers to interact with each other
- Making your IP address static can make it easier for you to use SSH and VNC to access your Raspberry Pi
- The 3 ways you find the IP address are:
- Using the ifconfig command
- Using the ping command
- Hovering over the Wi-Fi icon
- The 3 ways to make an IP address static are:
- Editing the DHCP file
- Using the Wireless and Wired Network settings
- Configuring the router
In the end, I hope these strategies make you ec-static to learn more about networking and Raspberry Pi!