Easiest Way To Set Up Ubuntu On Raspberry Pi Without Display
I first started getting into Ubuntu because I wanted to start learning Linux. Ubuntu is free to use, very secure, and very aesthetically pleasing. Consequently, I wanted to use it on my Raspberry Pi.
There are lots of guides on the Internet that’ll teach you how to set up an Ubuntu environment on your Raspberry Pi with the necessary peripherals (like mouse, keyboard, and monitor). However, I didn’t purchase a monitor, so those guides (as straightforward as they were) were of no use to me.
What I needed was to figure out how to implement Ubuntu using a headless setup (meaning without a monitor, mouse, or keyboard). Sadly, I couldn’t find any resources whose method would work for me, so I experimented and found the simplest way of setting up Ubuntu on my device without any displays.
In order to setup up Ubuntu on your Raspberry Pi using only your laptop, you’ll need to follow these steps:
- Install & Configure Your Raspberry Pi Imager
- Configure Password, Wi-Fi, & Additional Settings
- Write Ubuntu Server to SD Card
- Install VNC Viewer On Your Laptop
- Insert SD Card Into Raspberry Pi
- Identify Raspberry Pi’s IP Address
- SSH Into Raspberry Pi
- Install Ubuntu Desktop
- Install RealVNC Server
- Run Raspi-Config & Use VNC
Don’t worry if you don’t know how to implement all these steps. The rest of this article will dissect each step in much further detail and provide images (when necessary).
Headless Set Up For Ubuntu On Raspberry Pi
1. Install & Configure Your Raspberry Pi Imager
You will first need to go to the official Raspberry Pi website and download the imager: https://www.raspberrypi.com/software/. This will largely depend on the operating system (OS) your computer is running. For instance, I have a Macbook, so I will download the version suited for macOS.
The reason we need to have this installed is so that we can install the Ubuntu server onto your SD card (or microSD card), which is later needed by your Raspberry Pi.
Once you have installed it, you can open it up.
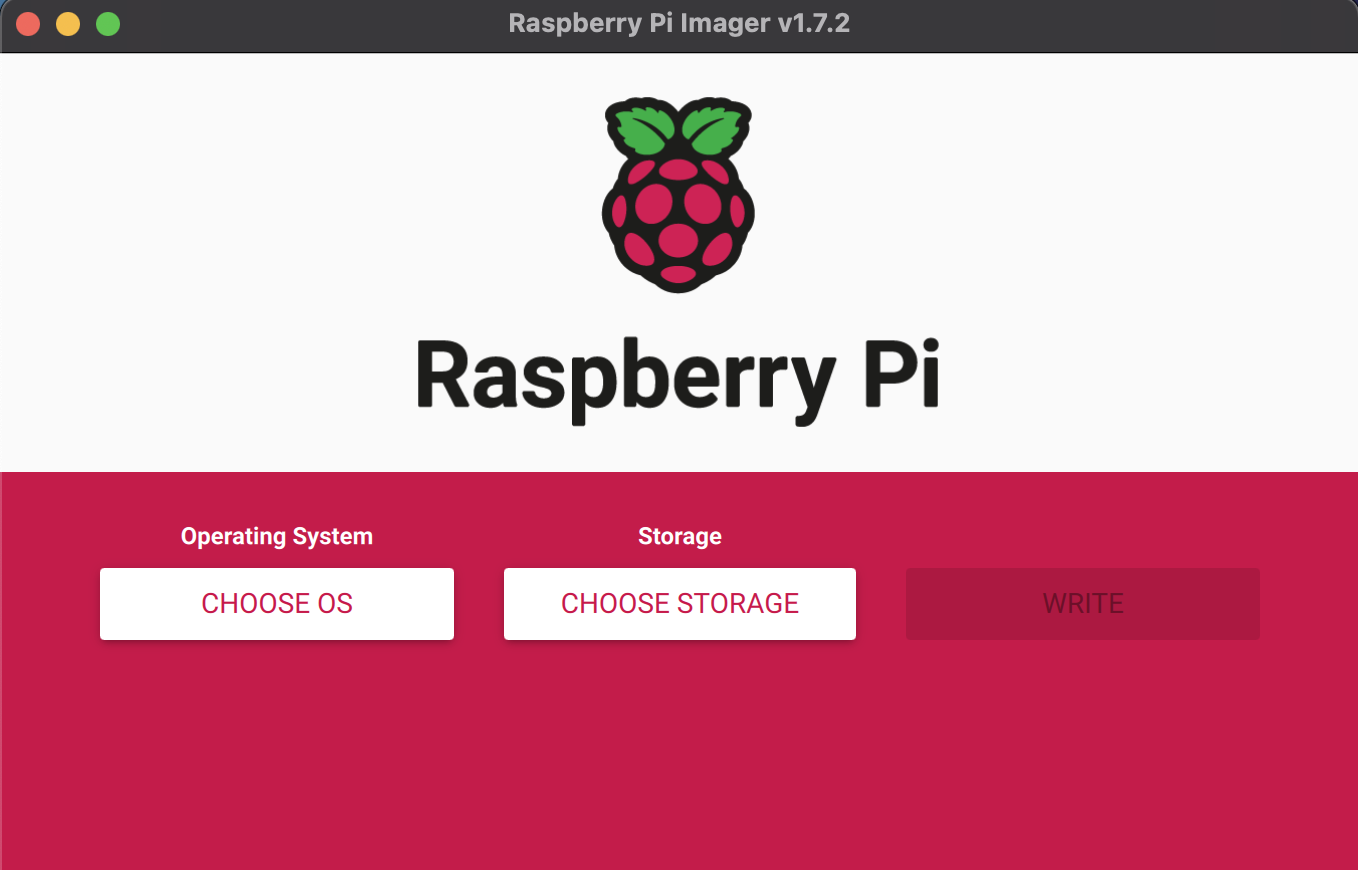
Now perform the following steps:
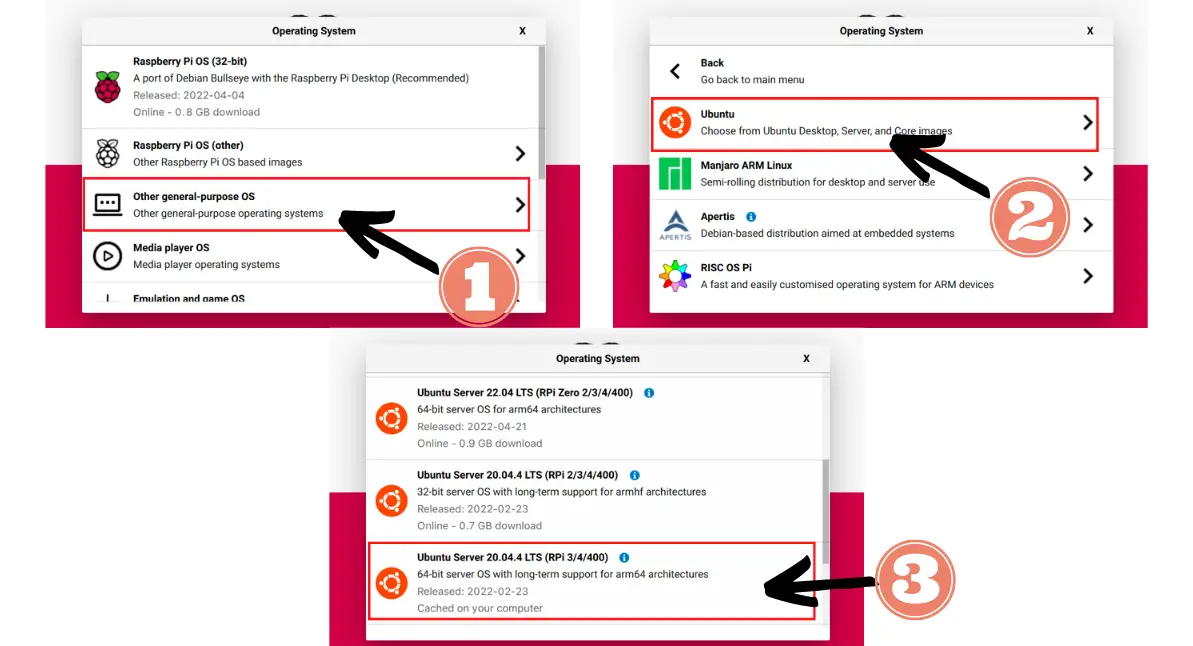
- Click “Choose OS”
- Click “Other general purpose OS”
- Click “Ubuntu”
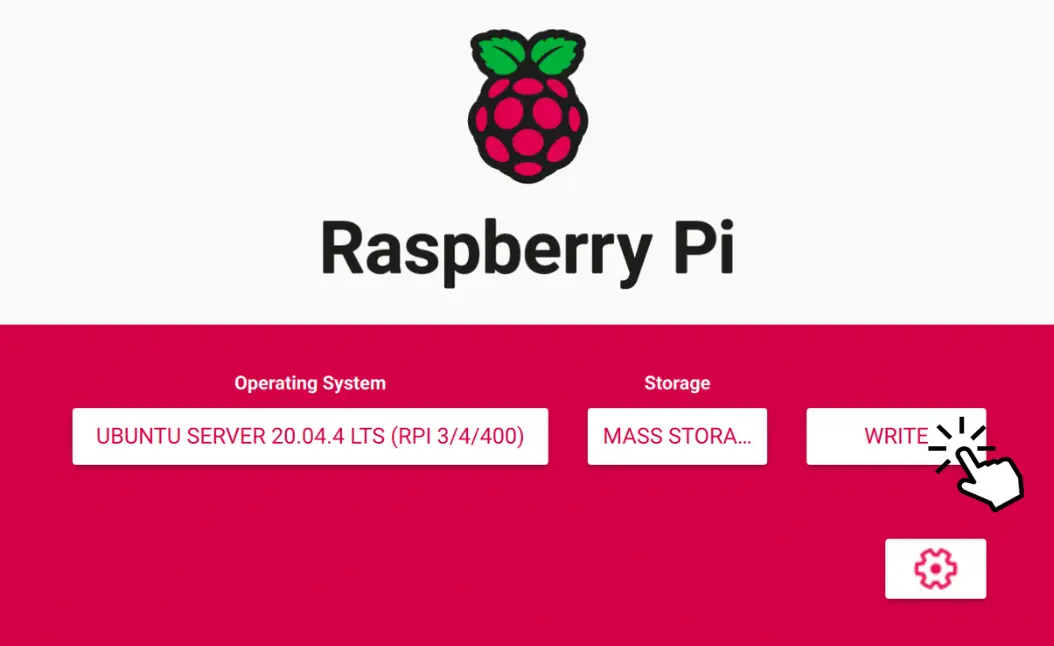
- Click “Ubuntu Server 20.04.4 LTS (RPi 3/4/400)”
- Plug in your external drive (like a microSD card)
- Click “Choose Storage”
- Select your external drive
Now, before you click the “Write” button, you’ll first need to make some adjustments in your settings. This is where the second step comes in.
2. Configure Password, Wi-Fi, & Additional Settings
The most important part of this step is enabling Wi-Fi and Secure Shell (SSH).
The reason we need Wi-Fi enabled is that we are going to connect the Raspberry Pi to your laptop through the Internet Protocol (IP) address, which identifies the device that is connected to the Internet. This can only be identified if the Raspberry Pi has Wi-Fi enabled. We also need SSH enabled so that you can remotely connect to your Raspberry Pi
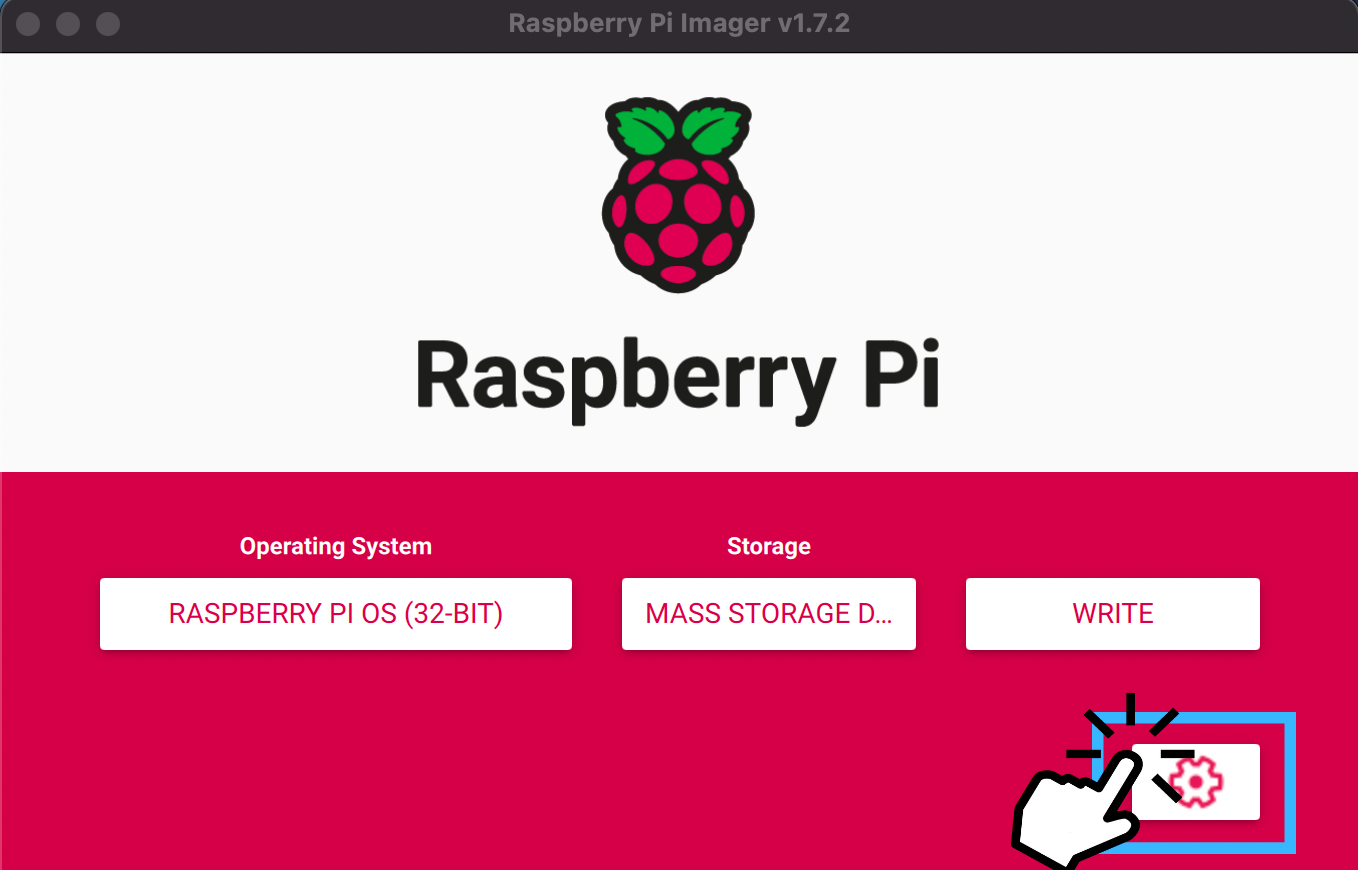
First, you’ll need to click on the gear tool near the bottom right corner of the Raspberry Pi Imager.
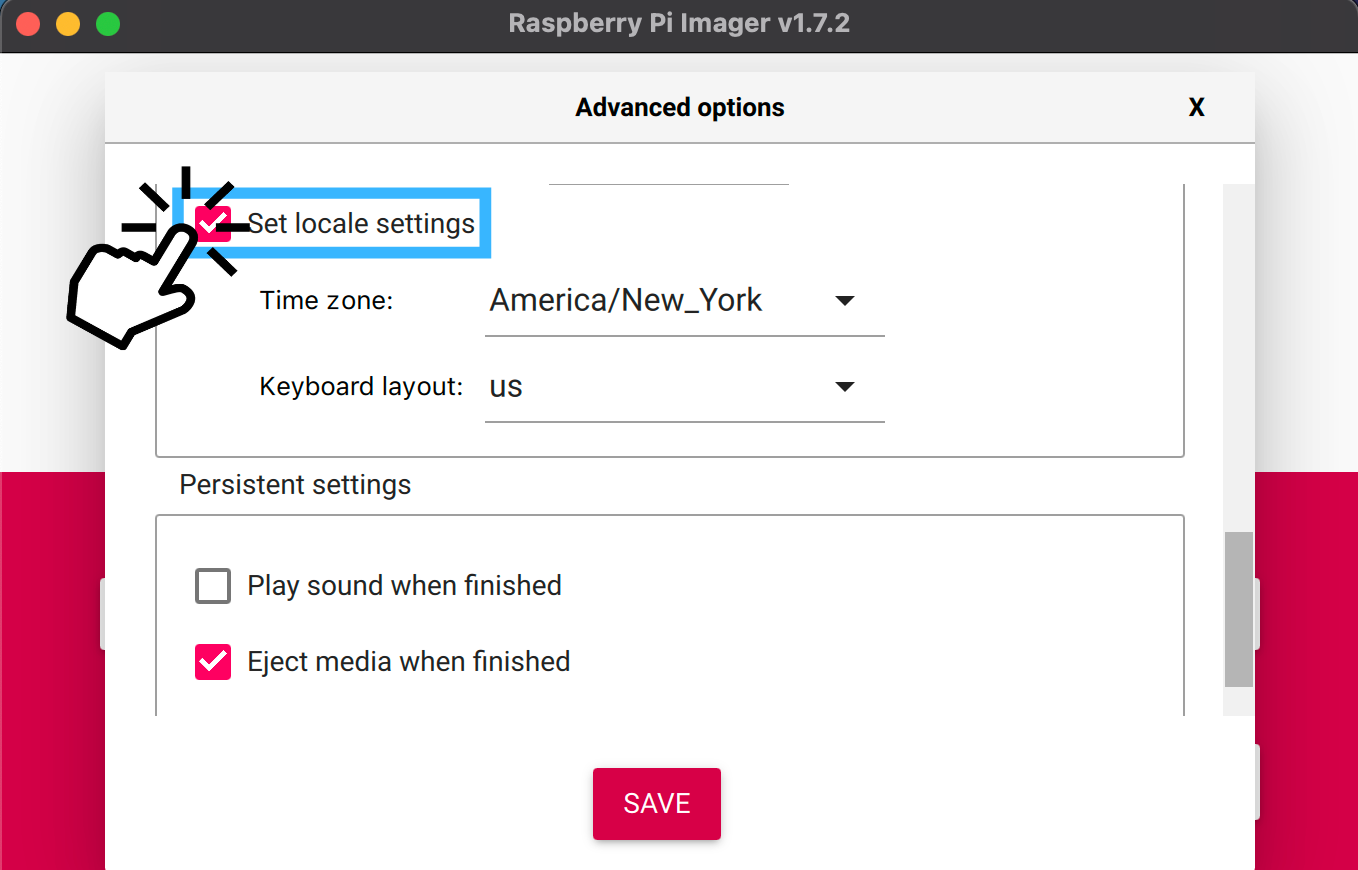
Then, you can scroll through the settings, and enable other features as well. For instance, besides setting up the Wi-Fi connection, you’ll also need to set up your hostname, username, password, and time zone.

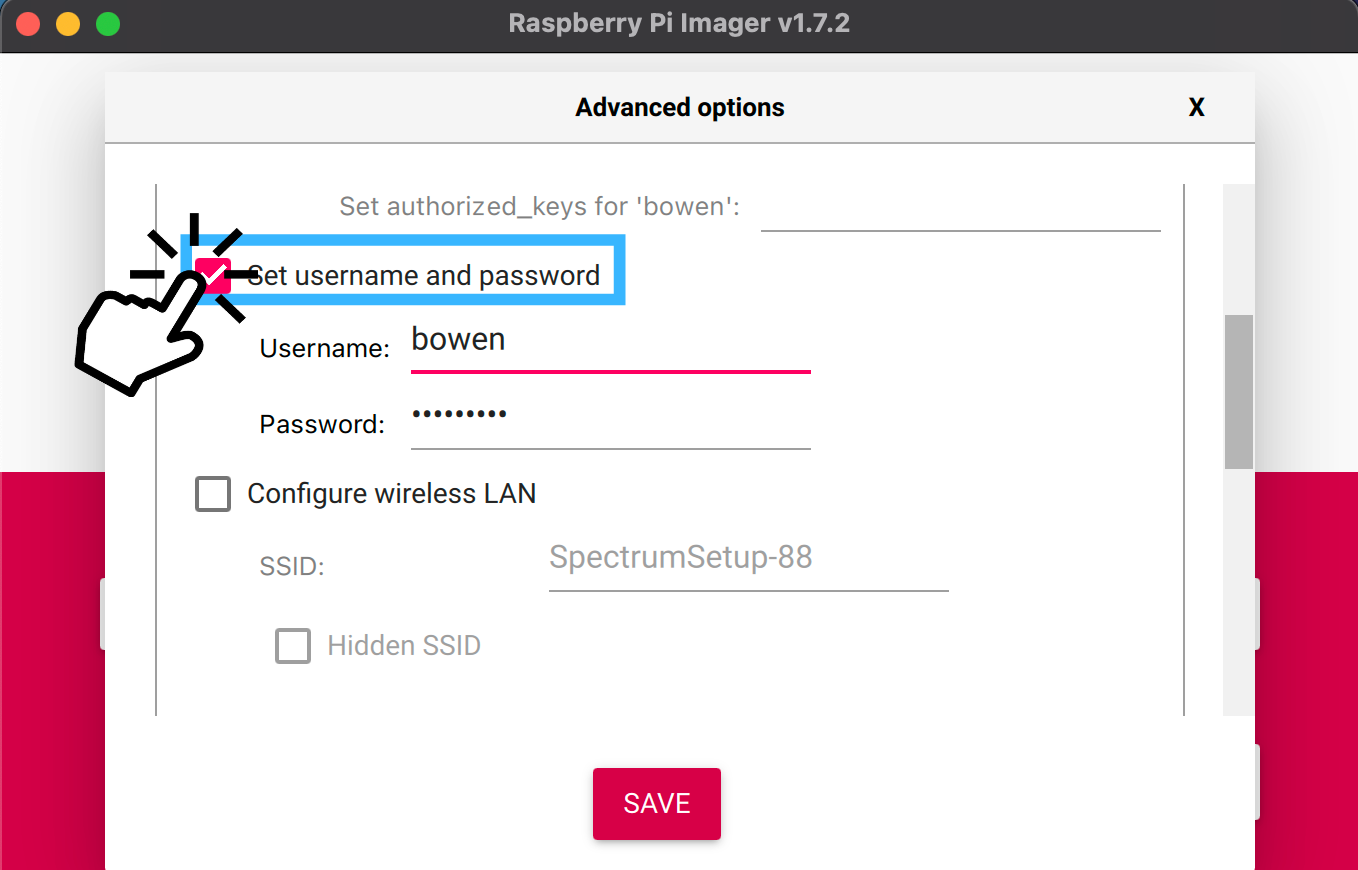
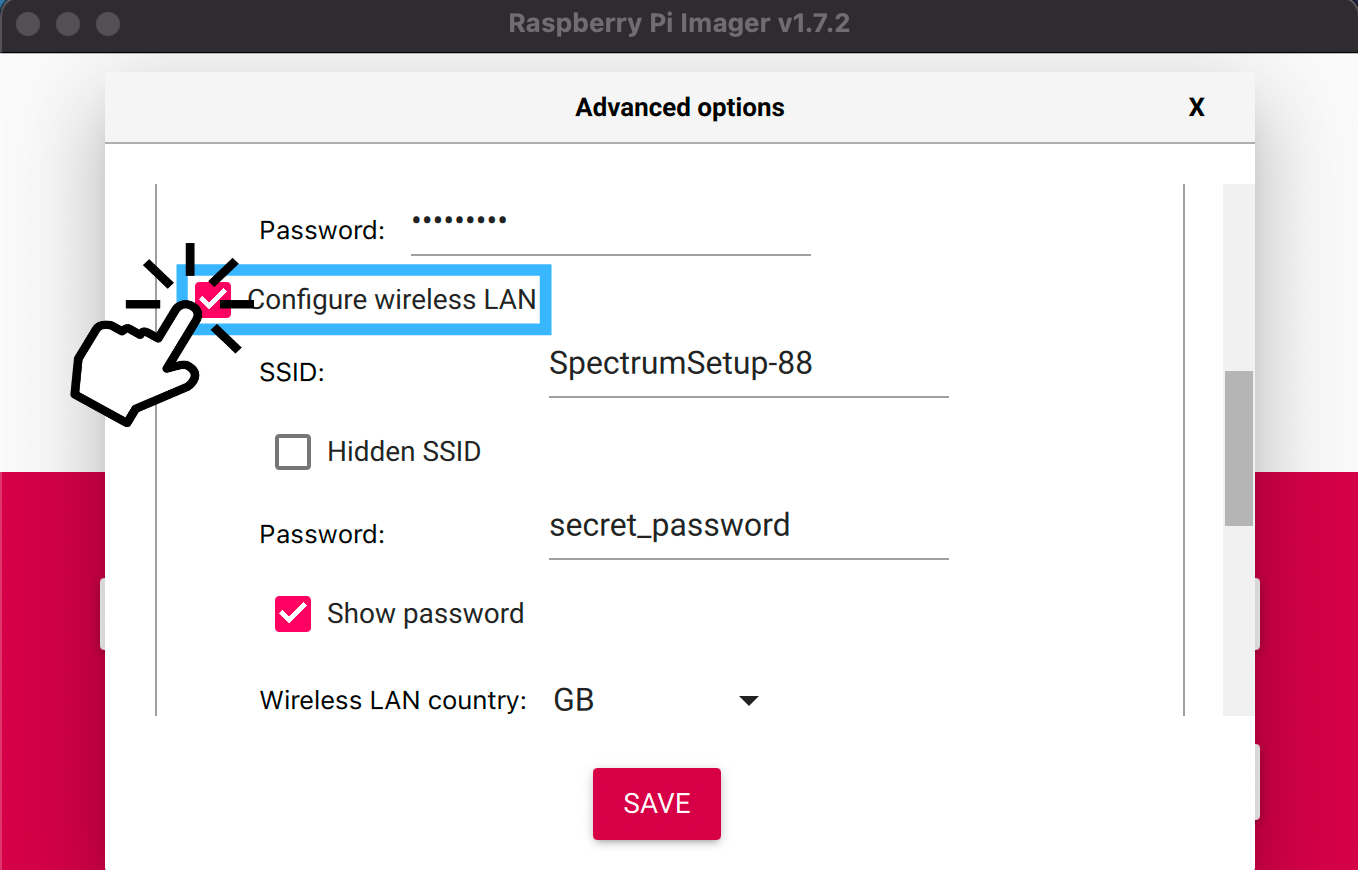
Now, you can click “Save” (which is the reddish/pink button near the bottom center of your screen).
3. Write Ubuntu Server to SD Card
After all your hard work, you can now click the “Write” button and wait anywhere between 10-20 minutes for the imager to finish.
The imager will first write to your disk device and then verify it. Since this process will take a while, we can move on to the next step to make the most of our time.
4. Install VNC Viewer On Your Laptop
All you need to do is go to the VNC Viewer website and install the software that is compatible with your laptop’s OS: https://www.realvnc.com/en/connect/download/vnc.
This tool will let us see our Raspberry Pi’s screen on your laptop!
5. Insert SD Card Into Raspberry Pi
By now, you should hopefully get an approval window in the imager that says it is done writing to your disk device.
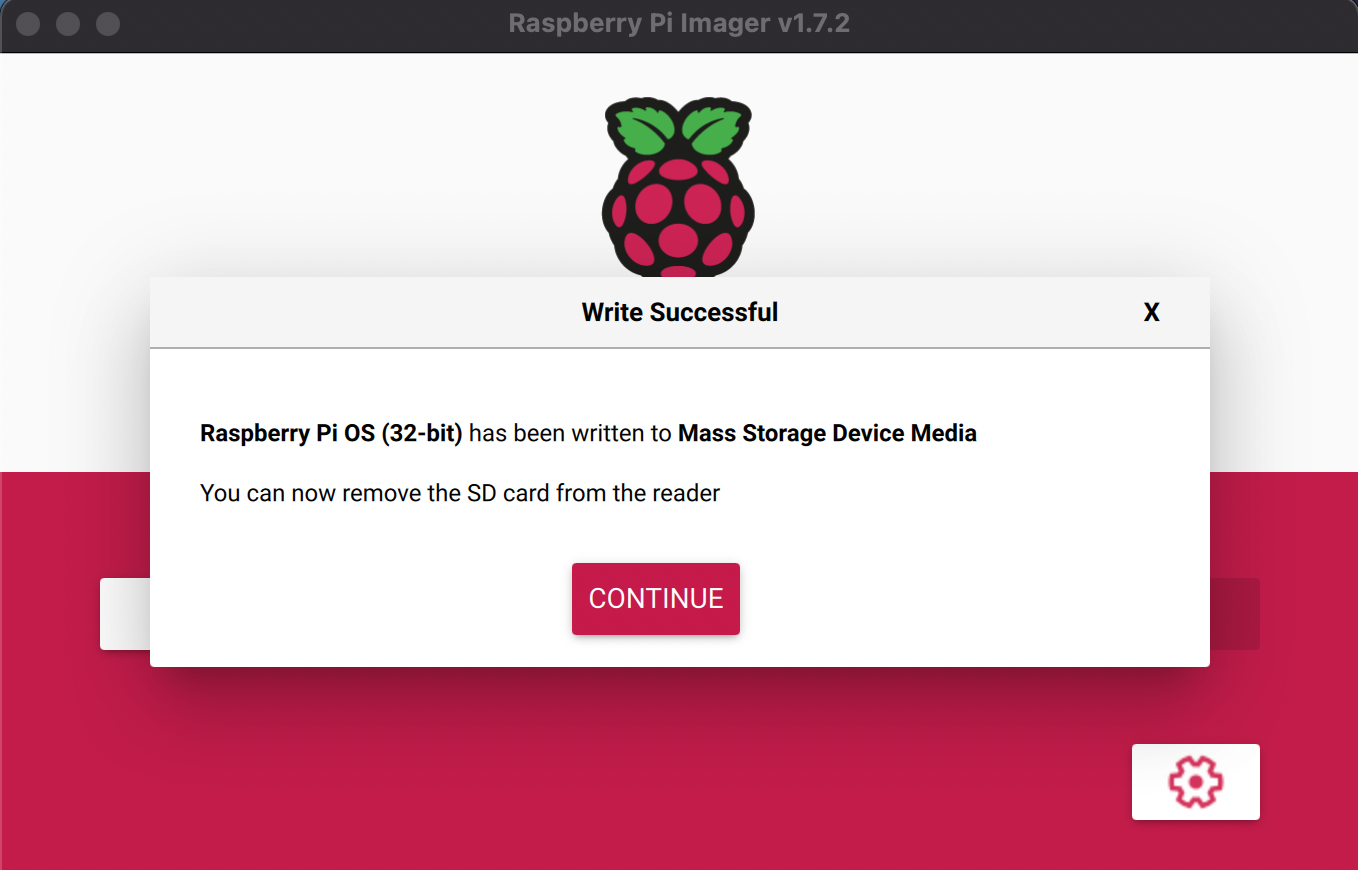
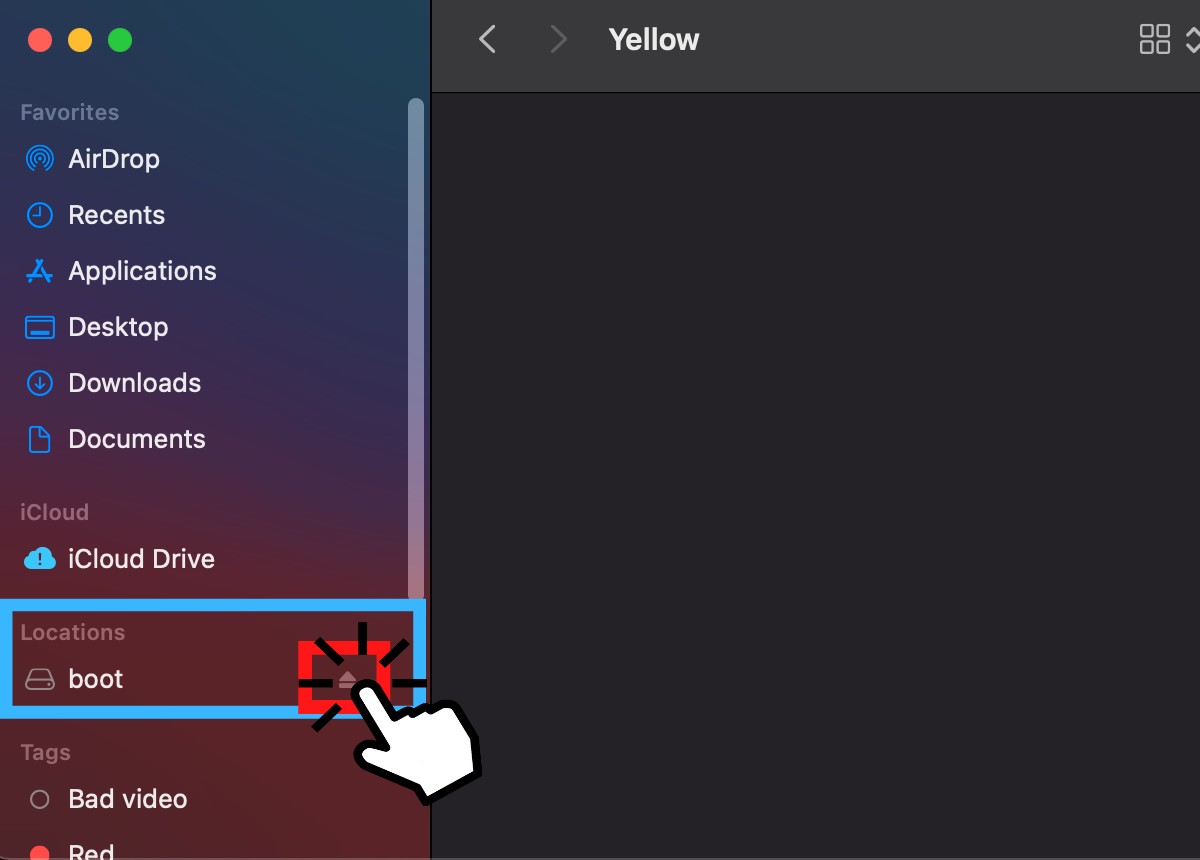
Before you remove your SD or microSD card, you should also make sure you ejected the card before inserting it into your Raspberry Pi. Doing so can avoid your SD card getting corrupted.
If you get the message as shown in the picture above, then you won’t need to worry about the rest of this step since the message lets you know it’s safe to remove the external drive.
For Macbook users, you can go to your Finder and look on the left column to find your disk device. To get to Finder, you can use the keyboard shortcut “Command + Spacebar” and then type in “Finder”.
If you’re a Windows user, you can go to this website to learn how to safely eject your SD or microSD card from your laptop.
6. Identify Raspberry Pi’s IP Address
Now, we need to find the IP address of your Raspberry Pi. Other sites may require you to install different software to do this, but I found one simple command to be the most effective and efficient.
Open up the terminal on your laptop and type in the following command:
ping raspberrypi
As you can see, my IP address for my Raspberry Pi (which is 192.168.1.109 in this instance) is first found in the second line.
To use this successfully, you will need to make sure your Raspberry Pi is powered on and running. Moreover, you will have to wait a few minutes after turning on your Raspberry Pi before running this command, or else it will look like this command doesn’t work.
If this doesn’t work for you, then it’s likely you’re either using a Windows computer or your hostname isn’t raspberrypi.
If it’s the former reason, then you can use this code to ‘ping’ the IP address instead:
nslookup raspberrypiIf it’s the latter reason, then you can easily substitute it out for your own. Your hostname should be the name that comes after the @ symbol.
If neither of these options work, then you can resort to installing software that’ll find IP addresses like Angry IP Scanner.
7. SSH Into Raspberry Pi
Now you’ll need to go to the terminal on your computer and type in this command:
ssh username@IP_addressKeep in mind that you’ll need to replace the username with your own and the IP_address with the one you found in step 6.
If you are encountering any trouble, go to my Troubleshooting section to check it out.
8. Install Ubuntu Desktop
If you had the ability to see the screen at this stage, you would only see lines of code. There is no graphical user interface (GUI) when you first start working with the Ubuntu server, so you’ll need to install the desktop. In your terminal, do the following:
- Update your system to make sure all the packages you install pull the latest versions:
sudo apt update && sudo apt upgrade -y- Install the Ubuntu Desktop:
sudo apt install ubuntu-desktop -yNow, it is highly likely you run into error messages like these:
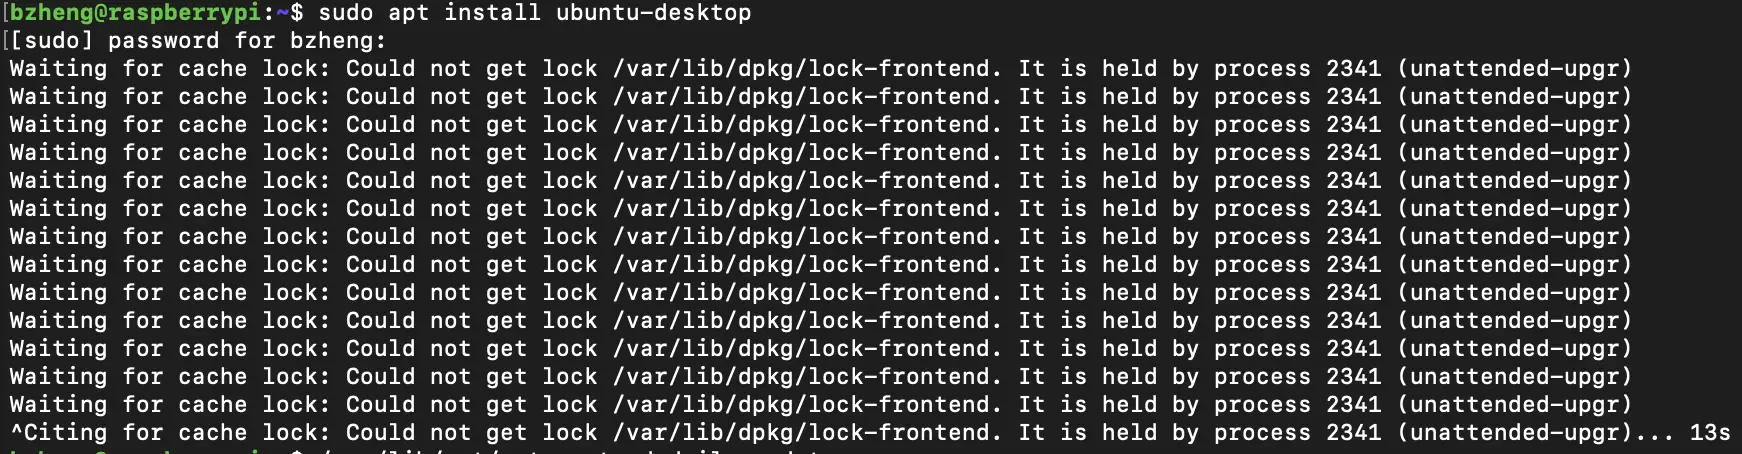
This will keep going on forever if you don’t interrupt it somehow. To do that, press CTRL + C.
The easiest way to bypass this issue is to remove the files mentioned in the error messages.
For example, I’d type in my terminal:
sudo rm /var/lib/dpkg/lock-frontendHere is a list of all the remove commands I needed to run before this installation command would work. The files you’ll need to remove may be different on your end, but you’ll see this takes a while.
sudo rm /var/lib/dpkg/locksudo rm /var/cache/apsudo rm /var/cache/apt/archives/locksudo rm -r /var/cache/apt/archives/Note: I included the -r option for the last command because I had to remove a directory.
Once this is all done and you’ve successfully installed the desktop, you’ll need to reboot it so that your changes go into effect:
sudo reboot9. Install RealVNC Server On Ubuntu
In order to use VNC from your laptop, you’ll need to install the server in your Ubuntu desktop, so they can communicate and let you share the screen.
Follow these steps in your Ubuntu’s terminal:
- Download the RealVNC package:
wget https://archive.raspberrypi.org/debian/pool/main/r/realvnc-vnc/realvnc-vnc-server_6.7.2.43081_arm64.deb- Because RealVNC works with Raspi-Config, we’ll need to fix and install any unmet dependencies. For instance, you’ll want to install the libraspberrypi0 dependency, which the next command takes care of:
sudo apt --fix-broken install- Install the package:
sudo dpkg -i realvnc-vnc-server_6.7.2.43081_arm64.deb- Move into the /usr/lib/aarch64-linux-gnu directory because we want to add 10 files to it:
cd /usr/lib/aarch64-linux-gnu- Now, add these 10 files by entering all these commands:
sudo ln libvcos.so /usr/lib/libvcos.so.0sudo ln libvchiq_arm.so /usr/lib/libvchiq_arm.so.0sudo ln libbcm_host.so /usr/lib/libbcm_host.so.0sudo ln libmmal.so /usr/lib/libmmal.so.0sudo ln libmmal_core.so /usr/lib/libmmal_core.so.0sudo ln libmmal_components.so /usr/lib/libmmal_components.so.0sudo ln libmmal_util.so /usr/lib/libmmal_util.so.0sudo ln libmmal_vc_client.so /usr/lib/libmmal_vc_client.so.0sudo ln libvcsm.so /usr/lib/libvcsm.so.0sudo ln libcontainers.so /usr/lib/libcontainers.so.0- Enable and start the services:
sudo systemctl enable vncserver-virtuald.servicesudo systemctl enable vncserver-x11-serviced.servicesudo systemctl start vncserver-virtuald.servicesudo systemctl start vncserver-x11-serviced.service10. Run Raspi-Config & Use VNC
Because I’m so used to working with Raspberry Pi, I feel like it’s easier to enable VNC from Raspberry Pi Configurations. Sadly, this isn’t installed on Ubuntu, so we’ll need to install it.
Once again in your terminal, follow these steps:
- Download the raspi-config package in your current directory:
wget https://archive.raspberrypi.org/debian/pool/main/r/raspi-config/raspi-config_20211019_all.deb -p ./- Install all the dependencies that will make it work:
sudo apt -y install libnewt0.52 whiptail parted triggerhappy lua5.1 alsa-utils- Fix any of the remaining broken packages before you actually install raspi-config:
sudo apt install -fy- Install raspi-config by targeting one of its files:
sudo dpkg -i archive.raspberrypi.org/debian/pool/main/r/raspi-config/raspi-config_20211019_all.deb- Reboot to make sure all these edits go into effect:
sudo rebootOnce you are back in the Ubuntu terminal (you have to use SSH to get there), you can go ahead and type in the following command:
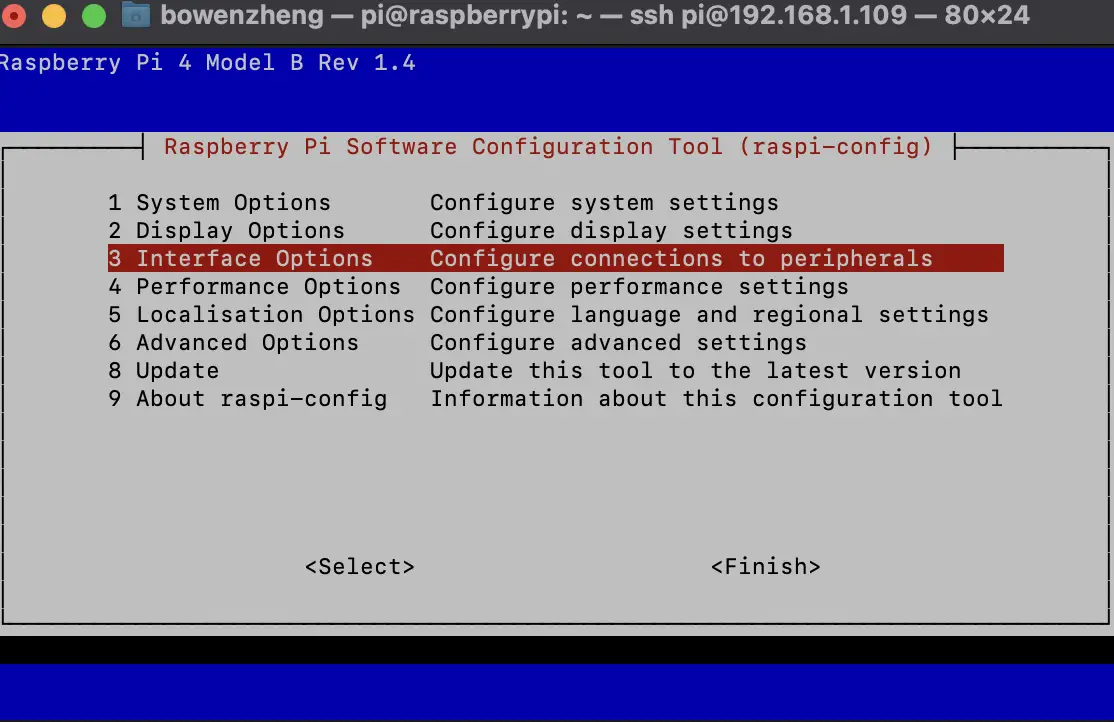
sudo raspi-configYou should now be aware that you can only use your arrow keys to move around rather than your mouse.
First, you will need to pick “3 Interface Options”. To do that, hit your down arrow key twice and the “Enter” key once.
Next, you should choose the option “I3 VNC …”. To do so, hit the down arrow key twice and the “Enter” key once.
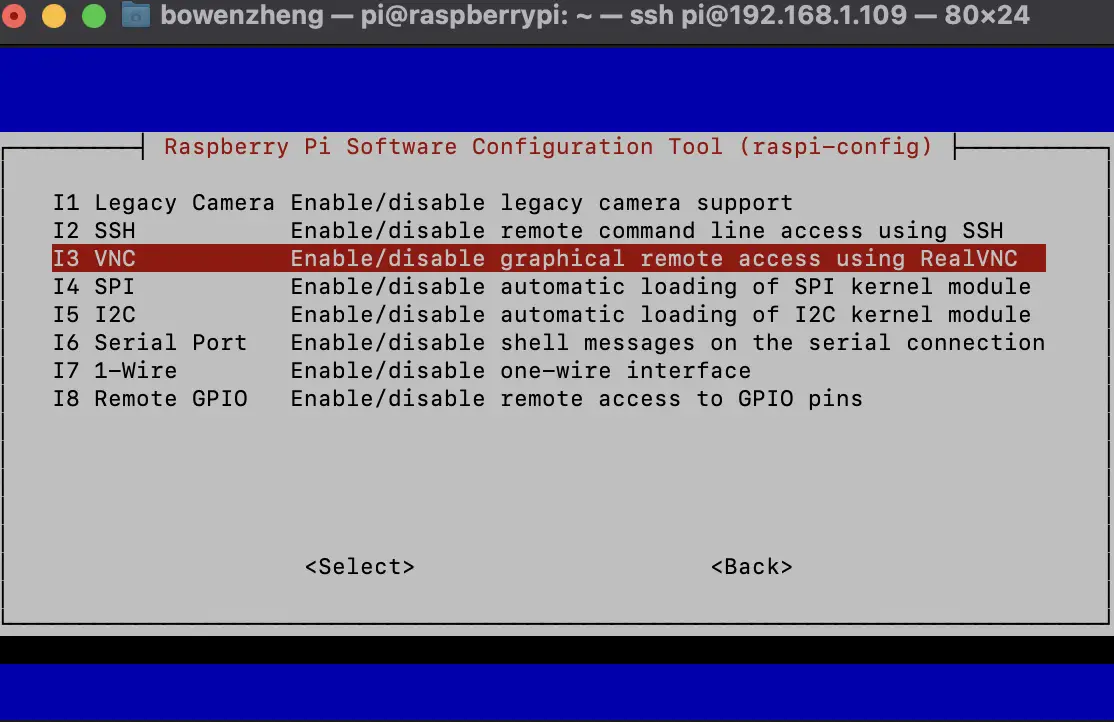
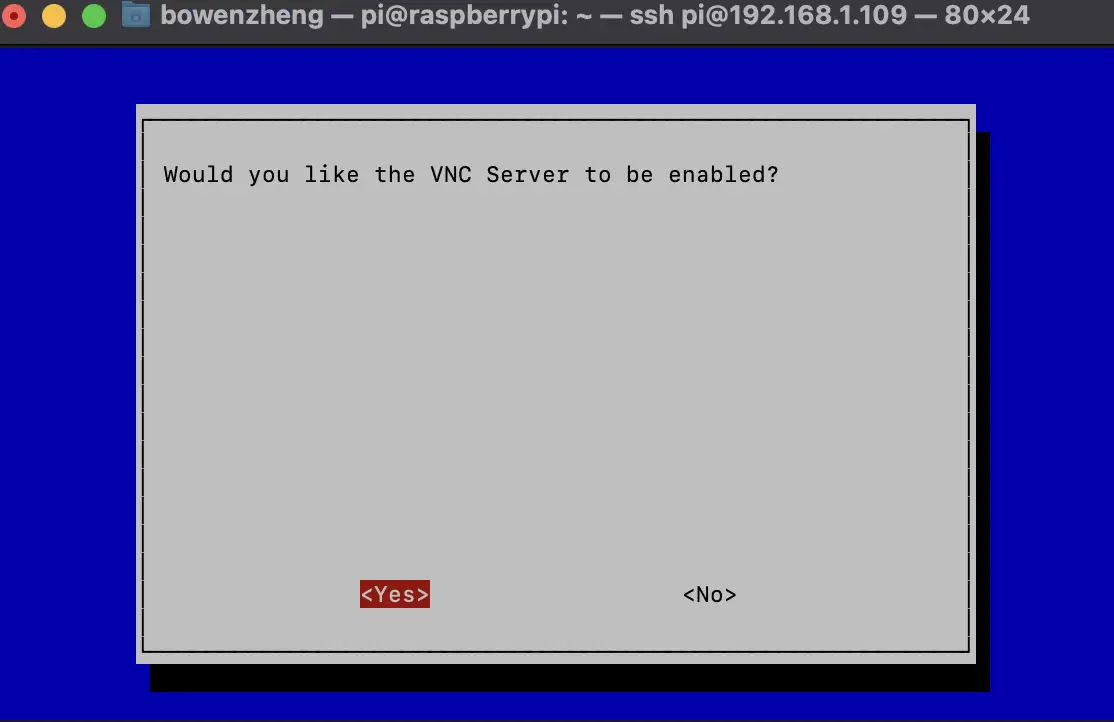
Then, you will be prompted whether you would like the VNC Server enabled. If your red highlighter isn’t already on the “Yes” option, use your left arrow key to choose “Yes” and hit the “Enter” key.
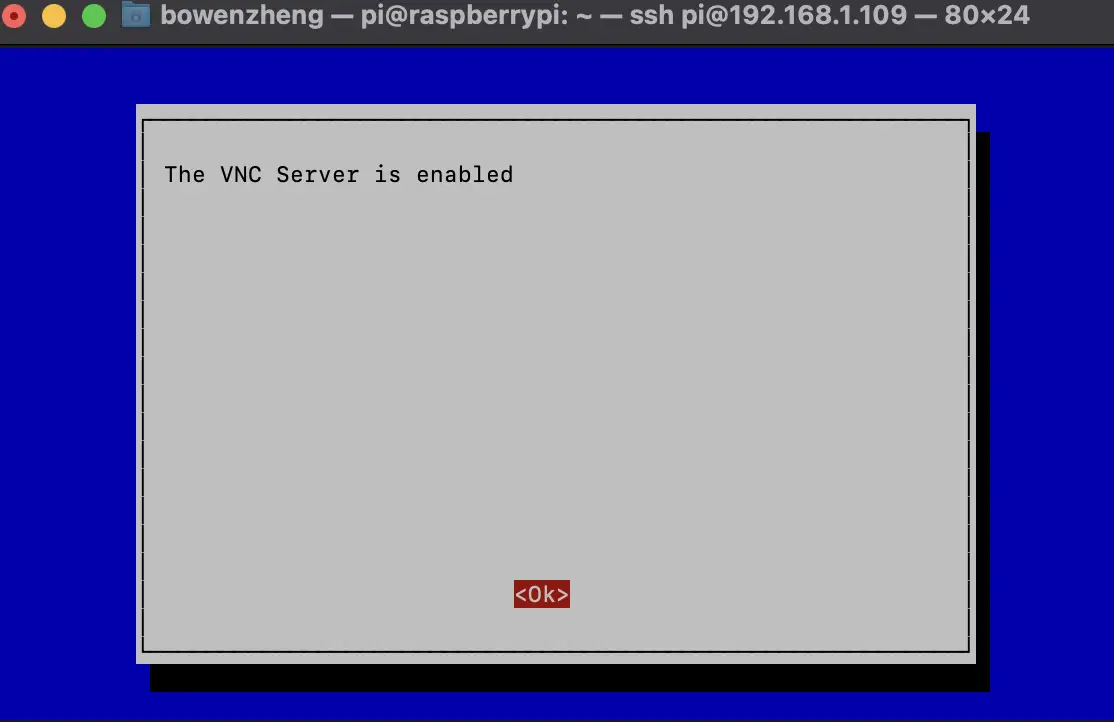
After that, you will see an approval window letting you know that the VNC Server is enabled. You can hit the “Enter” key to escape.
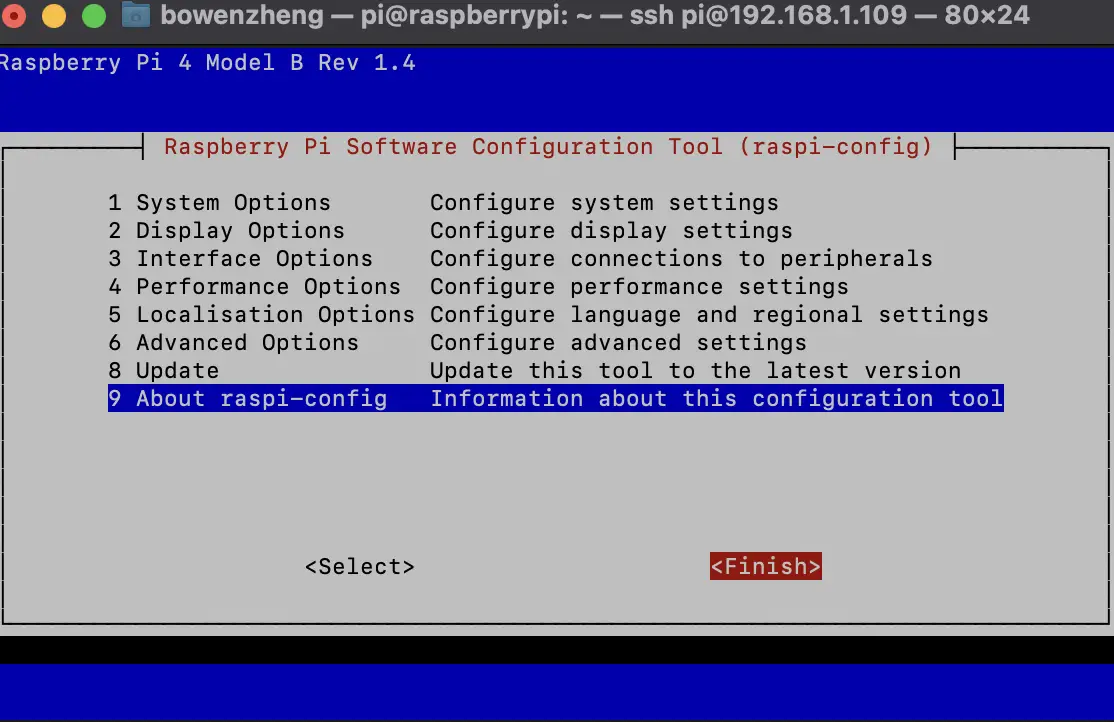
Finally, to escape the raspi-config window, you should hit the right arrow key twice and hit “Enter”.
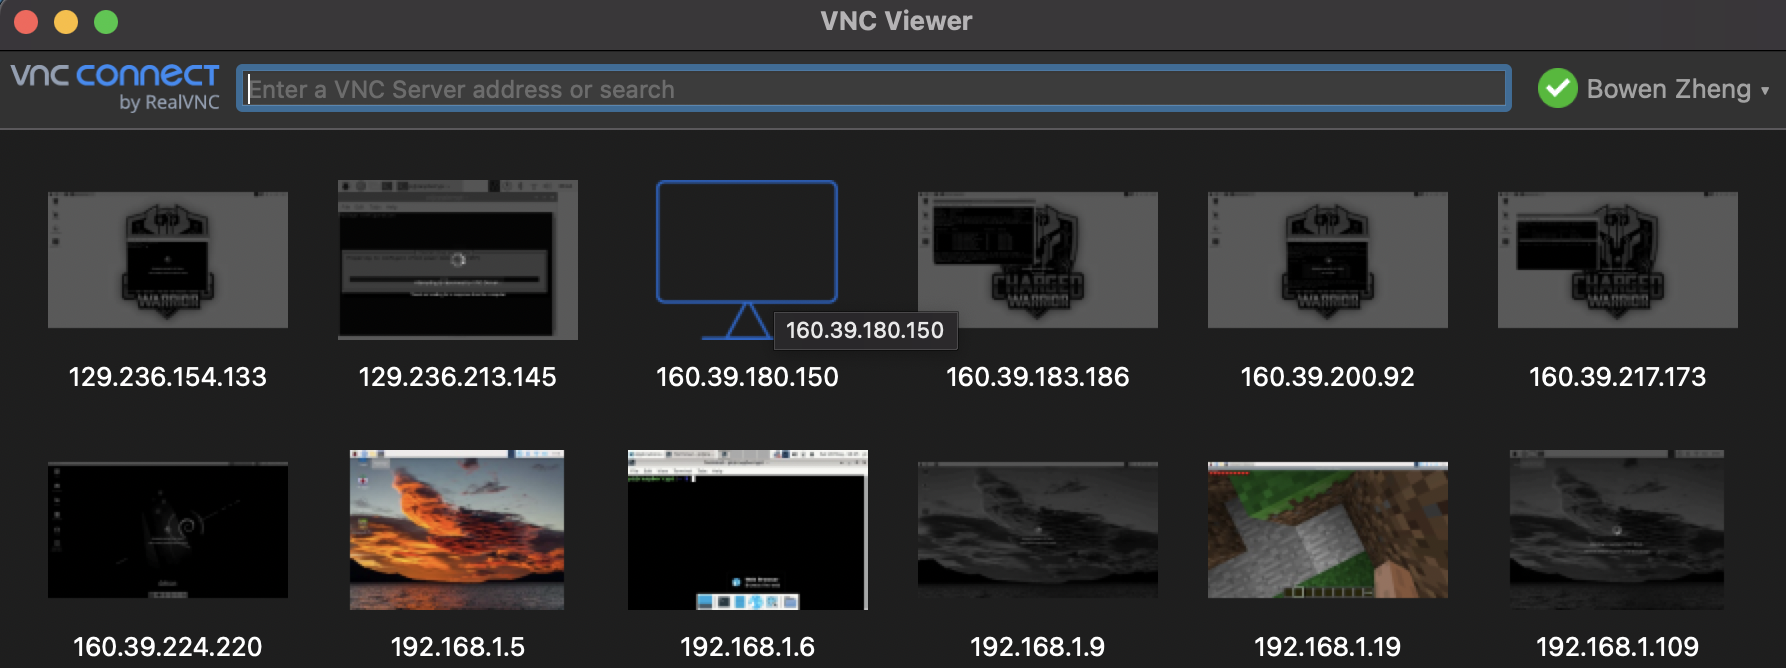
Finally, you can open up your VNC Server on your laptop and type in your IP address to connect.
Once again, you’ll need to type in your username and password. This can be what you set in step 2.
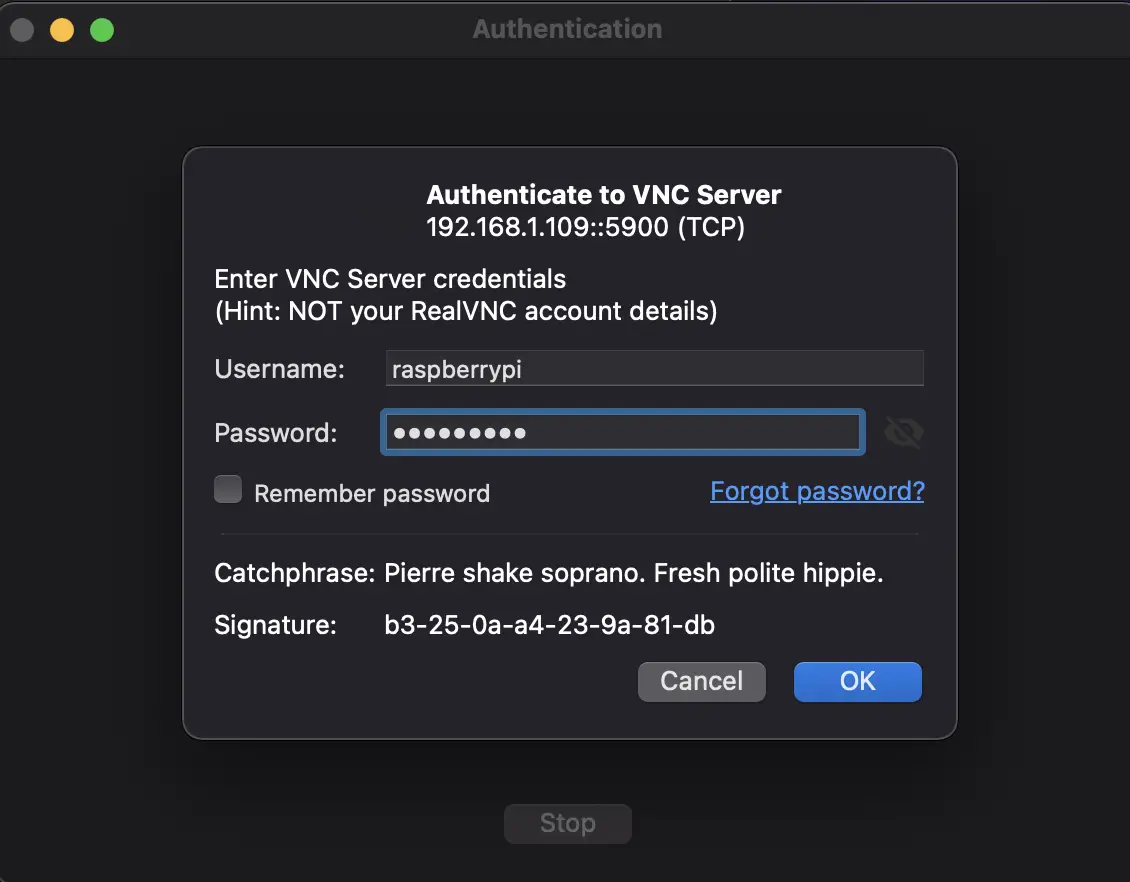
Finally, you can click “Ok” or “Continue” for the few windows that may pop up.
After that, you have successfully logged into your Raspberry Pi from your laptop!
Troubleshooting
As easy as I made have made it seem in the previous steps, I did encounter a lot of problems along the way. Consequently, I created this section to help you resolve any potential issues. If you don’t see a solution to your problem in the following list, please contact me at bz.chargedwarrior@gmail.com, so I can help you resolve it and add it to this list!
Here are some problems you may encounter:
1. “Error running authopen to gain access to disk device …”
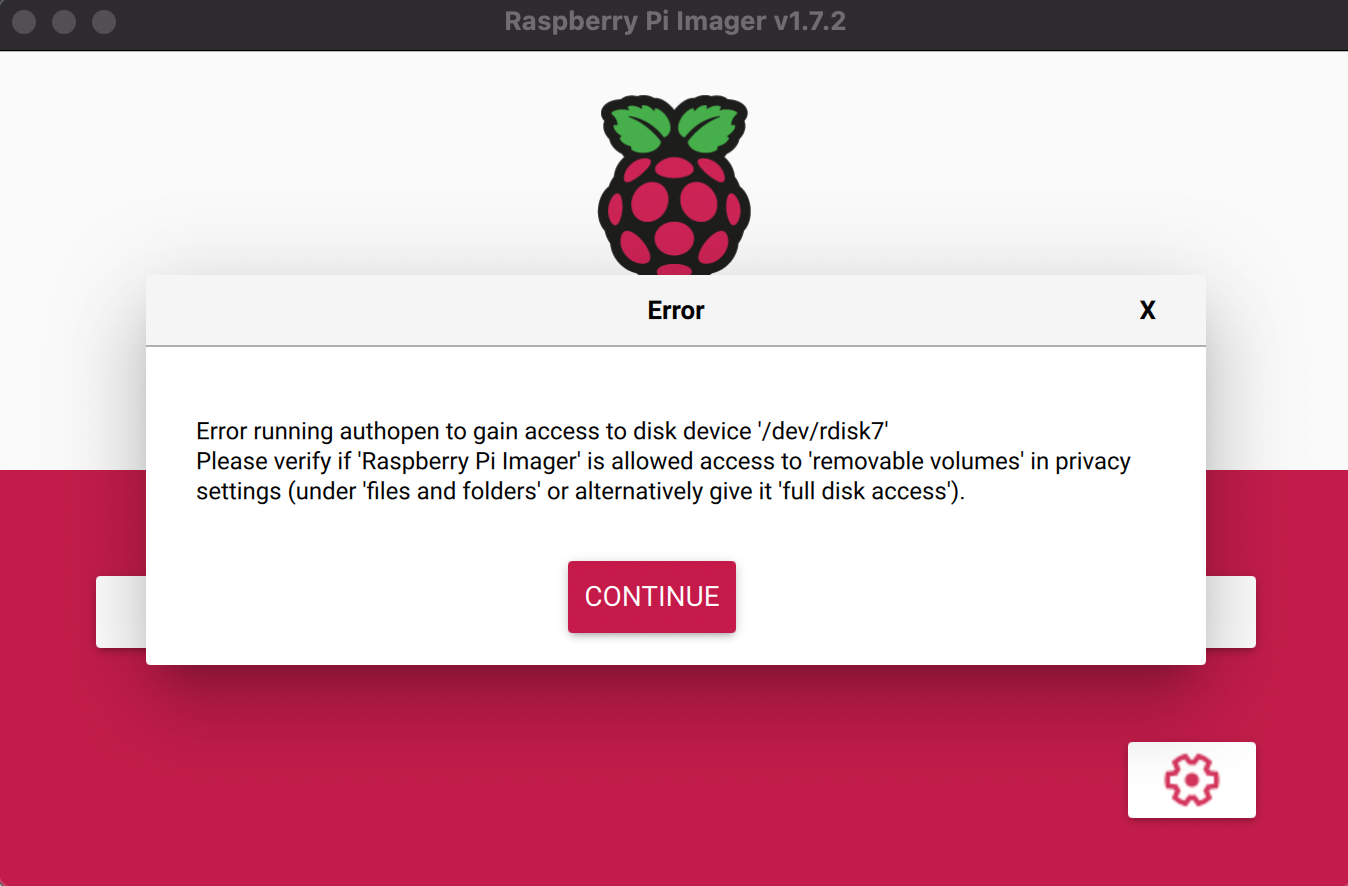
This most likely occurred because you tried to erase your SD card on your laptop.
The solution is to use the Raspberry Pi imager to erase your disk device so that it has permission to make future changes.
First, you’ll need to open up the imager, click “Choose OS”, and scroll all the way down.
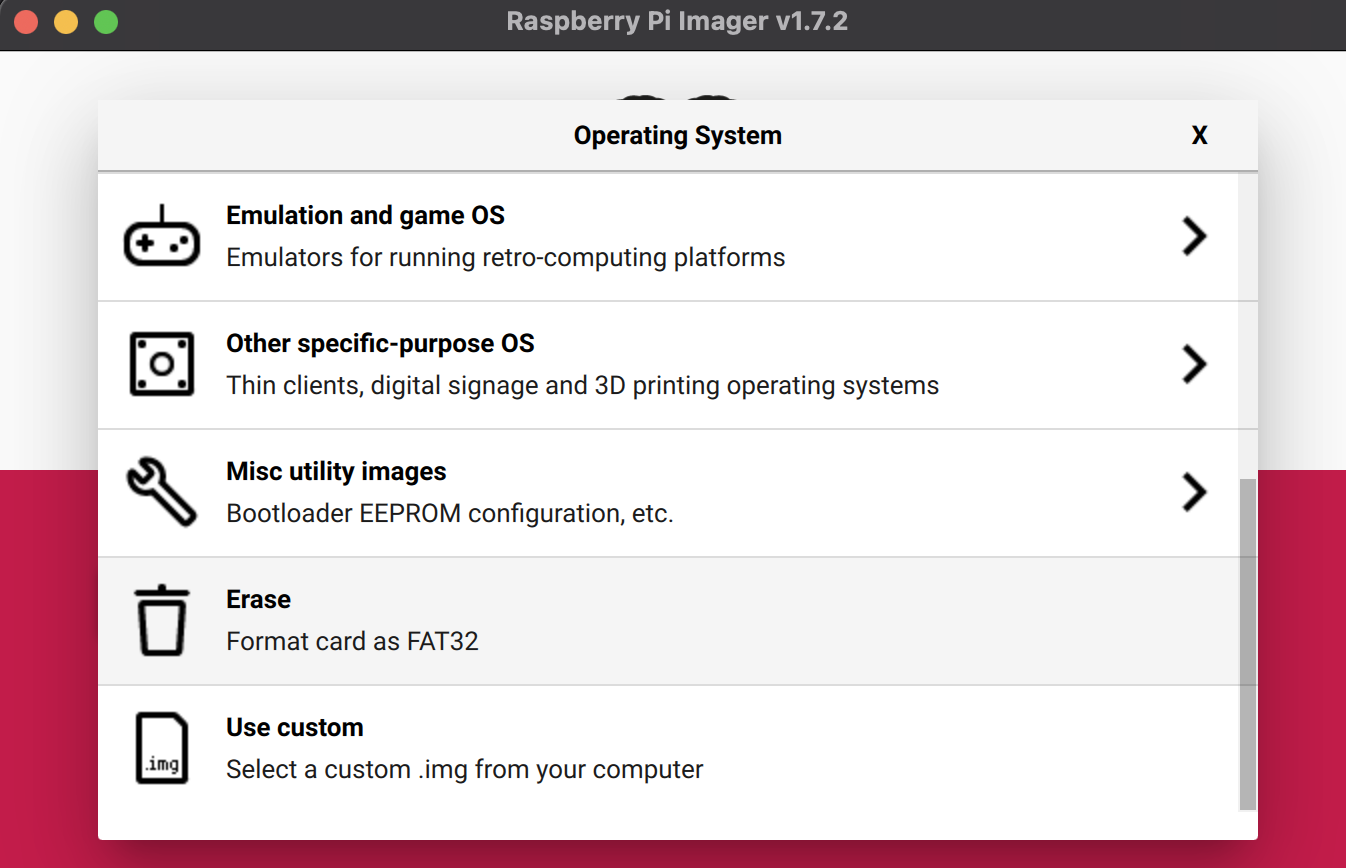
The “Erase” option (also known as formatting the card as FAT32) should be the second to last option. Click on it, and now you can write to it!
To my best understanding, this error occurs because only the laptop itself has the power to write to the SD card and prevents other software from doing so. I observed this happening when I found that I can drag multiple different files in my Macbook into the SD card, and it worked successfully.
In the future, if you want to start again and rewrite the SD card, you don’t not have to erase it to prepare it for the imager. In fact, the imager will prompt you to give it permission to erase the data that exists on it.
If this doesn’t work for you still, then it’s highly likely that your SD card is corrupted. To fix this, check out my article on what corrupted SD cards are, how to prevent them from being corrupted in the first place, and how you can fix them.
2. IP Address Not Working
Another error you may encounter is that the IP address doesn’t work when you try to SSH into your terminal or through VNC Viewer.
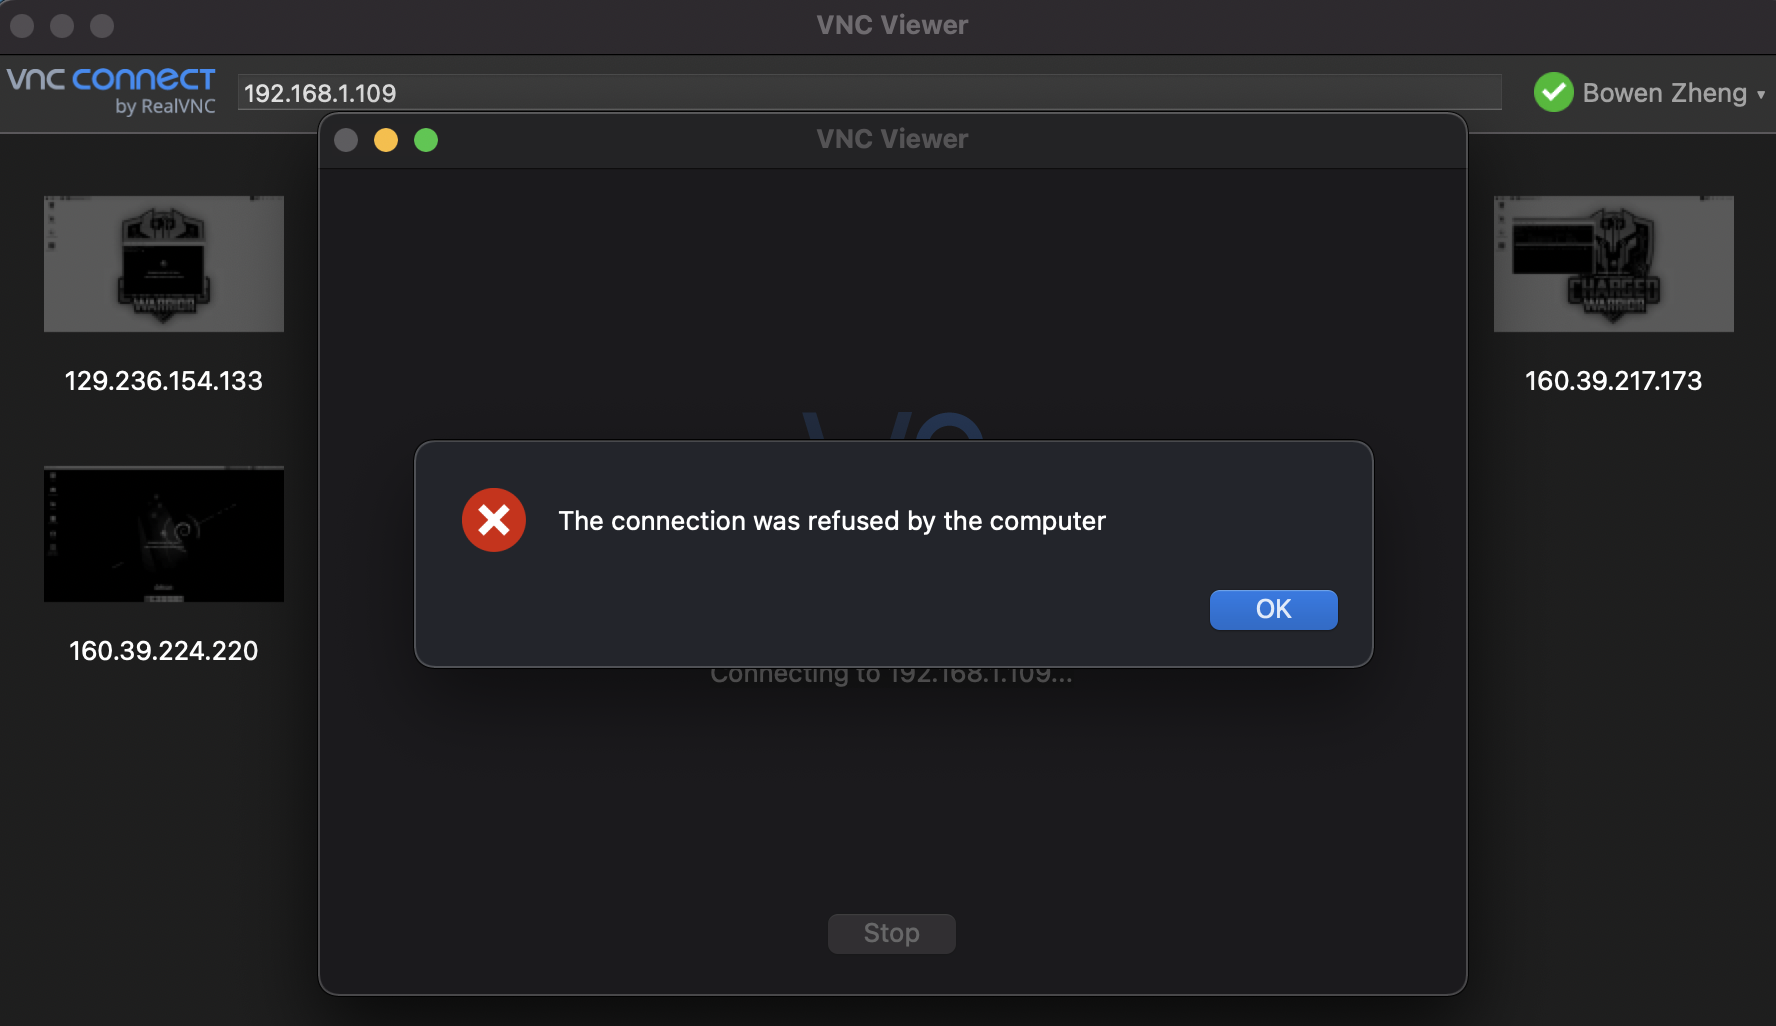
Alternatively, you may also be getting some unusual messages with the “ping raspberrypi” command, which should already alert you that there’s an issue with the IP address.
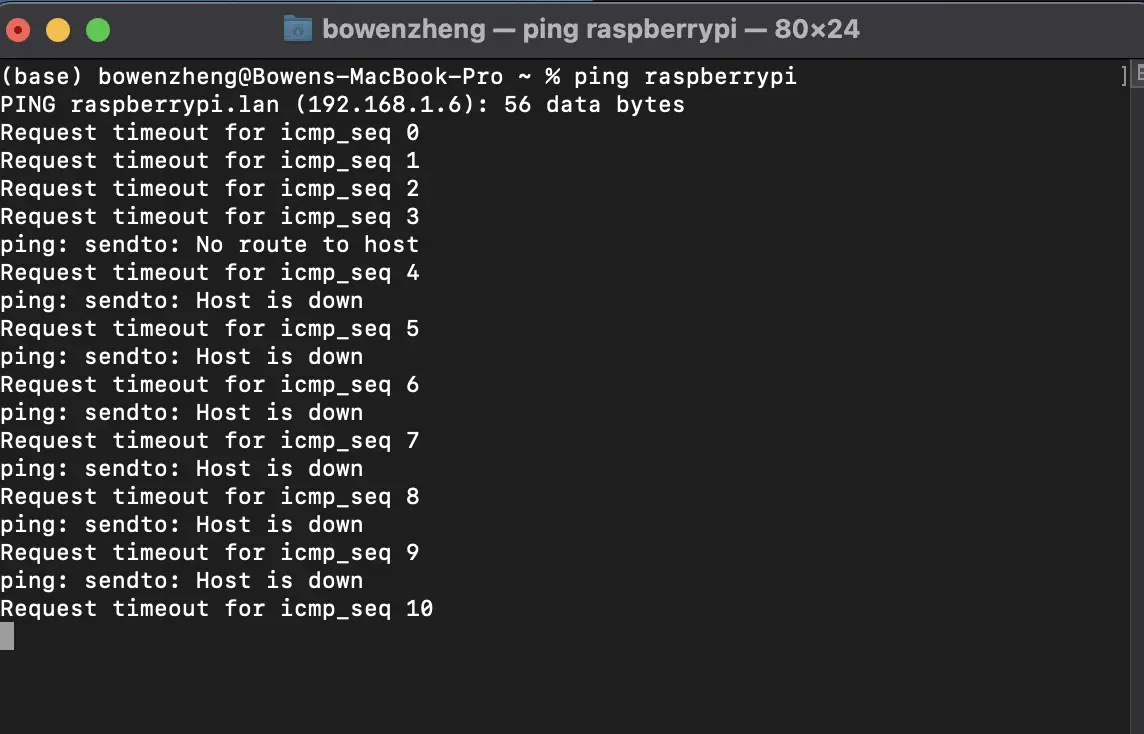
Either way, this problem most likely stems from you not enabling the Wi-Fi in the Raspberry Pi Imager in step 1 or you might have messed up the SSID name or password.
Regardless, we can fix it by inputting a wpa_supplicant.conf file onto your Raspberry Pi SD card. Here are the following steps to do so:
1. Insert your SD card (or microSD card) back into your laptop.
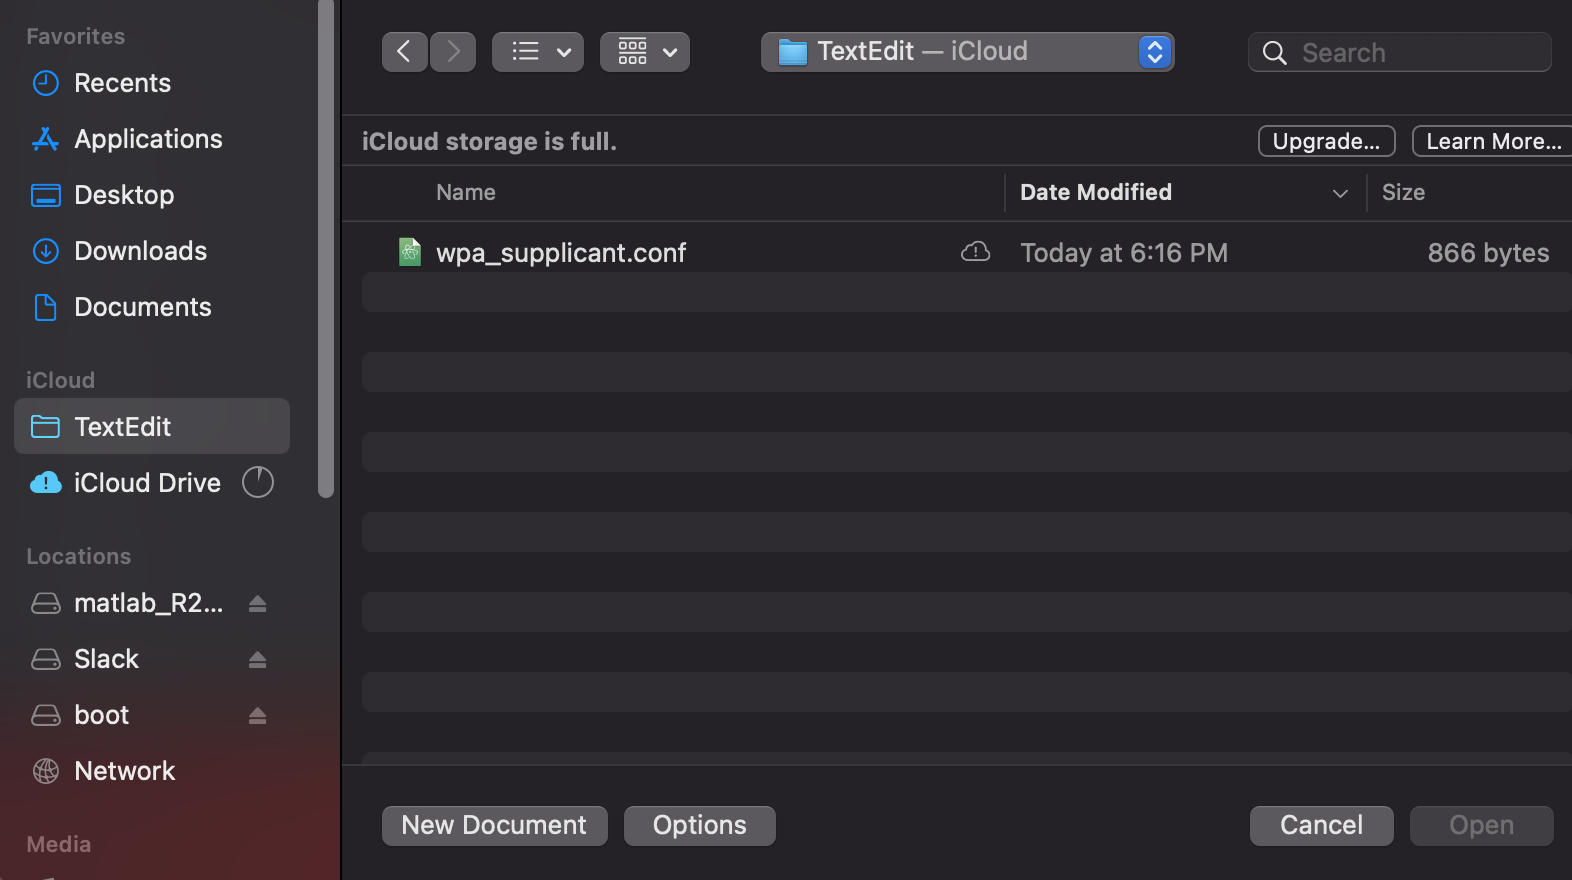
2. Create a blank .txt file.
Helpful Tip!
For Macbook users, you can use the keyboard shortcut “Command + Spacebar” and type in “TextEdit”
3. Type in the following code in the blank file:
country=US # Your 2-digit country code
ctrl_interface=DIR=/var/run/wpa_supplicant GROUP=netdev
network={
    ssid="INSERT NAME OF YOUR NETWORK HERE"
    psk="INSERT YOUR PASSWORD HERE"
    key_mgmt=WPA-PSK
}
If your network doesn’t require a password, type in the following:
country=US # Your 2-digit country code
ctrl_interface=DIR=/var/run/wpa_supplicant GROUP=netdev # Include this line for Stretch
network={
    ssid="INSERT NAME OF YOUR NETWORK HERE"
    key_mgmt=NONE
}
4. Rename the file to wpa_supplicant.conf (and make sure the file type is in .conf and not .txt)
5. Drag the file into your SD card. Or you can copy and paste the file into your SD card.
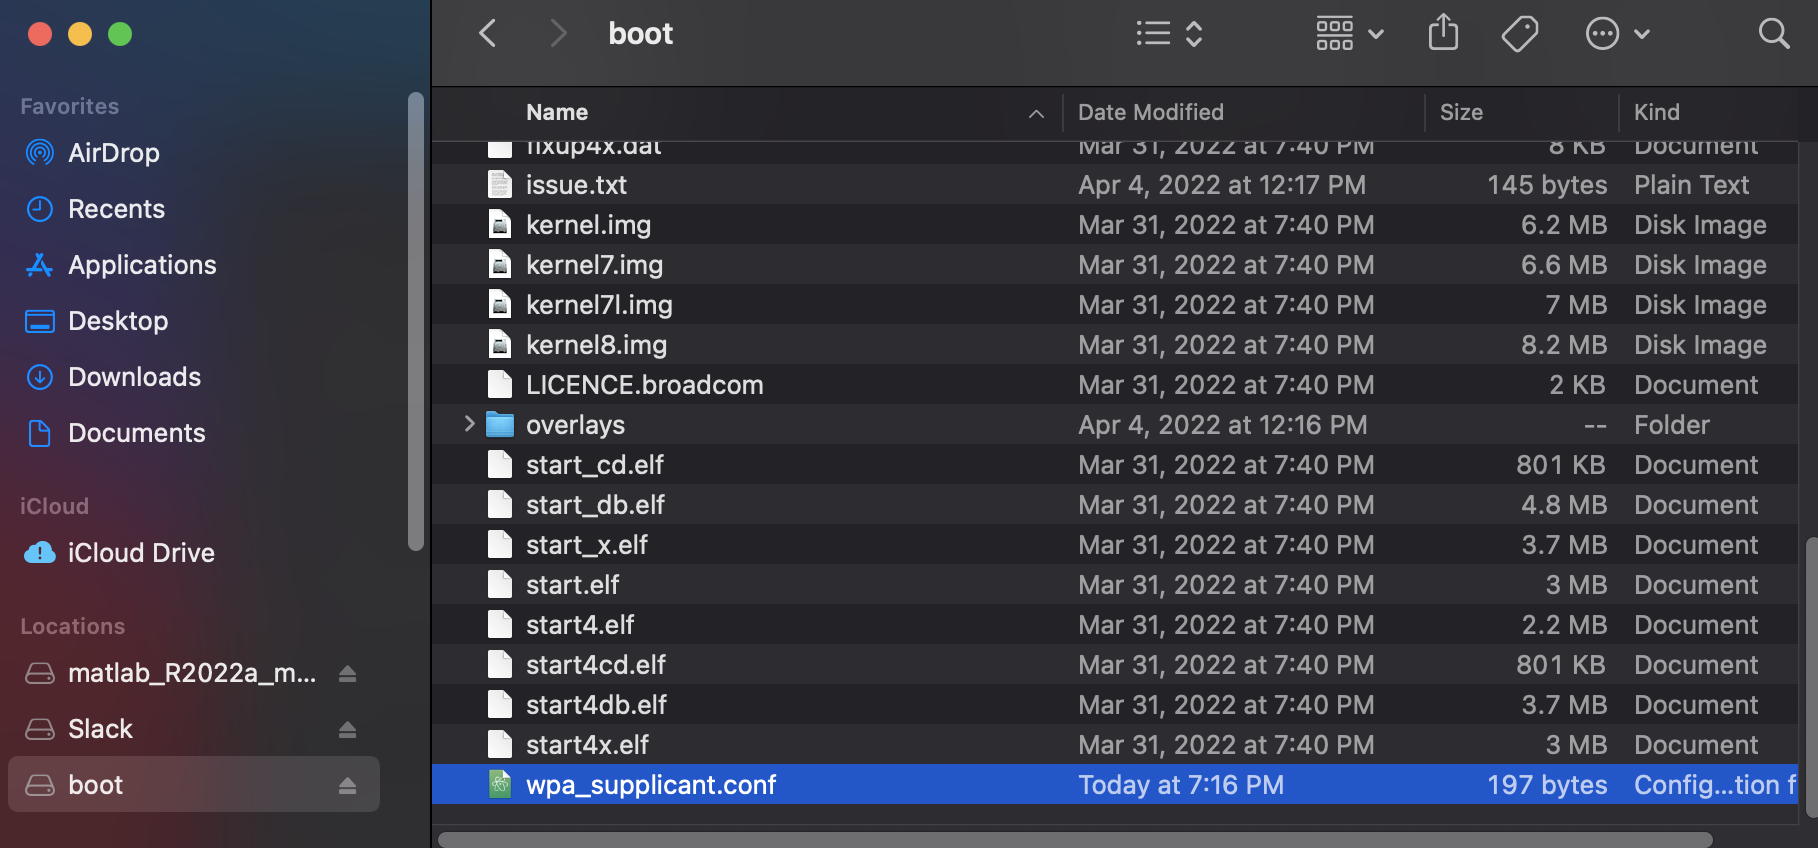
6. Eject your SD card safely before removing it
7. Insert it back into your Raspberry Pi and try the “ping raspberrypi” command again
3. Can’t Use SSH
There is a possibility you might encounter this error if you tried using SSH.

Although the text may be daunting, you don’t need to worry. Instead, focus on the line: “Offending ECDSA key in …”.
This tells you exactly where the error is. All you need to do is go to that file and remove the line that’s causing you an error. For me, it’s line 14, which is in the /Users/bowenzheng/.ssh/known_hosts file.
Here is the steps I took to fix it:
- Open the file
- In my Macbook, I have vim (which is a text editor) installed
- If you want to follow along with the rest of the steps, you can install vim on your machine at this site: https://www.vim.org/download.php
- You should copy and paste the name of the file you want to open after the vim command. For example:
vim /Users/bowenzheng/.ssh/known_hosts- Enter last line mode by typing a colon (:)
- Enable line numbers by typing:
set nu- Go into insert mode by hitting the esc key and pressing the ‘i’ key
- Delete that line
- Go into last line mode again. Press the esc key and type a colon
- Press enter after typing this command to save and exit:
wq!Now you can run your SSH command again. This time it should work because you removed the offending line.
Summary – tl;dr (Too Long; Didn’t Read)
Here are the key takeaway points you should keep in mind after reading this article:
- You can easily install Ubuntu and use it on your Raspberry Pi by following these 10 steps:
- Install & Configure Your Raspberry Pi Imager
- Configure Password, Wi-Fi, & Additional Settings
- Write Ubuntu Server to SD Card
- Install VNC Viewer On Your Laptop
- Insert SD Card Into Raspberry Pi
- Identify Raspberry Pi’s IP Address
- SSH Into Raspberry Pi
- Install Ubuntu Desktop
- Install RealVNC Server
- Run Raspi-Config & Use VNC
In the end, I hope this post helped you set up a headless Raspberry Pi with Ubuntu and your plans on working with Ubuntu!
Additional Notes
There were many moving parts in this article, so I want to acknowledge the sources that I pulled some of the code used here from:
- dexterexplains.com – teaches how to install raspi-config on Ubuntu
- omar2cloud.com – teaches how to install vnc on Ubuntu