Can You Create Desktop Shortcuts On Raspberry Pi? 2 Easy Ways!
In my life, I always try to find the best, simplest way of doing something. For instance, when I find a website I really like on my Macbook, I bookmark the page on the Google Chrome. Later on, when I want to go back to it, I’ll only need to look through my saved bookmarks.
Consequently, I started wondering if I could create these little shortcuts on Raspberry Pi since I’m using it all the time.
There are 2 easy ways to set up shortcuts on your desktop in Raspberry Pi OS. The first way is by dragging and dropping the apps from the Raspberry Pi start menu onto the screen. The second way is by right-clicking on the app and selecting “Add to desktop”.
If you want to learn more about these techniques, I’ll discuss them in full detail for the rest of the guide. Moreover, I’ll go over 2 techniques you can learn and master to create and install app-like shortcuts, which can make your Raspberry Pi workflow smoother.
Creating Desktop Shortcuts
1. Drag & Drop Method
The general way to do this is as followed:
- Install the app you want on your desktop if you haven’t already.
- Open the start menu. You can do this by clicking on the Raspberry Pi icon near the top left corner of your screen.
- Locate the app you installed.
- Maybe it’s a programming app like an Arduino IDE. If so, you can find that in the “Programming” section of the menu
- Use your mouse to click (left-click) on the application and drag it to the desktop. This will result in an icon of the app you desire shown on your desktop with a name ending in “.desktop”.
- If you want to rename the application, just press the F2 key, use the keyboard control CTRL + A to highlight all the text, and rename the application
Granted, if you want an easier method without all the work to rename your app, then you need to try the second method.
2. “Add to desktop” Method
The general process is the same as above except for the last few parts:
- Install the app you want on your desktop if you haven’t already.
- Open the start menu. You can do this by clicking on the Raspberry Pi icon near the top left corner of your screen.
- Locate the app you installed.
- Maybe it’s a programming app like an Arduino IDE. If so, you can find that in the “Programming” section of the menu
- Use your mouse to right-click on the app.
- A little window will pop up, and you’ll need to select the option “Add to desktop”
Congratulations! You learned 2 semi-unique ways to add shortcuts to your desktop. If you want a few screenshots of this process, I’ll include them in the next section of this article, which will go over how you create unique app shortcuts to save yourself time in the future.
Creating App Shortcuts
There are 2 ways you can create app shortcuts. One way is to create an app shortcut in your main menu and the other way is to use a program called nativefier. Although both may require some effort and time commitment in the beginning, setting up shortcuts from there will be as easy as pie (Raspberry Pi that is).
The first thing you will need to do before going any further is deciding on a website you use often that you would want to have a shortcut for. Maybe you like going to Google.com, Facebook.com, or even Youtube.com. In any case, I’ll be using gmail.com as an example to help you better visualize the whole process.
1. How To Use The Main Menu Method
The first step you’ll need to take is open your favorite browser or you default browser. It can be the preinstalled one (which is Chromium) or something fun like Firefox. If it’s Chromium, you can just click on the globe icon near the top left corner of the screen (it should be to the right of the Raspberry Pi icon).
Either way, you want to get onto a search engine like DuckDuckGo and search for the logo of the site you’re creating the shortcut for. If there’s no logo, locate an image that best represents the site. In either case, you should find an image you like since this will be the image of the desktop shortcut you’ll be creating.
Click on the image and then right-click on the image to see additional options. Now, you’ll need to click on “Save image as … ” to save it. This will open a new tab in which you’ll need to name it and then save it by pressing the “Save” button near the bottom right corner of the window.

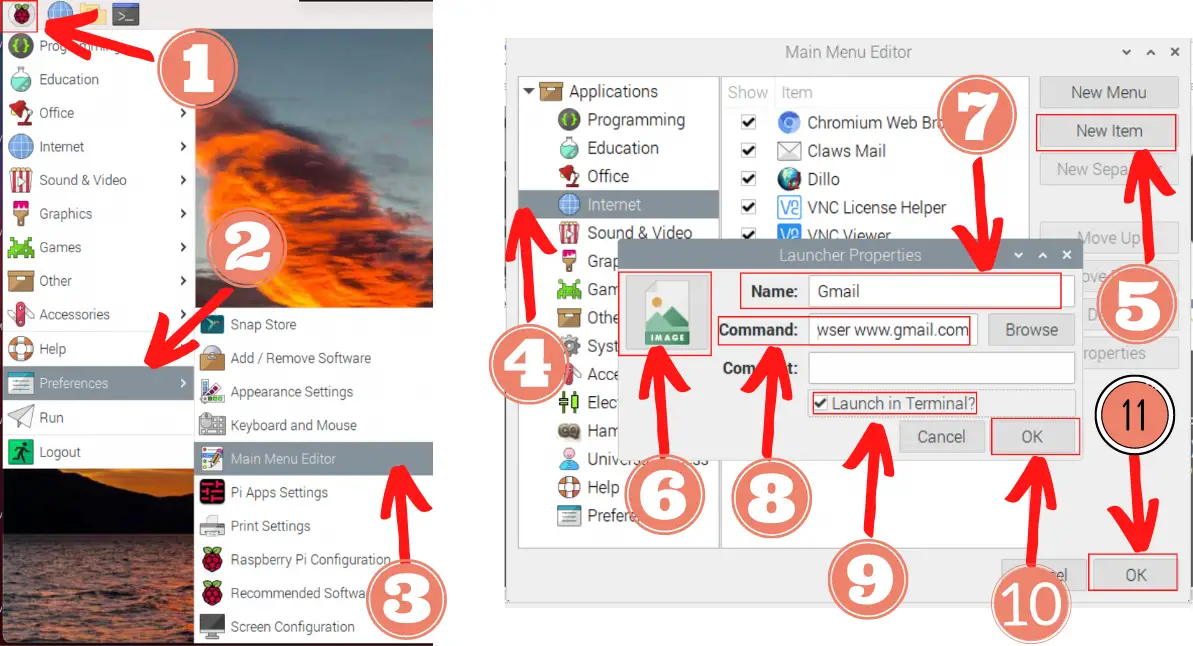
Now, you’ll want to click on the Raspberry Pi icon near the top left corner of your screen. This should display a drop down menu (also known as the start menu).
Next, you’ll need to click on “Preferences” and then “Main Menu Editor”.
Then, you should decide which menu you want to store the shortcut after it has been created. Because Gmail will take me to the Internet, I’ll put it under the “Internet” category.
After that, click on “New Item” near the top right.
Once you’ve hit “OK”, you’ll see a new window pop up. This is the “Launcher Properties” window, and it’s where you’ll handle the functionality of the shortcut when you click on it later.
First, you should pick an image. Click on the empty image icon and choose the image you saved earlier.
Secondly, you’ll need to give it a name. This will show up underneath the image as the desktop shortcut.
Thirdly, you’ll need to type in a command. Because we want to open a browser, we’ll need to type:
sensible-browser <website link>That means I’ll be typing in the following code:
sensible-browser www.gmail.comFourthly, check the box next to “Launch in Terminal?” because this is a terminal command. Then, you can click on “OK” to save all that information.
After that, you’ll need to go back to the start menu again (click on the Raspberry Pi icon near the top left corner of the screen) and click on the tab you selected initially.
Now, you’ll need to right-click (or double-click if you’re using a mouse pad) on your created shortcut and select “Add to desktop”.
Congratulations! You’ve now successfully created a desktop shortcut! To actually use it, you’ll need to click on the icon twice and a new window will pop up. In the “Execute File” window, select the “Execute in Terminal” button.
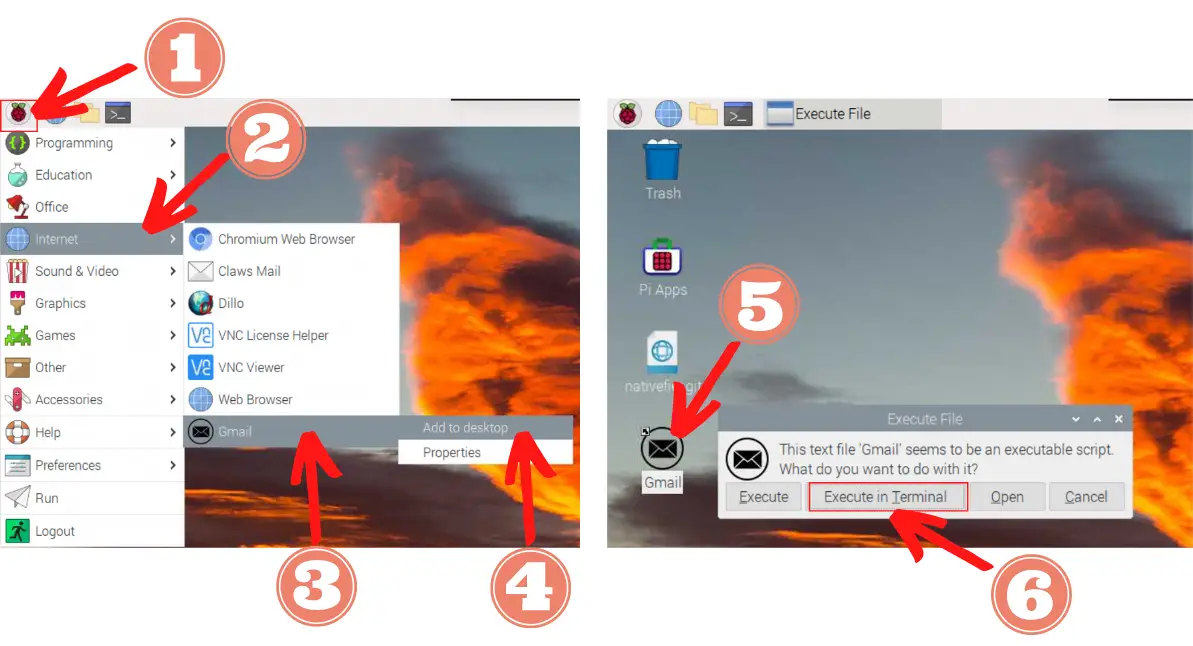
Finally, a browser will appear and take you to your site.
2. How To Use Nativefier
Nativefier is a command line tool that can create a desktop app (thanks to Electron, which is a framework for creating native applications) for any website with minimal effort on your part.
In my research, I found that you couldn’t install nativefier with the Snap store anymore, which is why I resorted to installing it will Node Package Manager (npm). This (as the name suggests) manages packages, and it comes installed with Node.js.
So if you want to use this method, perform the following steps:
- Open up your terminal. You can do this by using the keyboard shortcut CTRL + WINDOWS KEY + T (or CTRL + COMMAND + T if you’re a Macbook user).
- Alternatively, you can click on the terminal icon near the top left corner of the screen. It looks like a blackboard and it’s near the Raspberry Pi icon (which is the start menu).
- Update the terminal to make sure we pull the most recent and up to date files:
sudo apt update- You’ll first need to switch to root to become a super user (since many of the following commands require this power):
sudo su- Enable NodeSource Repository because you want to install Node.js in the next step to make this work:
curl -fsSL https://deb.nodesource.com/setup_17.x | bash -- Install Node.js:
sudo apt install nodejs- Install corepack with npm :
npm i -g corepack- Enable corepack since it acts as a bridge between npm and Node.js:
corepack enable- Now you can install nativefier:
npm install nativefier -g- Change directory into the Downloads folder. This is where we want to store the app that nativefier builds when we run the command in step 10:
cd Downloads- Finally, you can start converting the website into an app with nativefier:
nativefier --arch="armv7l" -n <name of the shortcut> <website link>From my research, nativefier doesn’t support the current Raspberry Pi architecture, which is why we needed to add the code --arch="armv7l". This changes the architecture, which makes it possible to use nativefier.
Now, if you want to use the new app shortcut you downloaded, you’ll need to run a few more commands back in the terminal:
- If you haven’t already exited root, type the command to exit:
exit- Change directory into Downloads:
cd Downloads- Now, we want to change directory into the folder you created that contains the app. Run the list command to find the name of all the files and folders in the directory. You should be able to locate the folder because it should have a word in it that relates to your app shortcut:
ls- Copy and paste the name when you change directory again with the cd command
For example, I’ll do:
cd gmail- Change the executable permission so you can run the app:
sudo chmod +x *- To run the app, write the name of the application after “./”. This will execute the script, which is a text file that contains code.
For example, my script file would be called whatever I named it (which is gmail):
./gmailI personally really like the second approach. Although the setup is a little more tedious than the first way, it also sets me up to quickly create little ‘apps’ for other websites in the future.
I plan on creating lots of apps in the future for lots of the common websites I visit 😀.
Summary – tl;dr (Too Long; Didn’t Read)
Here are the key takeaway points you should keep in mind after reading this article:
- There are 2 easy ways you can create desktop shortcuts on your Raspberry Pi (although I’d much prefer the second approach)
- The first way is to open the start menu (by clicking on the Raspberry Pi icon near the top left corner of the screen), find your app, and drag and drop it onto the desktop
- However, this method will generate a name for the icon ending in “.desktop”. Therefore, if you want to change it, press the F2 key, select all the letters with CTRL + A, and rename it.
- The second way is to open the start menu again, find your app, and right-click on it. This will open a new window with new options. You should select the “Add to desktop” option. This will also create an icon on your desktop with the name preserved.
- Of course, you can still change the name with the F2 key shortcut.
- The first way is to open the start menu (by clicking on the Raspberry Pi icon near the top left corner of the screen), find your app, and drag and drop it onto the desktop
- There are 2 ways you can create app shortcuts on your Raspberry Pi and use the previously mentioned methods to add them to your desktop (although I’d prefer the second method again in this instance).
- The first method is use the main menu editor (which is located in Start menu < Preferences < Main Menu) to install an ‘app’ that will take you to the website.
- The second method is to use the nativefier software, which will do about the same thing as mentioned previously.
- Even though this method may be a little long to set up, it’ll be easier and quicker to do so moving forward because you have the nativefier software installed the first time you do it.
Regardless of the app-roach you take, each method should lead you to the desired result.