Can You Play Minecraft On Raspberry Pi? Let’s Find Out!
Ever since Minecraft came out in 2011, I was an avid fan of it. I played it all the time and loved reading books about it. It was very addicting because I loved “building” things in the game and going on my own personal quests.
Now that I have a Raspberry Pi, I started wondering “Can you play Minecraft on Raspberry Pi?”
You can definitely play Minecraft on Raspberry Pi as long as you install it properly. A great, simple method of doing so is by installing Pi Apps on your Raspberry Pi and then installing Minecraft from there.
The rest of this guide will go further in-depth on how you can install Minecraft as well as provide pictures for each step.
How Do You Install Minecraft on Raspberry Pi?
Here are the steps you need to follow in order to install Minecraft on your Raspberry Pi:
Step #1: Open Terminal
To access the terminal, you should click on the 4th icon from the top left corner of the display. The terminal icon looks like a blackboard with the symbols “>_”. An easier way to access it is to use the keyboard shortcut CTRL+ALT+T.
Step #2: Perform Some Updates
You’ll need to perform some updates so that the terminal will install the latest package. Here are the commands you need to perform in the command line of your terminal:
sudo apt-get updatesudo apt-get upgradeThese updates should only take a few minutes.
Step #3: Download Pi Apps
In the command line of your terminal, type in the following code:
wget -qO- https://raw.githubusercontent.com/Botspot/pi-apps/master/install | bashIt should finish within 5 minutes.
Step #4: Launch Pi Apps
Click on the Raspberry Pi icon (it should be the first icon you see on the top left corner of your screen).
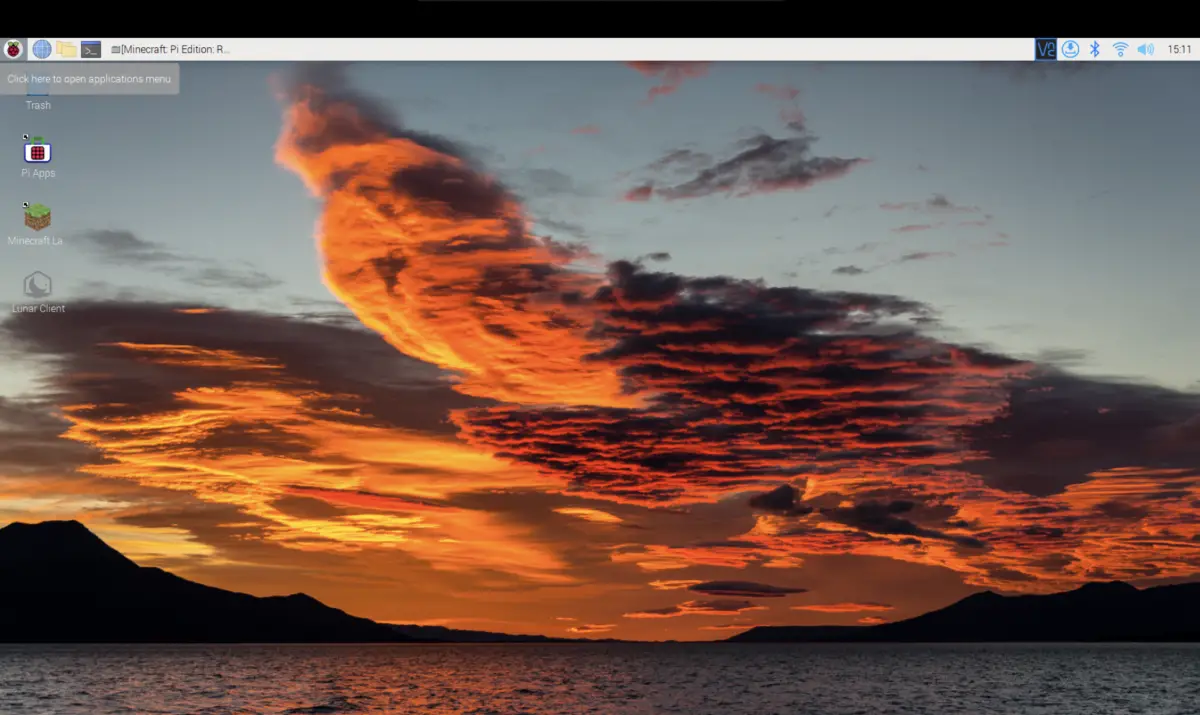
Next, click on Accessories and you should see the Pi Apps icon. Click on that to start it.
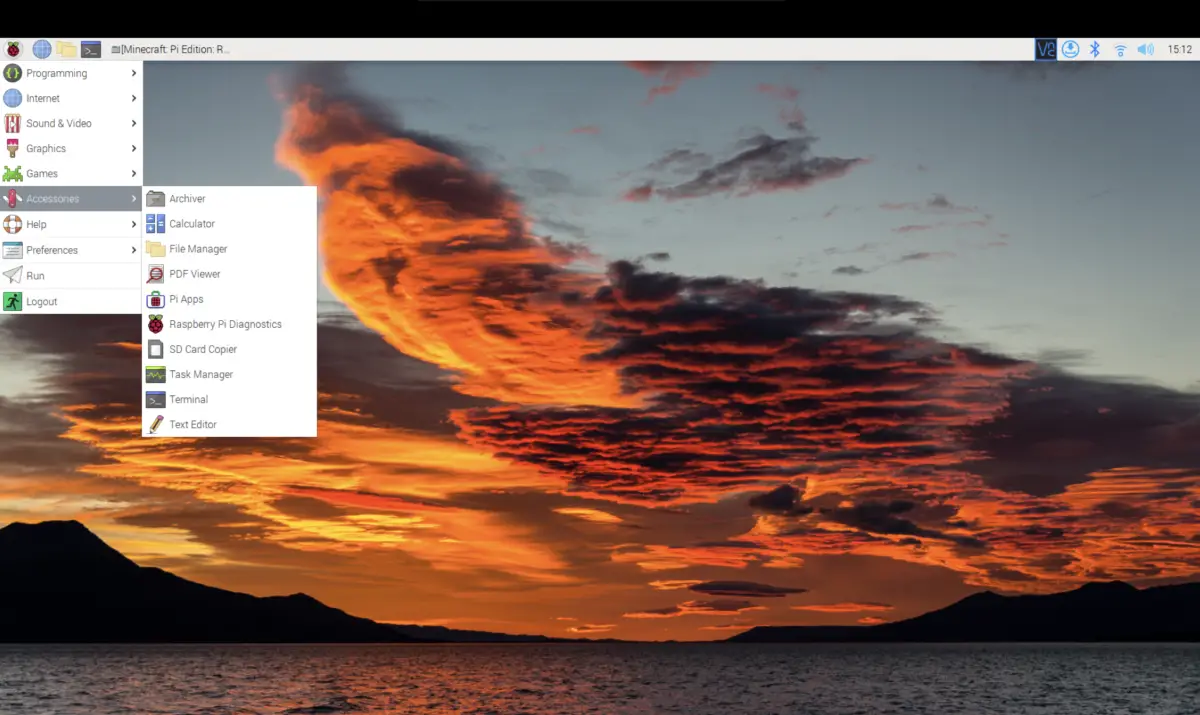
Step #5: Install Minecraft Pi
Now, you should click on the “Games” folder.
Then, you’ll need to scroll down and click on Minecraft Pi to install it.

This is a free version of Minecraft that was made especially for Raspberry Pi. You could also install Minecraft Java, but you’ll need to log in with an account. With Minecraft Pi, the only thing you’ll need to do is to create a name and the mode (ie Creative or Survival).
Step #6: Launch Minecraft Pi and Play!
Now go back to the Raspberry Pi icon (it should be the first icon you see on the top left corner of your screen)
Then, click on the “Games” folder and click on Minecraft Pi. Doing this will launch the application and now you can start playing your game! All you have to do is create your character and the world you want to play in.
How Do You Play Minecraft On Raspberry Pi
If you’re not used to playing Minecraft with a keyboard, here are all the important game controls you’ll need to learn before you start playing:
| Keyboard Shortcuts | Action |
|---|---|
| W | This lets your character move forward |
| A | This lets your character move to the left |
| S | This lets your character move backward |
| D | This lets your character move to the right |
| E | This lets you access your inventory. This also lets you start crafting basic things like a crafting table. |
| esc | This lets you pause the game |
| Q | This lets your character drop the things it’s holding |
| Spacebar | This lets you jump. Moreover, if you’re underwater and sinking, holding this key will let you get to the surface |
| CTRL + Q | This lets you drop a whole stack of items |
| Shift + Left (arrow key) | This combination has three different functions depending on the situation you’re in: 1. If you’re crafting something, doing this lets you create the maximum amount of items possible based on your inventory. 2. If you’re in the inventory screen, doing this lets you move items between your hotbar and inventory 3. If you’re in front of an open container, doing this lets you move an item into your inventory |
| F | This lets you switch the items in your hand |
| Left Shift | This lets you sneak |
| Left Control (or double- tapping the W key) | This lets you move faster (ie sprint) |
| F1 | This will hide the heads up display |
| F2 | This lets you take a screenshot of the game |
| F3 | This lets you see the character’s coordinates in addition to some other useful information |
| F4 | This disables shaders (shaders give the game a more realistic feel) |
| F5 | This toggles between the first-person point of the view and third-person point of view |
| F6 | If you want to stream, this can either turn it on or off |
| F7 | If you’re streaming, this pauses it |
| F8 | This makes your mouse more sensitive |
| F11 | This lets you toggle between a full-screen display and a windowed display |
If you want to use the F1-11 keys, you’ll need to press the “fn” key in addition to the F1-11 key.
| Mouse Action | Action |
|---|---|
| Left-click | This lets you attack |
| Right-click | This lets you place objects. If you’re holding food and you right-click your mouse, you can eat the food and regain health |
| Scroll wheel | This lets you choose the object you want to use |
| Moving the Mouse | This lets you look around |
Summary – tl;dr (Too Long; Didn’t Read)
Here are some of the key takeaway points you should keep in mind after reading this article:
- The steps you need to take to install Minecraft on your Raspberry Pi are:
- Open the terminal on your Raspberry Pi
- Perform some updates
- Here’s the code you’ll need to type in the terminal:
1. sudo apt-get update
2. sudo apt-get upgrade
- Here’s the code you’ll need to type in the terminal:
- Download Pi Apps
- Use the following code to install it:
wget -qO- https://raw.githubusercontent.com/Botspot/pi-apps/master/install | bash
- Use the following code to install it:
- Launch Pi Apps
- Install Minecraft Pi
- Launch Minecraft Pi and play!
- The controls for the gameplay are relatively simple: you’d use W, A, S, D, and spacebar to move and jump around and you’d use a mouse to swivel your head and attack something. I made a table that contains all the other important controls you’ll need above.
In the end, I hope that you’ll have a great time mining and crafting stuff in Minecraft!

