How Do You Tell If Your Arduino Is Working? (Simple Guide)
The guide you are about to read contains tips and tests you can run on your Arduino board when it doesn’t seem to work. This is mostly directed towards the Arduino Uno Rev 3 board because it’s the most popular board. Moreover, it is the one I have the most experience with.
However, that isn’t to say that any of the suggestions I make aren’t going to pertain to your specific board. Some of the advice isn’t too specific, which means that if you go through the guide and your board still isn’t working, then you should post your issues in an Arduino forum for a more catered solution.
You can think of this article as the first line of defense: it saves you the trouble of asking a question in the forum and waiting for an answer. Many of the tips I provide below are applicable to all (if not most) Arduino users, so you can focus on those before worrying too much.
But before I get into the article, let’s answer the question: “How can you tell if your Arduino is working or not?”
You should use the indicator light on your Arduino board and the blink test to see whether your Arduino is functioning or not.
The rest of this article will dive deeper into another test called the heartbeat test, steps for understanding why your Arduino board isn’t working, and some common problems for why your Arduino won’t work. If all of this advice doesn’t work for you, I’ve included a step-by-step plan of action for asking for help in the Arduino forum in my Final Thoughts section.
Locating Your Arduino’s Source Of Problem
In order to make your search more efficient and effective, you first have to decide whether it’s the IDE or the Arduino board giving you all the trouble.
As a result, I will be dividing this section into two groups: software (for those having issues with the programming aspect) and hardware (for those having trouble with the board). Let’s start with the hardware:
Hardware
To make sure your board is working at all, use the indicator light.
Indicator Light
For those who don’t know this, the quickest and easiest way to tell if your Arduino is working is by checking the built-in LED (Light-Emitting Diode) on your board.
You can enable it by supplying power to it. You would most commonly use a USB (Universal Serial Bus) cable and a computer to power it. By connecting the USB cord to the computer’s USB port and the Arduino’s USB port, the LED should light up green (it’s next to the word “ON”).
Notice the green LED light up on the left side
If the light doesn’t turn on, then your Arduino board is either damaged or defective. You could either spend more time finding the source of the error and spend money and effort to fix it, OR you can just buy a new board.
It’s well worth the investment, but you need to make sure the board you buy isn’t a cheap knockoff.
However, if you want to fix it, go to the section below titled “Hardware Issues” to see how you can fix it.
Software
Now, if you know your board is not the issue here, use the blink test to make sure that it is actually the software that’s problematic.
Blink Test
For this test, you don’t need any equipment besides your Arduino, a USB cable, and a computer.
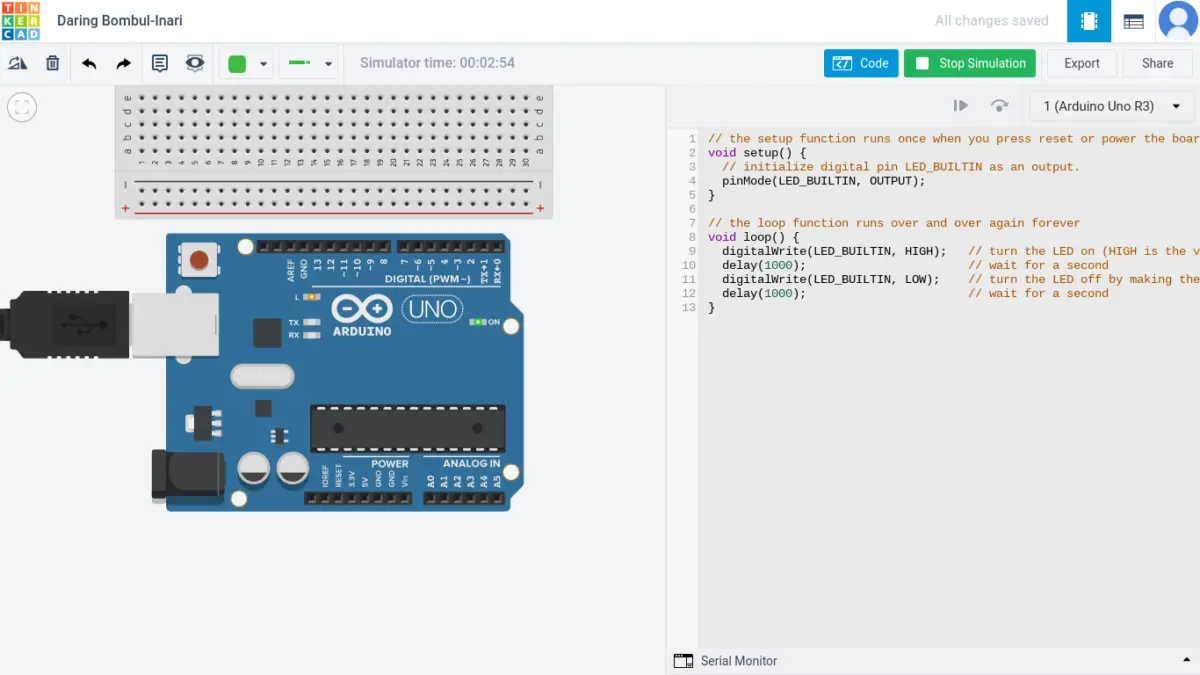
Connect your Arduino to your computer with the USB cord and put the following code in the IDE (Integrated Development Environment – it’s where you write your code):
// the setup function runs once when you press reset or power the board
void setup() {
  // initialize digital pin LED_BUILTIN as an output.
  pinMode(LED_BUILTIN, OUTPUT);
}

// the loop function runs over and over again forever
void loop() {
  digitalWrite(LED_BUILTIN, HIGH);   // turn the LED on (HIGH is the voltage level)
  delay(1000);                       // wait for a second
  digitalWrite(LED_BUILTIN, LOW);    // turn the LED off by making the voltage LOW
  delay(1000);                       // wait for a second
}
This makes sure that your Arduino board can work with the IDE. The board’s L-light should turn on and emit the color orange/yellow (see picture below) for one second, and then turn off for one second. This will continue to repeat as long as the Arduino is powered.
If you’re certain that your software is the issue here, go to the “Software Issues” section to find the potential software-related causes there.
Hardware Issues
Your Arduino isn’t working because:
- You are having problems with the header pins.
- Check out my “Arduino Pins Guide: Their Functions And How To Test Them” guide to see how you can test them.
- If it does turn out you have a pin problem, you need to buy a new board or just replace the pin headers using a technique called soldering. Read my post “Should You Use Soldering For Your Arduino? (Soldering Guide)” for more information.
- Your computer’s USB port is worn.
- You can tell it’s worn out if the port looks dirty, rusted, or dusty.
- Solution: Go buy a new computer or a refurbished one. It will be well worth the investment for both your Arduino adventure and your future web surfing exploits.
- Your USB cable is defective.
- To make sure it is your USB cable that’s damaged, connect your Arduino to a different USB cord that you know works for sure.
- Solution: If the cable is really damaged, just buy a new USB cable as it is relatively cheap. For example, it costs around $7 on Amazon.
- You’ve overheated your board.
- Go read “How Hot Or Cool Can Your Arduino Be? Let’s Find Out!” to understand at what temperatures your Arduino should be running and how you can prevent an Arduino from overheating.
- Your board has been fried.
- Go check out my post “How To Tell If Your Arduino Is Fried And Prevent It From Frying” to see what caused your Arduino to fry and how you can fix a fried Arduino.
- Your board has been short-circuited.
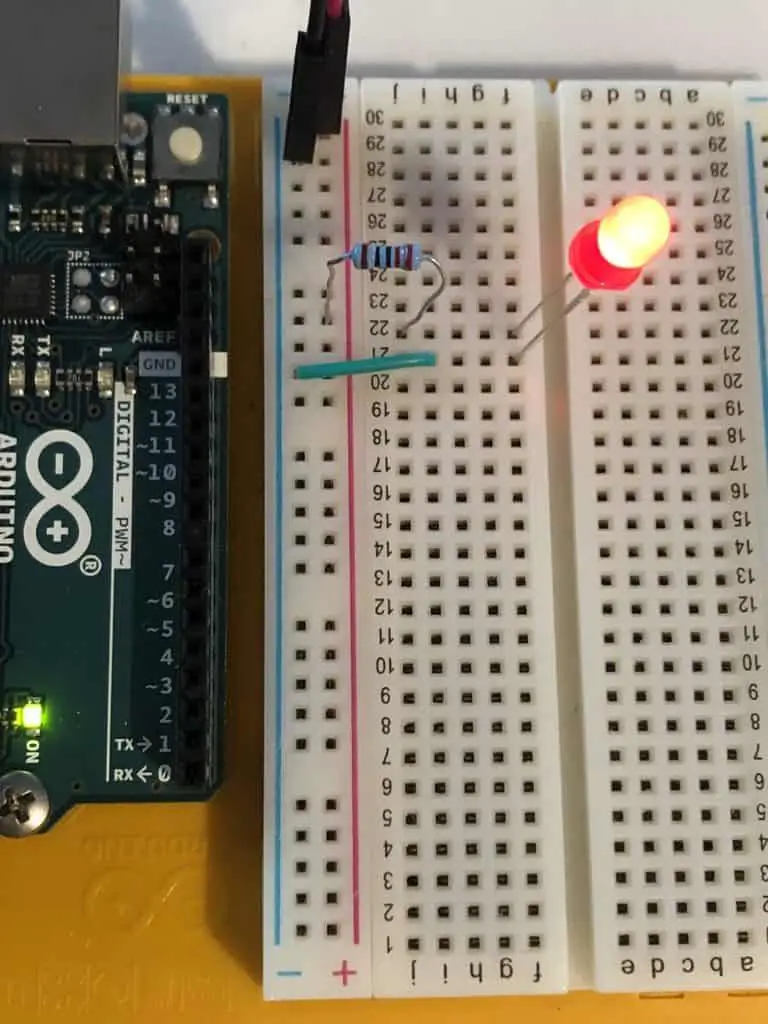
- For instance, you can short circuit your board if you don’t use a resistor with an LED.
- Solution: Buy a new board unless you’re experienced and want to spend more time, money, and effort into locating the mistake and fixing it.
What Is Short-Circuiting?
Short-circuiting is when the electrons in the negative terminal of the battery (the “-” part) move rapidly towards the positive terminal of the battery (the “+” part) without anything in their path to slow them down.
If your board doesn’t have one of the above issues, go read “Top 10 Beginner Mistakes That Can Damage Your Arduino” to see other (potential) that may have damaged your boards and my prescribed solutions.
Software Issues
Your Arduino isn’t working because:
- Your Arduino code is wrong.
- You most likely have an error in your code and you need to debug it.
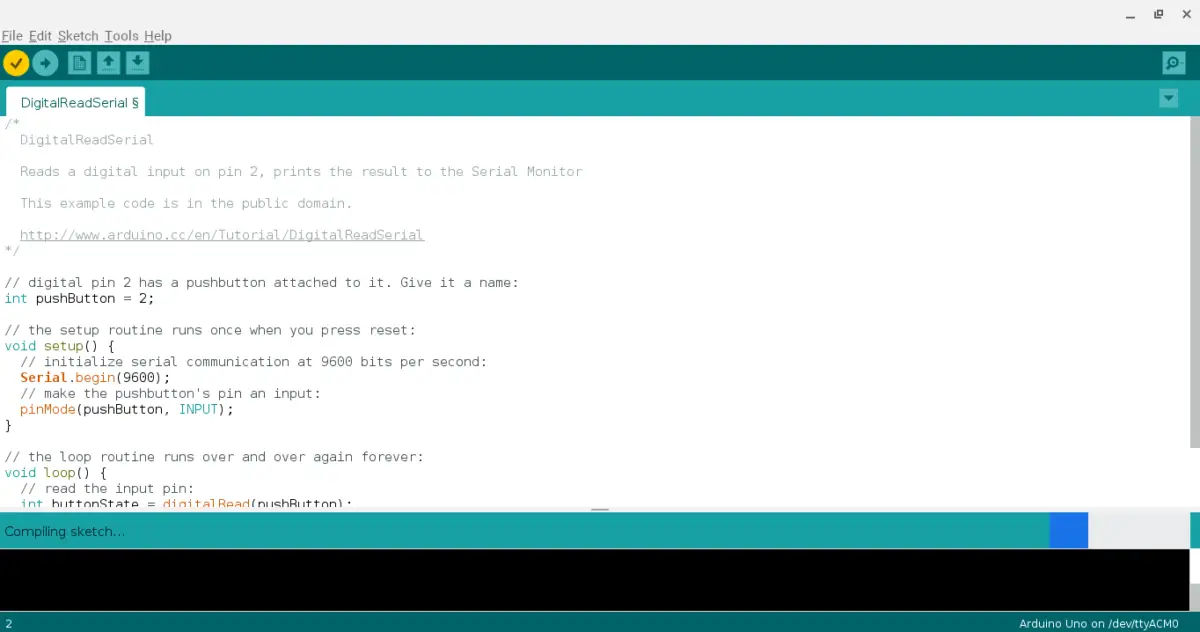
- My tip is that when you’re writing your code, you should hit the verify button every 2-4 new lines.
The verify button is the first button you see on the top left corner of your Arduino IDE. Its symbol is a checkmark and it basically checks your code to see if there are any errors.
If there are any errors, it will highlight the line of code that’s wrong in red and send a message to the console. The message will be in red letters detailing what the IDE thinks is wrong with your code.
- You ran out of memory.
- To better understand what to do when you’ve run out of memory, how to fix it, and preventative measures to make sure you don’t run out of memory, go check out my two-part guide:
- You’re stuck in an infinite loop.
- To learn more about that and how to stop the loop to fix it, check out my post “How Do You Stop A Loop Arduino? (4 Best Easy Loop Tips)”.
- Your Arduino driver or IDE aren’t updated.
- Solution: To fix your driver, go to your control panel and click on the Device Manager. Find the Arduino USB port on it, but not the name of the Arduino board because your computer doesn’t recognize it yet. Right-click on the USB port (which is connected to your Arduino board) and click on “update drivers”.
- I’ve also created a great guide called “How Do You Update Arduino IDE? Here Are Some Simple Steps”, and it should help you better address this issue if my short solution above didn’t help you.
- You chose the wrong COM port.
What is a COM port?
A COM (which stands for communication) port an Input/Output (I/O) interface that allows a serial device (like an Arduino) to be connected to a computer. It is also known as a serial port.
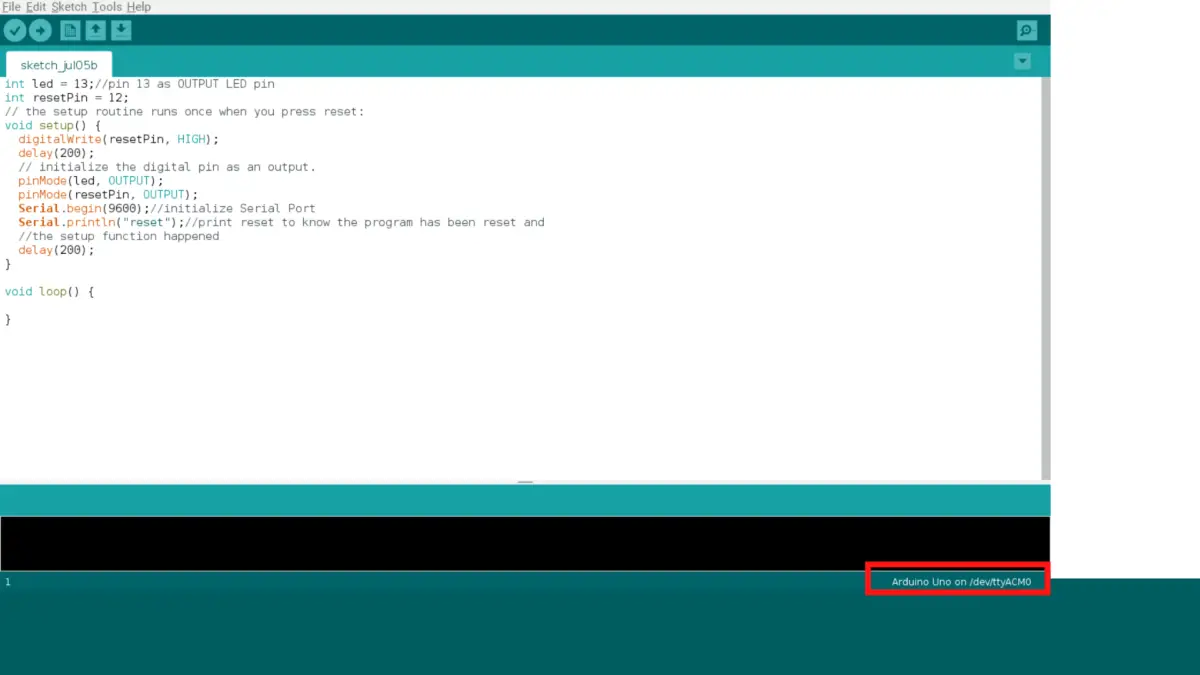
You can tell which COM port you’ve connected by looking at the bottom right of the Arduino IDE
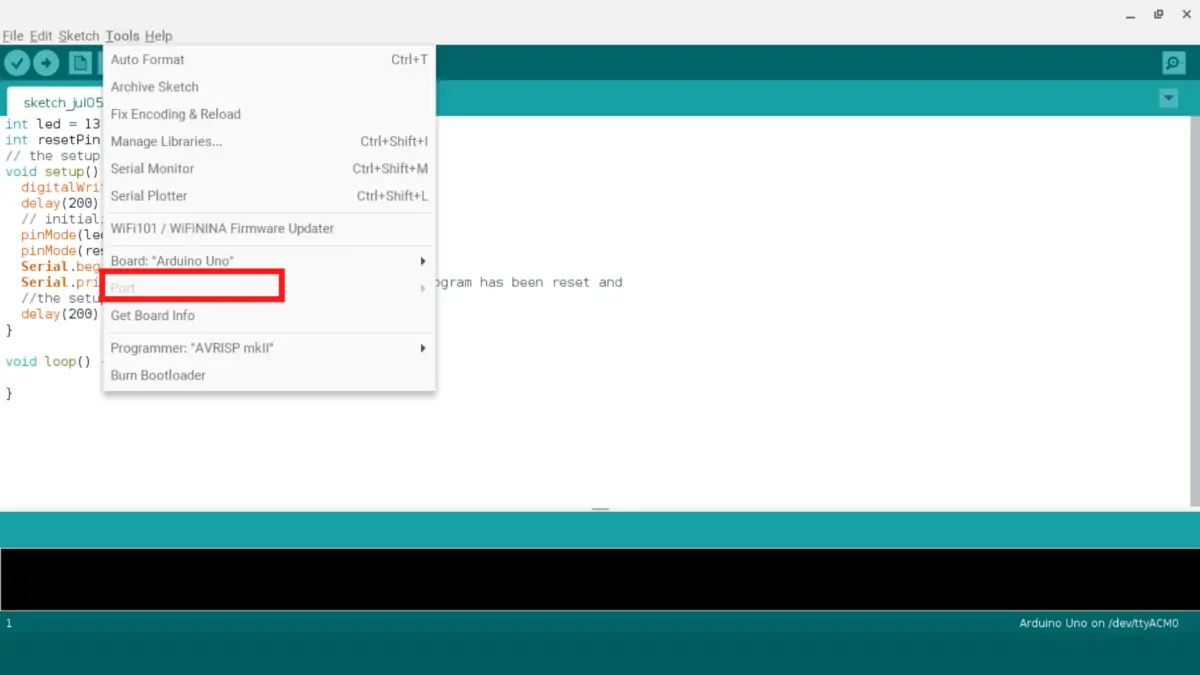
Solution: To change your COM port, go to your Arduino IDE, click on “Tools”, click on “Port”, then choose the correct one that’s compatible with your Arduino. After that, your Arduino should be detected.
- Your Arduino IDE is malfunctioning and shows the “launch4j” error because it’s buggy. This bug is due to a glitch in the Arduino IDE’s backend.
- Solution: Try restarting your Arduino IDE. If the issue continues, you need to uninstall and reinstall the IDE.
- Note: Make sure you are installing the IDE from the arduino.cc site, not any other shady third-party site.
- You’ve selected the wrong board on the IDE that doesn’t match with the type of board you are using.
Another mistake that beginners can make is clicking on the wrong type of board in the Arduino IDE or not checking whether the selected board is the correct one.
Because there are many types of Arduino (like the Arduino Uno or the Arduino Nano), picking a board in the IDE other than what you have will make it unrecognized by the computer. This is because your computer expects one type of Arduino, and your Arduino type doesn’t match up.
You can check what board you’re using at the bottom right-hand corner of the screen:
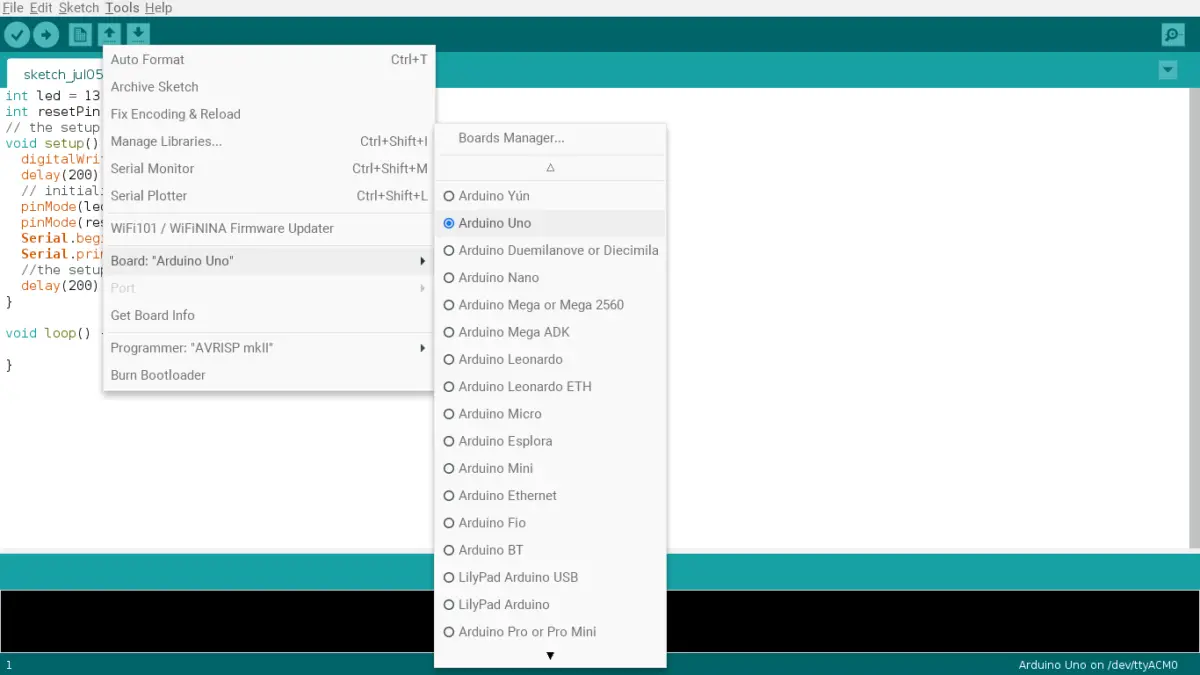
Solution: To fix it, click on “Tools”, and look for “Board: <the name of the Arduino board>”. Know what type of Arduino you have and make sure it matches. If not, just click on the board and pick the right one.
Heartbeat Test
This test combines the blink test with the code you’re using. It’s very effective and tests whether there are any irregularities when you are running your code. This is great to check whether your code still has any bugs or not.
This test turns the L-light on and off in a fixed pattern. When you are running your code with this and you notice that the L-light is flashing randomly, then there’s something wrong with your code. For instance, your code may be stuck in an infinite loop.
If it’s taking a long time, your processor may be encountering a lot of interrupts or that the code you’re using is taking too long to run.
The syntax for the heartbeat test is this:
void setup() {
// insert the code you're using (that's only in your setup) in this setup
// initialize digital pin LED_BUILTIN as an output.
pinMode(LED_BUILTIN, OUTPUT);
}
void loop() {
// insert the code you're using (that's only in your loop) in this loop
heartbeat(); // starts running the heartbeat test
delay(500); // pauses for half a second (or 500 milliseconds)
}
void heartbeat(){
digitalWrite(LED_BUILTIN, HIGH); // turn the LED on (HIGH is the voltage level)
delay(1000); // wait for a second
digitalWrite(LED_BUILTIN, LOW); // turn the LED off by making the voltage LOW
delay(1000); // wait for a second
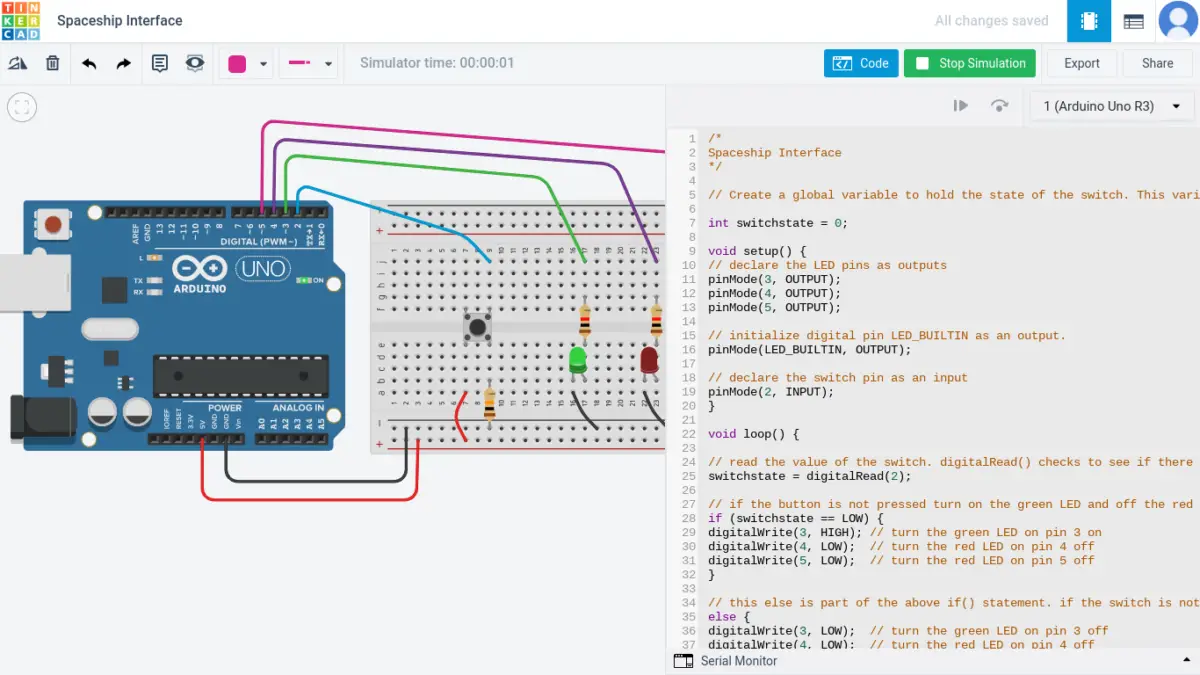
}Here is the example code to show you how I do it. I incorporated the heartbeat test into the Spaceship Interface project.
/*
Spaceship Interface
*/

// Create a global variable to hold the state of the switch. This variable is persistent throughout the program. Whenever you refer to switchState, you’re talking about the number it holds.

int switchstate = 0;

void setup() {
// declare the LED pins as outputs
pinMode(3, OUTPUT);
pinMode(4, OUTPUT);
pinMode(5, OUTPUT);

// declare the switch pin as an input
pinMode(2, INPUT);

// initialize digital pin LED_BUILTIN as an output.
pinMode(LED_BUILTIN, OUTPUT);
}

void loop() {

// read the value of the switch. digitalRead() checks to see if there is voltage on the pin or not
switchstate = digitalRead(2);

// if the button is not pressed turn on the green LED and off the red LEDs
if (switchstate == LOW) {
digitalWrite(3, HIGH); // turn the green LED on pin 3 on
digitalWrite(4, LOW);  // turn the red LED on pin 4 off
digitalWrite(5, LOW);  // turn the red LED on pin 5 off
}

// this else is part of the above if() statement. if the switch is not LOW (the button is pressed) turn off the green LED and blink alternatively the red LEDs
else {
digitalWrite(3, LOW);  // turn the green LED on pin 3 off
digitalWrite(4, LOW);  // turn the red LED on pin 4 off
digitalWrite(5, HIGH); // turn the red LED on pin 5 on
// wait for a quarter second before changing the light
delay(250);
digitalWrite(4, HIGH); // turn the red LED on pin 4 on
digitalWrite(5, LOW);  // turn the red LED on pin 5 off
// wait for a quarter second before changing the light
delay(250);
}

heartbeat();
delay(500);
}

void heartbeat() {
  digitalWrite(LED_BUILTIN, HIGH);   // turn the LED on (HIGH is the voltage level)
  delay(1000);                       // wait for a second
  digitalWrite(LED_BUILTIN, LOW);    // turn the LED off by making the voltage LOW
  delay(1000);                       // wait for a second
}
Issue Still Not Resolved?
In an ideal situation, you should either have a working Arduino by now or be aware of how to fix your Arduino if it stops working in the future.
In case my suggestions are not working for you, you should post your problems on the Arduino forum. You can post it on other forums like Quora or Reddit, but the Arduino forum is geared more towards Arduino users.
Anyways, when you’re submitting your issue, make sure it is as detailed as possible. Ask yourself these questions:
- What operating system are you using?
- What type of Arduino board do you have?
- What does your circuit look like?
- Take a picture of the wiring and make sure it looks as neat as possible so that others can provide you with the best possible answer.
- What was your previous experience with that problematic board?
- Was it working before? If it did previously work, what recent change did you make to your computer that prevented your board from working again? For instance, did you make any software updates?
- What error messages were displayed (if any)?
- You can find these messages in the bottom, black section of your Arduino IDE. The messages’ text color is typically red.
- What code are you using?
- Include your code with your post so others can make sure it’s not the bugs in the code causing the appearance that your board is not working (or some other reasons).
- When posting your code, use the code tags (</> button on the forum website toolbar) to make it easier for others to understand. This allows a quicker response time.
Summary – tl;dr (Too Long; Didn’t Read)
Here are the key takeaway points you should keep in mind after reading this article:
- If your Arduino isn’t working, you should first determine if it’s a hardware or software issue
- If it’s a hardware problem, you should check:
- Your header pins
- USB cable
- USB port
- Board (to see if it’s fried, short-circuited, or overheated)
- If it’s a software problem, you should check:
- Arduino code
- Arduino IDE
- Did you use up too much memory?
- Are you stuck in an infinite loop?
- Did you choose the right board or COM port?
- Is your Arduino IDE updated?
- You can always perform a heartbeat test to test for irregularities in your code
In the end, I hope your Arduino issue is resolve so that you won’t have to fix-ate too much on it.
References
Some of the information used in this article was used from other sources to ensure that I provide you the highest quality and most relevant information. The sources include: