Can You Run Arduino Code On Raspberry Pi? Here Are 3 Easy Ways!
I’ve been working on both the Arduino and Raspberry Pi for a while now, so I’ve been constantly thinking about how I can bring them together. Raspberry Pi is basically a credit card sized computer, so it would be advantageous for me to use in the future if I wanted to travel light if I want to bring my Arduino with me.
Consequently, I researched and experimented heavily to extract the simplest steps of running Arduino code from a Raspberry Pi.
It is possible to run Arduino code from Raspberry Pi. To do that, you’ll need to first install the Arduino IDE (Integrated Development Environment) on the Raspberry Pi and upload it to your Arduino through a USB cable. The 3 ways to do that is by installing it through the terminal, downloading and extracting it from the website, and creating a desktop shortcut to the online IDE.
The rest of the article will dive deeper into each of these methods as well as showing you how to upload code from your Raspberry Pi to your Arduino. Lastly, I’ll show you a basic test you can run on your Arduino to see if it’s running or not.
How To Install Arduino IDE On Raspberry Pi
1. Using The Desktop Shortcut
Previously, the only way to write and upload Arduino code was by downloading and running the Arduino IDE. Admittedly, you could also install other text editors like Visual Studio Code or Atom to do so, but the point is, you always needed to download some form of software to write and run the code.
Now, that isn’t the case anymore. Recently, Arduino created an online version of the Arduino IDE, making it possible for users to quickly access a platform to code without the hassle of installing an IDE. Yet, there are a few bugs and the user experience isn’t the best, but it’s still useable.
Therefore, if you just want to use the Arduino IDE, then you can go to this website and start programming: https://create.arduino.cc/editor
But this guide is about installing Arduino IDE on your Raspberry Pi, and that’s what I’m going to do. I’ll show you how to create a desktop shortcut on your Raspberry Pi to the Arduino IDE in your browser. This will give the illusion that you installed the Arduino IDE.
The first step you’ll need to take is open your favorite browser or you default browser. It can be the preinstalled one (which is Chromium) or something fun like Firefox.
Either way, you want to get onto a search engine like DuckDuckGo and search “Arduino image” (or logo). Find an image you like since this will be the image of the desktop shortcut you’ll be creating.
Click on the image and then right-click on the image to see additional options. Now, you’ll need to click on “Save image as … ” to save it. This will open a new tab in which you’ll need to name it and then save it by pressing the “Save” button near the bottom right corner of the window.
Now, you’ll want to click on the Raspberry Pi icon near the top left corner of your screen. This should display a drop down menu (also known as the start menu).
Next, you’ll need to click on “Preferences” and then “Main Menu Editor”.
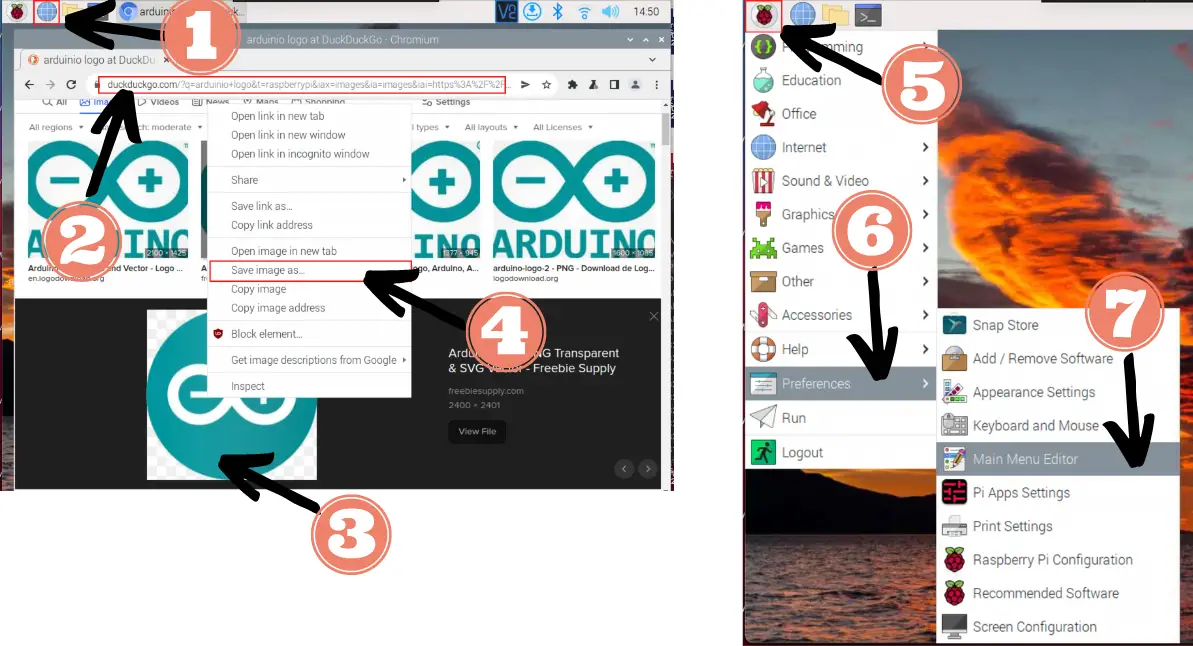
Because the Arduino IDE is a programming tool, I decided to put this shortcut under the “Programming” section. If you choose to actually install the software (as I’ll show in later steps), it will also end up in this section.
Of course, if you have a better idea or preference on which section the IDE should go, you can perform this process there too (since it’s the same).
Anyways, I’ll click on the “Programming” tab and then click on “New Item” near the top right.
Now, you’ll see a new window pop up. This is the “Launcher Properties” window, and it’s where you’ll handle the functionality of the shortcut when you click on it later.
First, you should pick an image. Click on the empty image icon and choose the Arduino image you saved earlier.
Secondly, you’ll need to give it a name, which is “Arduino IDE”. This will show up underneath the image as the desktop shortcut.
Thirdly, you’ll need to type in a command. Because we want to open a browser, we’ll need to type:
sensible-browser create.arduino.cc/editorYou can open any other browser from your terminal if you replace https://create.arduino.cc/editor with a different browser link.
Fourthly, check the box next to “Launch in Terminal?” because this is a terminal command. Then, you can click on “OK” to save all that information. Press “OK” again to confirm your decision.
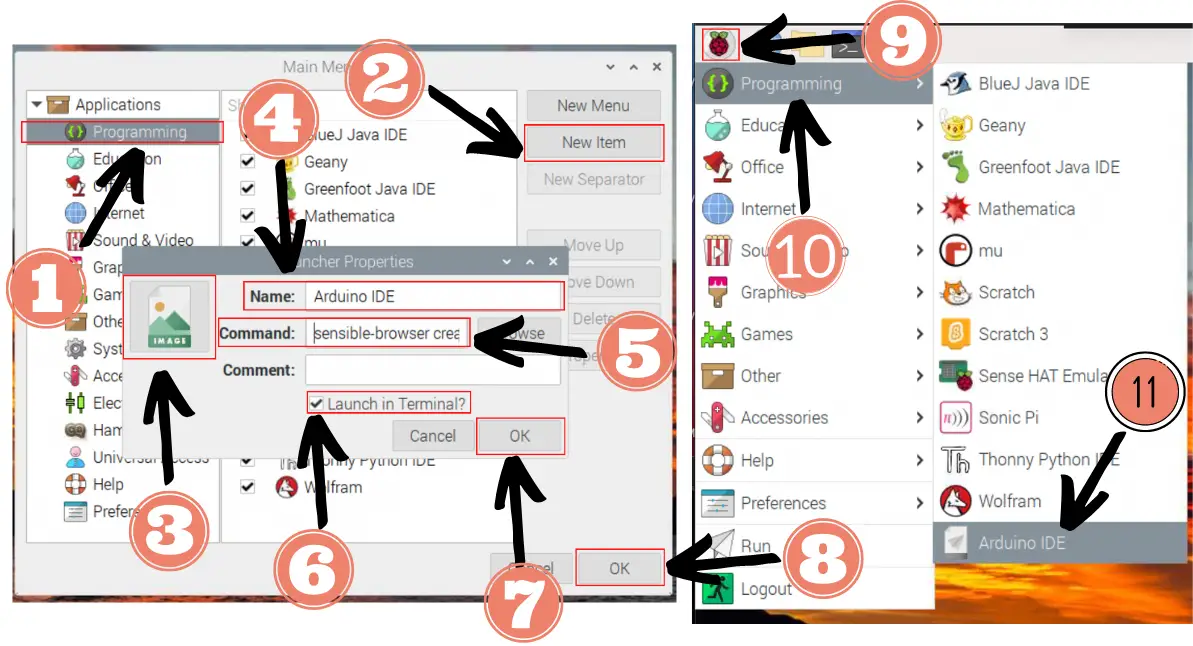
After that, you’ll need to go back to the start menu again (click on the Raspberry Pi icon near the top left corner of the screen) and click on the “Programming” tab.
Now, you’ll need to right-click (or double-click if you’re using a mouse pad) on the “Arduino IDE” and select “Add to desktop”.
Congratulations! You’ve now successfully created a desktop shortcut to Arduino IDE! To actually use it, you’ll need to click on the icon twice and a new window will pop up. In the “Execute File” window, select the “Open” button.
Finally, a browser will appear and take you to the website.
If this isn’t the installation you imagined, don’t worry, the next few methods will satisfy your needs!
2. Using The Terminal
The following method is the easiest way to install the Arduino IDE:
- First, update your Raspberry Pi so that the packages you pull will be recent:
sudo apt-get update && sudo apt-get upgrade -y- Install the Arduino IDE:
sudo apt install arduino -yNote: the -y option means that you want to check yes whenever the terminal prompts you with a yes or no question.
- Run the Arduino IDE:
arduinoAnother way to open up your Arduino IDE is by doing the following steps:
- Open the start menu. You can do this by clicking on the Raspberry Pi icon near the top left corner of your screen.
- Click on the “Programming” tab
- Click on the “Arduino IDE” tab
3. Using The Arduino Download Page
This approach utilizes the graphical interface of the Raspberry Pi, which means it doesn’t use the terminal.
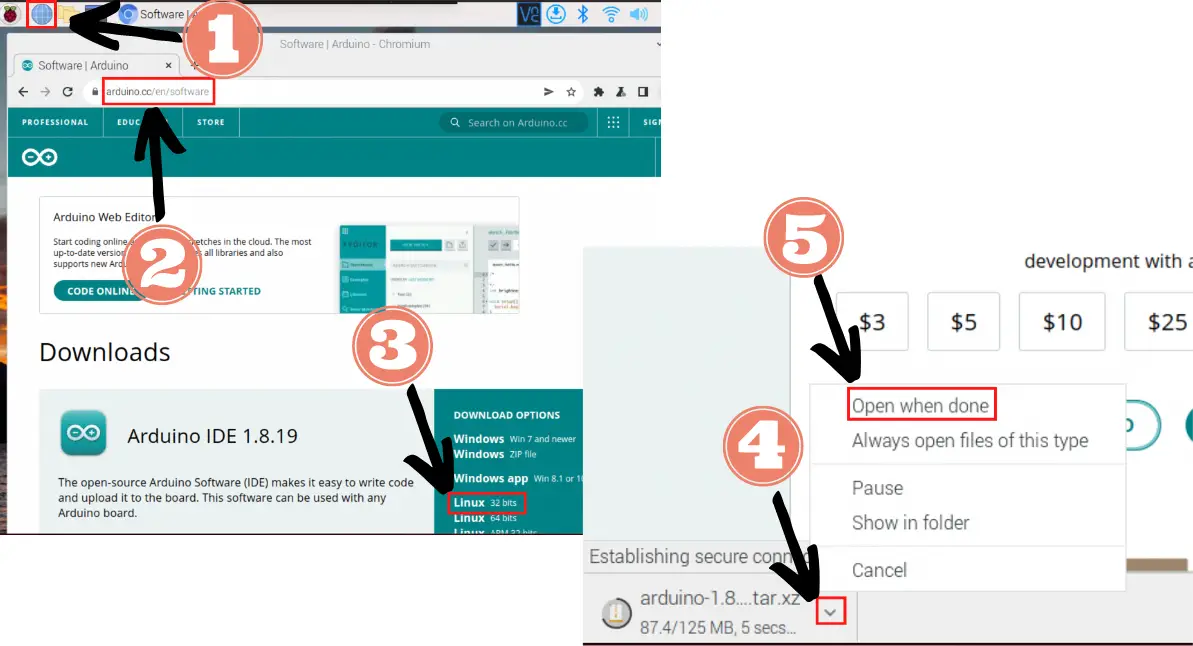
Firstly, open up a browser. This can be the preinstalled one (which is Chromium) or your favorite one. If it’s the former, you can just click on the globe icon near the top left corner of the screen (it’s right next to the Raspberry Pi icon).
Next, go to the official Arduino IDE downloads website: https://www.arduino.cc/en/software
You should select the package best suited for your device, which, in my case, is the “Linux 32 bits” one.
Now, you’ll see the downloading file pop up near the bottom of the screen. We want to unzip this file, so click on the upside down caret symbol (^) and then select “Open when done”.
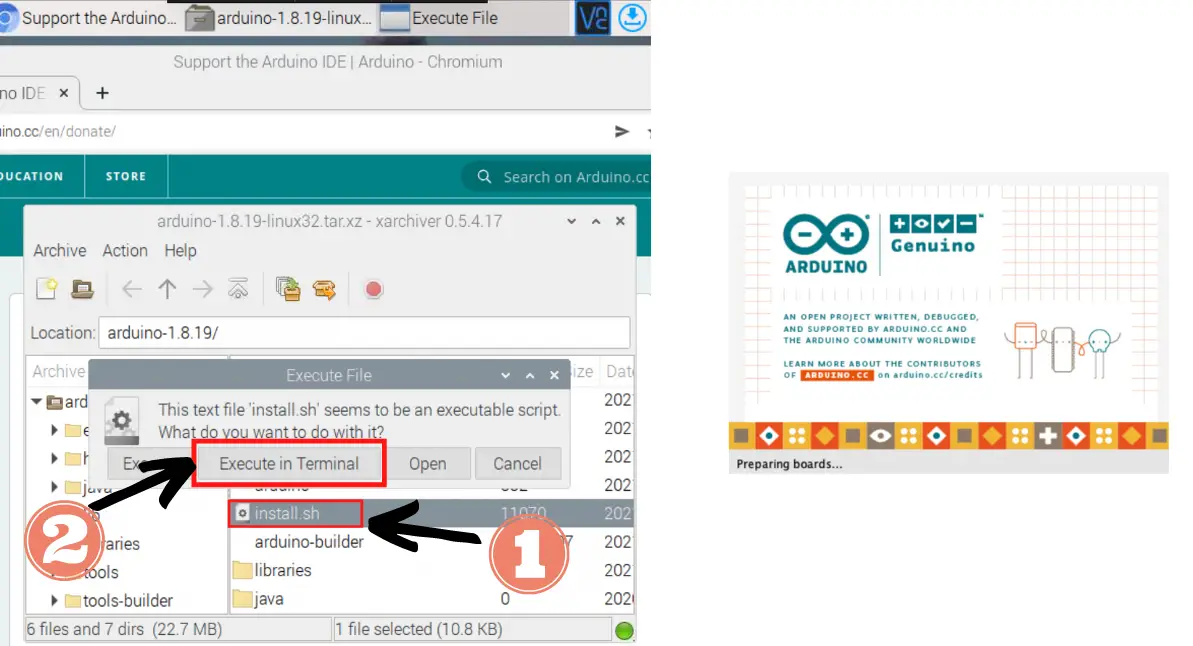
Once it’s unzipped, a new window will pop up. You should see a file called “install.sh”. Double-click on that and a new window called “Execute File” will appear. Select “Execute in Terminal” and now the Arduino IDE should be installing.
Now, the Arduino IDE should be running. Once again, you can find it under the start menu and “Programming” section.
Alternatively, if you are using SSH (secure shell) and can only access the terminal, perform the following steps:
- Open up your terminal. You can do this by using the keyboard shortcut CTRL + WINDOWS KEY + T (or CTRL + COMMAND + T if you’re a Macbook user).
- Alternatively, you can click on the terminal icon near the top left corner of the screen. It looks like a blackboard and it’s near the Raspberry Pi icon (which is the start menu).
- You’ll need to update your Raspberry Pi:
sudo apt update- Move into the Downloads folder on your Raspberry Pi so you know where to find the file later on:
cd Downloads- Download the Arduino IDE meant for Linux systems with 32-bits:
wget https://downloads.arduino.cc/arduino-1.8.19-linux32.tar.xz- Unzip the file so you can access it:
tar -xvf arduino-1.8.19-linux32.tar.xzNote, if you’re running into an error, it’s most likely due to the name of the file. Consequently, use the “ls” command to list the name of all files in the folder. Locate the arduino file, copy the name, and substitute it for the “arduino-1.8.19-linux32.tar.xz” file in the command above.
- Move into the new folder (with the appropriate name):
cd arduino-1.8.19- Enable executable permission for the installation script:
chmod +x install.sh- Run the installation script:
./install.shCongratulations! Now you can open the IDE with the command by going into the start menu, Programming, and clicking on Arduino IDE.
How To Upload Code From Raspberry Pi To Arduino
To upload code from your Arduino IDE on your Raspberry Pi, you’ll need to perform the following steps:
- First open up the IDE.
- Open a file or the sketch you want to upload to your Arduino.
- Connect your Arduino to your Raspberry Pi with a USB cable.
- The USB end should go into 1 of the 4 USB ports on the Raspberry Pi.
- Select your board and port in the IDE
- Upload the sketch by pressing the upload button (which is the icon that looks like an arrow pointing to the right and it’s located near the top left corner of the IDE).
- Alternatively, you can use the keyboard shortcut by pressing CTRL + U.
- You should now see the lights on your Arduino flashing, which means that it received the sketch (which is synonym for code).
Basic Test For Arduino
If you want to make sure that your Arduino is alive and running, then you should use the Blink test.
You can open the Blink code on your IDE by clicking on File, Examples, 01.Basics, and Blink.
If not, you can create a new file (by using the keyboard shortcut CTRL + N) and copying and pasting the following code inside it:
/*
  Blink

  Turns an LED on for one second, then off for one second, repeatedly.

  Most Arduinos have an on-board LED you can control. On the UNO, MEGA and ZERO
  it is attached to digital pin 13, on MKR1000 on pin 6. LED_BUILTIN is set to
  the correct LED pin independent of which board is used.
  If you want to know what pin the on-board LED is connected to on your Arduino
  model, check the Technical Specs of your board at:
  https://www.arduino.cc/en/Main/Products

  modified 8 May 2014
  by Scott Fitzgerald
  modified 2 Sep 2016
  by Arturo Guadalupi
  modified 8 Sep 2016
  by Colby Newman

  This example code is in the public domain.

  https://www.arduino.cc/en/Tutorial/BuiltInExamples/Blink
*/

// the setup function runs once when you press reset or power the board
void setup() {
  // initialize digital pin LED_BUILTIN as an output.
  pinMode(LED_BUILTIN, OUTPUT);
}

// the loop function runs over and over again forever
void loop() {
  digitalWrite(LED_BUILTIN, HIGH);   // turn the LED on (HIGH is the voltage level)
  delay(1000);                       // wait for a second
  digitalWrite(LED_BUILTIN, LOW);    // turn the LED off by making the voltage LOW
  delay(1000);                       // wait for a second
}
This code is identical to the one you’d find already pre-installed in the Arduino IDE.
This code will blink the built-in LED on your Arduino board periodically. This means that the light will turn on for 1 second and turn off for 1 second repeatedly.
If you want to change the speed of the light turning on and off, you can change the number inside the delay functions (which happens to be 1000). The number represents the time in milliseconds, which means if you want it to last 3 seconds, for example, then you’d replace 1000 with 3000!
Summary – tl;dr (Too Long; Didn’t Read)
Here are the key takeaway points you should keep in mind after reading this article:
- There are 2 platforms you can write Arduino code on.
- One way is by going to the online editor, which was a recent feature
- Another (traditional) way is by installing the Arduino IDE and working on it from there.
- There are 3 ways (I’ve found) you can install Arduino IDE:
- One way is installing it from the downloads page
- Another way is to create a desktop shortcut to the online version
- Third way is to use the terminal to install it
- You can upload code to your Arduino from your Raspberry Pi by using its USB port.
- You have to make sure you choose the right board and port or else the code will not be uploaded to the Arduino.
- You can easily tell if your Arduino received the code if the lights on the device is flashing.
- You have to make sure you choose the right board and port or else the code will not be uploaded to the Arduino.
- You can use the blink test to see if your Arduino is up and running
I hope that at least 1 of the 3 methods I mentioned provides an IDE-al solution!