How To Measure Time In Arduino: Complete Arduino Timer Guide
As the great Benjamin Franklin once said, “Remember, that time is money”. It’s something that we all think about, and it can be especially important for certain projects with Arduino. Consequently, I’ve decided to create this post about time and give you a glimpse into the Arduino’s time-keeping abilities.
The first question we should ask is: “Can an Arduino count time?”
The Arduino can count and measure time by utilizing the micros() or millis() functions. The millis() function counts in milliseconds and starts over from the beginning every 50 days. The micros() function counts in microseconds, which is a lot smaller than milliseconds, and it repeats every 70 minutes.
What is the difference between millisecond and microsecond?
There are 1000 milliseconds in 1 second whereas there are 1,000,000 microseconds in 1 second. As you can see, 1 microsecond is 1000 times faster than a millisecond!
The rest of this article will guide you through the other time functions you can use to measure time in Arduino, why you would need your Arduino to use time functions, their accuracy, and other timer-related tips.
Time-Related Arduino Functions
As I mentioned previously, the two simplest ways to measure time using the Arduino are the micros() and millis() function. Here is a table to deepen your understanding:
| Function | Purpose | Unit | Result |
|---|---|---|---|
| delay() | Pauses function | millisecond | Action |
| delayMicroseconds() | Pauses function | microsecond | Action |
| micros() | Keeps track of time | microsecond | Returns value |
| millis() | Keeps track of time | millisecond | Returns value |
Do keep in mind that the millis() and micros() function both start counting the number of milliseconds or microseconds (respectively) as soon as the Arduino board is powered on or when the sketch is finished uploading. The only way you can “control” when these time functions start is by resetting your board (by pressing the reset button).
Why Is It Important For Arduino To Use Time-Related Functions?
It can be important for the Arduino to use time-related functions because you either need to activate a specific task at a specific moment in time or you need to stop everything in the program to see your work.
For example, one of the most common, easy projects that beginners use is the Blinking LED project. As you may have noticed in the code, there are delay() functions in there. Without them, the LEDs flash too fast for our eyes to process, which makes it seem like we programmed something wrong in our code. Consequently, it’s necessary to have them there so that we can see the LEDs blink.
Other times, you’d need to use those functions to keep track of time. This is important if you have a function that needs to be implemented at a specific time for a one-time event, or for repetitive events.
For example, when you’re implementing one-time events, you can just use an if statement that will only run once when a specific condition is met.
Repetitive events are useful in projects that involve a constant check. For instance, you could have a project that checks the temperature every 15 seconds to decide whether it should activate a DC (direct current) motor (since it acts as a fan). For this type of event, you can use the following formula in an if statement:
if (currentTime - previousTime >= interval) {
/*
insert the code for a task to be repeated constantly
*/
}
Speaking from my own personal experience, I created my own alarm clock build from scratch using an Arduino and these time functions. Obviously, I needed to keep track of time in order for my clock to work successfully, but I was unaware of them at the start.
I tried incrementing a variable in an if statement or while loop. Yet, the variable only increased by one variable in the if statement whereas it wouldn’t stop iterating in the loops. I did some more research and realized the millis() function was the best option.
I realized that it was the best option for me because the millis() function runs independently of the void loop().
If you want to learn more about how I built my own clock using a starter kit from the Arduino company, check out my blog here. You will also be able to see the millis() function in action, and I’ll go through the step-by-step process I went through to design it.
How Accurate Is Arduino Timer?
The Arduino timer is accurate to a certain extent. On the micro-level, the Arduino’s internal clock is not very precise as the count of the milliseconds or even microseconds will be off by a small percentage. That means you will lose or gain time, but in the grand scheme of things, it’s hardly noticeable.
For those who want to understand why the inaccuracies are present, let’s take the millis() function as an example. The accuracy of the millis() function is affected by the clock source and the timer implementation.
Arduino boards are commonly outfitted with a processor chip that has a 16 MHz clock speed (which may fluctuate depending on the temperature). This chip is relatively cheap, so if you want a more precise measurement, then you need a pricier board with a faster processing chip. For instance, the Due board has an 84 MHz clock speed while the Portenta H7 has the fastest Arduino board clock speed of 480 MHz.
The second factor is a minuscule factor that doesn’t have an overall big effect on the Arduino’s timer. Essentially, using the Timer 0 method will require the millisecond timer’s interrupt to divide the 16 MHz clock using a prescaler. That means that the timer’s output is not very exact. As you’ll see in the next section, the microsecond increments by 4 for boards with 16 MHz clock speed, but it’ll be more precise if you use a board with a higher clock speed.
Arduino Time-Related Function Tips
- The delayMicroseconds() function can only accurately delay your program from running for up to 16383 microseconds. You should generally go with the delay() function. You wouldn’t use this unless you need a very precise pause.
- Like I said before, the millis() function rolls over after 49 days and the micros() function overflows after 70 minutes. This basically means that once the number hits the max number, it will start over from zero. This is because they both can only use 32 bits of memory on the Arduino.
- To achieve these long times, you’ll need to use “unsigned long” when storing these functions.
- The unsigned keyword only uses positive numbers, so the range you would get from using “unsigned long” is from 0 to 4,294,967,295.
- If you want to see what range other data types can have, check out the following table I created:
- To achieve these long times, you’ll need to use “unsigned long” when storing these functions.
| Data Type | Bit | Range of Numbers |
|---|---|---|
| bool | 8 | 0 or 1 |
| byte | 8 | 0 to 255 |
| char | 8 | -128 to 127 |
| unsigned char | 8 | 0 to 255 |
| word | 16 | 0 to 65,535 |
| unsigned int | 16 | 0 to 65,535 |
| int | 16 | -32,768 to 32,767 |
| unsigned long | 32 | 0 to 4,294,967,295 |
| long | 32 | -2,147,483,648 to 2,147,483,647 |
| float | 32 | -3.4028235E38 to 3.4028235E38 |
- The return value of the micros() function varies depending on the clock speed of different Arduino boards.
- The faster clock speed your board has, the more precise your results will be from using the micros() function.
- For example, if you use the Arduino Portenta (which has the fastest clock speed of all Arduino products), the value will always return as its actual value. For example, if the time was 183 microsecond, it would state 183 microsecond instead of rounding up or down.
- Boards with clock speeds of 16 MHz (millihertz) like the Arduino Uno R3 return values that are a multiple of 4 while boards with clock speeds of 8 MHz like the Lilypad return values that are a multiple of 8.
I explain more about clock speeds in my clock speed guide on Arduino. You should go check it out since I’ve also included a list of Arduinos, their price, and their speed. Moreover, I talk about the methods you can use to increase your Arduino’s clock speed and speed tests you can run to make sure your Arduino is up to snuff.
- The delay function stops everything in the function when running it.
- Here’s an analogy of what I mean: Say you’re microwaving popcorn. You’re standing there, waiting, and staring at the microwave as it heats the popcorn. This is the equialent of using the delay() function. You get bored easily because you can’t do anything else besides stare at the microwave.
- Advanced programmers avoid using delay() and use other techniques and functions like millis() instead. This is equivalent to scrolling through your social media feed or going to the bathroom (or doing both) while you wait for your popcorn to finish cooking.
A great example of using a method different from the delay() function is called the “Blink Without Delay” program. Here is the code for it:
/*
Blink without Delay
Turns on and off a light emitting diode (LED) connected to a digital pin,
without using the delay() function. This means that other code can run at the
same time without being interrupted by the LED code.
The circuit:
- Use the onboard LED.
- Note: Most Arduinos have an on-board LED you can control. On the UNO, MEGA
and ZERO it is attached to digital pin 13, on MKR1000 on pin 6. LED_BUILTIN
is set to the correct LED pin independent of which board is used.
If you want to know what pin the on-board LED is connected to on your
Arduino model, check the Technical Specs of your board at:
https://www.arduino.cc/en/Main/Products
created 2005
by David A. Mellis
modified 8 Feb 2010
by Paul Stoffregen
modified 11 Nov 2013
by Scott Fitzgerald
modified 9 Jan 2017
by Arturo Guadalupi
This example code is in the public domain.
https://www.arduino.cc/en/Tutorial/BuiltInExamples/BlinkWithoutDelay
*/
// constants won't change. Used here to set a pin number:
const int ledPin = LED_BUILTIN;// the number of the LED pin
// Variables will change:
int ledState = LOW; // ledState used to set the LED
// Generally, you should use "unsigned long" for variables that hold time
// The value will quickly become too large for an int to store
unsigned long previousMillis = 0; // will store last time LED was updated
// constants won't change:
const long interval = 1000; // interval at which to blink (milliseconds)
void setup() {
// set the digital pin as output:
pinMode(ledPin, OUTPUT);
}
void loop() {
// here is where you'd put code that needs to be running all the time.
// check to see if it's time to blink the LED; that is, if the difference
// between the current time and last time you blinked the LED is bigger than
// the interval at which you want to blink the LED.
unsigned long currentMillis = millis();
if (currentMillis - previousMillis >= interval) {
// save the last time you blinked the LED
previousMillis = currentMillis;
// if the LED is off turn it on and vice-versa:
if (ledState == LOW) {
ledState = HIGH;
} else {
ledState = LOW;
}
// set the LED with the ledState of the variable:
digitalWrite(ledPin, ledState);
}
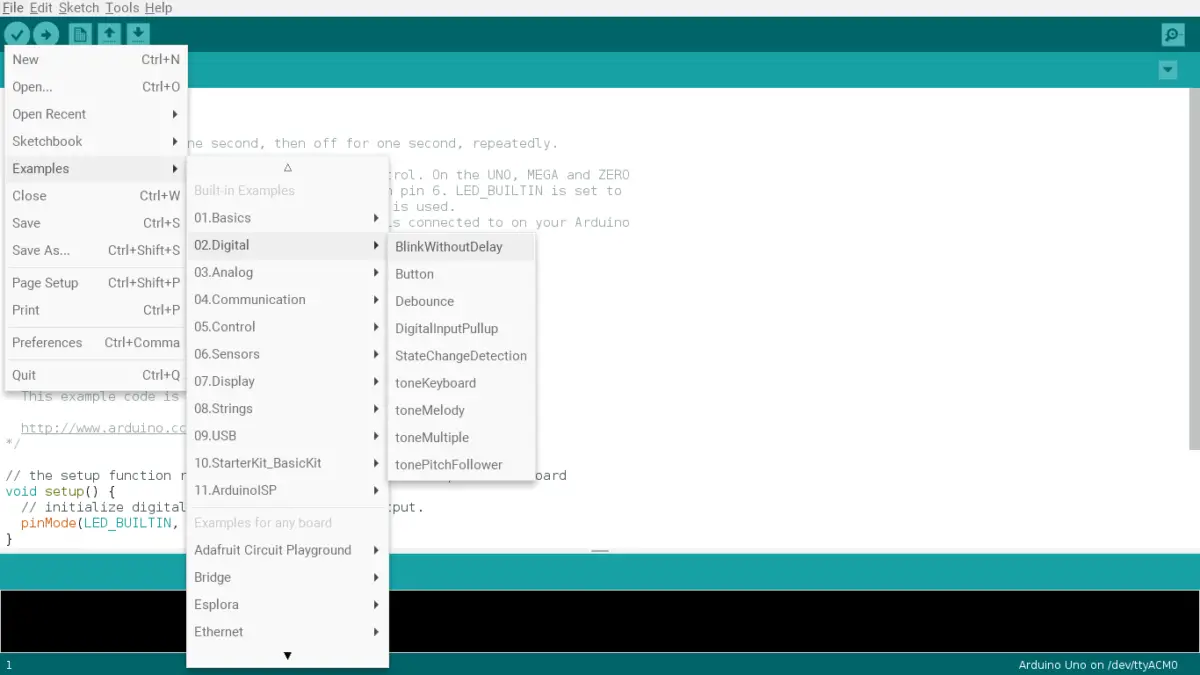
}It is also located in your Arduino IDE (Integrated Development Environment). It’s preinstalled, and it’s called “Blink without Delay”. To access it, go to your Files menu in the IDE and click Examples < 02. Digital < BlinkWithoutDelay.
As you can see from the code above, it contains the magic formula I mentioned previously:
if (currentMillis - previousMillis >= interval) {
// insert the code to be repeated
}
Summary – tl;dr (Too Long; Didn’t Read)
Here are the key takeaway points you should keep in mind after reading this article:
- Arduino can count time if you utilize the micros() and millis() functions
- Other time related functions include:
- delay()
- delayMicroseconds()
- Time functions are important because in some specific projects, you might want to activate some specific task at a specific time
- The Arduino has a built in timer that is very accurate. Granted, there may be some small imprecisions by they’re hardly noticeable
- Note that the delay function will stop everything from running when it’s activated
In the end, you should take some time to try these functions out yourself and see what you like or dislike about them.
References
I used the following sources in my writing journey to ensure that my information is correct and up-to-date: