How Do You Stop A Loop Arduino? (4 Best Easy Loop Tips)
I remember the first time I encountered a loop error. I made a logical error in my JavaScript code where there was no exit condition. That meant my loop wouldn’t stop running, which was very frustrating. When I made my transition to Arduino and made my first loop error, I started wondering:
How do you stop an Arduino from looping?
Resetting your Arduino, running exit(0), using an infinite loop, and implementing an if statement and a boolean are great ways to stop an Arduino from looping. These methods depend on your situation and the reason why you want the loop to stop in the first place.
If you want to understand how to utilize these 4 methods successfully, keep reading to find out.
What’s The Purpose Of An Arduino Loop In The First Place?
An Arduino loop performs very repetitive tasks for you quickly, which is very helpful. This can save you a lot of time and effort, but it can also perform poorly if you don’t implement it correctly.
The most common loops in Arduino (based on my experience) is the void loop, the while loop, and the for loop.
Void loop
For beginners, the void loop is used quite often. For me, I had to use it for the majority of my projects in the Arduino Starter Kit. Many of your Arduino sketches will be executed using the void loop.
You can think of it as the meat of the sketch.
Like any other loop, it starts from the first line, reads each line after that until it reaches the last line, and loops to the beginning where it reads the first line again.
While Loop
Similar to the void loop, a while loop can loop through lines of commands, but its exit condition is more defined. The while loop would end once the condition turns false.
You would typically use a while loop when you don’t know exactly how many times you want your code to run or when the loop would only occur during certain conditions.
For Loop
A for loop is a more complex version of a while loop, and you would use it if you knew exactly how many times you want your lines of code to run.
It creates a variable, implements a condition involving the aforementioned variable to test, and iterates the variable (meaning it increments or decrements it).
Like the while loop, the for loop will end when the condition becomes false.
What Causes An Arduino To Loop Forever?
An Arduino will loop forever because the user never specified an exit condition for the loop to break out of. Another potential reason is that the user coded illogically so that the loop never meets the exit condition. That’s why you should always check your work before implementing your code.
Personally, I mentally run through the loop myself. If I can’t get out of the loop I’ve designed, then I highly doubt it will work successfully.
You could also use the verify button (the check icon on the top-left area of your Arduino IDE) to make sure your code is correct. Don’t solely rely on this function because it won’t always catch all of your errors.

How To Actually Stop Arduino Loop
Tip #1: Running Exit(0)
If you’ve accidentally trapped yourself in a void loop, you can insert “exit(0);” at the end of your code (before the closing bracket of the void loop). This will end your loop, but technically, it stops the whole program.
Let’s take a look at the following code to see how it is done:
void loop() {
// All of your code here

// Exit the loop
exit(0);  //The 0 is required to prevent compile error.
}
Tip #2: Pressing the Reset Button
Utilizing the reset button can be very handy, especially if all your other methods of stopping an Arduino loop don’t work.
All you’ve got to do is press the small, round button (usually orange or white) labeled ‘reset’ and is next to the USB port (which is the big, rectangular gray object on your Arduino board).
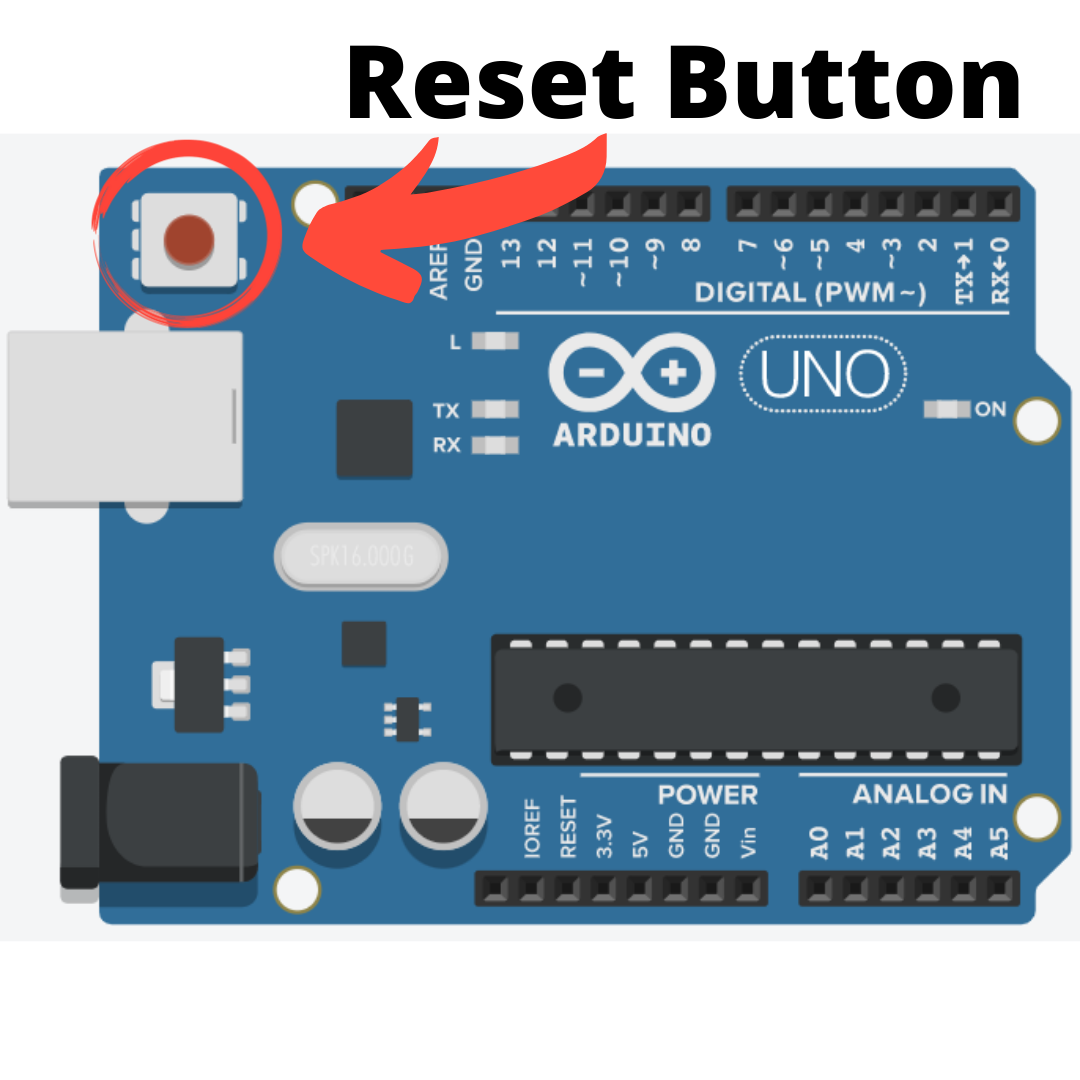
The reset button will only stop the program from being executed, and it doesn’t fix your loop issue. This is similar to unplugging and plugging your Arduino back again.
If you want to learn efficient ways to reset your Arduino, check out my guide on resetting your Arduino. These 5 methods have been tested by me repeatedly.
All in all, it is your responsibility to locate your loop error and resolve it.
Tip #3: Using an Infinite Loop
Another cool (ironic) method you can use to get out of a loop is executing an empty infinite loop inside it.
I have found three different possible ways to use an infinite loop, which include, but is not limited to:
while (1) { /* empty */ }for (;;) { /* empty */ }while (true) { /* empty */ }You put one of the three choices at the end of your void loop, and it will let the above code in the void loop run once and then stop running.
Even though the void loop has stopped running, the infinite loop is still running in the background because there is no condition for it to stop. As a result, it gives the appearance that your code stopped looping.
Tip #4: Using Both the If Statement and Boolean
If you are more experienced and want more technical control over your loops, use a boolean and an if statement. A boolean holds only two values: true and false. The if statement will check the boolean, and if it is set to false, you can insert code that will break out of the loop in the else statement (like exit(0);).
Technically, the Arduino doesn’t stop working even it may look that way. It will still keep working and checking the loop and if statement but never implementing it because it’s not valid.
You can check out the example code below:
boolean repeat = true;

void setup() {
   Serial.begin(9600); //9600 is the baud rate or the speed at which the phrase "It works!" from below shows (if it loop keeps running)
}

void loop() {

   if (repeat == true) {
      Serial.println("It works!); //the message you'd find in the Serial Monitor (useful for debugging)
   }

   repeat = false; //this "stops" the loop. This means that the message would only appear once because repeat is turned off here

}
If you want more techniques for stopping loops, I’ve included a YouTube video below:
What Happens If You Don’t Fix An Arduino That’s Stuck In A Loop?
If you don’t fix an Arduino that’s stuck in an infinite loop, it will continue running forever. Even though nothing dangerous will happen, an infinite loop will be extremely bothersome if you did not intentionally make it happen.
Consequently, if the loop is an accident, you have to find a way to stop it from happening by going back into your code, fixing the problem, and running it again.
In many cases, you should avoid an infinite loop because it serves no purpose, and it may consume most of your power since it’s intensive.
Summary – tl;dr (Too Long; Didn’t Read)
By the end of this article, you should understand these main points:
- Loops are useful because they do repetitive tasks for you.
- Loops tend to run forever because the coder never specified an exit condition or the exit condition won’t ever become a true statement.
- You can stop a loop by:
- Running exit(0);
- Pressing the reset button
- Utilizing an infinite loop, and
- Using both an ifstatement and a boolean
Hopefully, learning these loops and fixing loop issues won’t make you loop-y!
If you’re still deciding whether Arduino is good or not, go read my article on the pros and cons of Arduino. It contains great information on whether Arduino is right for you.