Can You Run Arduino Without A Computer? Here’s How To Do It
For a long time, I’ve always thought I needed to connect my Arduino to my computer to have it run. That meant I had to constantly unplug and plug my Arduino back into the computer whenever I start to run a project. I started growing sick of it and wondered:
Can an Arduino run without a computer?
Arduino can run without a computer, but you must have an alternate external power supply to power it. The external power sources could include but are not limited to: a 9V (9 volts) battery, a battery shield, a DC power adapter, and a portable battery pack.
The rest of this article will be dedicated to providing easy steps to utilize the aforementioned power supply and explain why many people run their Arduino with a computer.
Why Do People Run Their Arduino With A Computer?
People connect their Arduino to a computer for two reasons: to power it and to upload code from the Arduino IDE (Integrated Development Environment).
What is an Arduino IDE?
An Arduino IDE is a text editor where you write code to upload into your Arduino so that it can perform different functions.
Once you’ve successfully uploaded code from your computer to your Arduino, the code will remain in the flash memory until you upload the next batch of code.
Even if you disconnect the Arduino from the computer, the sketch (which contains code) will still remain there, but the Arduino will not run because there is no power supply.
Beginners usually start out with this because it’s the most convenient to use (in some cases) and the simplest way of powering their Arduino.
Why Should You Run Your Arduino Without A Computer?
Many people choose to run their Arduino without a computer as their power source because they want flexibility and adaptability.
For example, if you choose to utilize the Arduino in a complicated build, you would upload all the code that is necessary to your project and use other sources of power to execute it (see below for help).
Moreover, there is a higher energy consumption (meaning you waste more energy) when you use a computer to power your Arduino because the computer has to stay on for the whole duration of the execution.
How Do You Run Your Arduino Without A Computer?
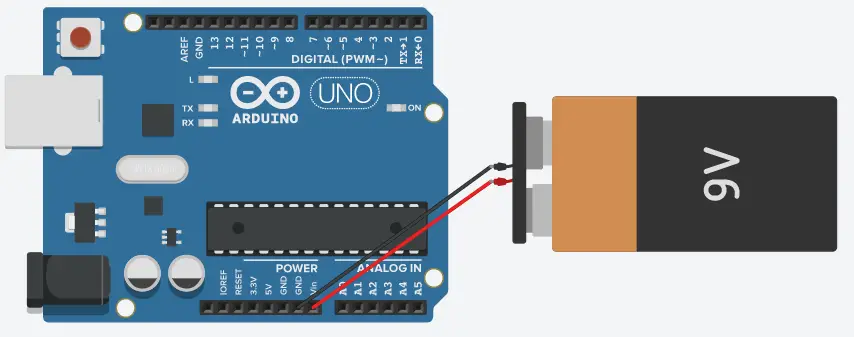
Option #1: Connecting Battery Through Vin Pin And GND (Ground) Pin
As the subheading suggests, you can power your Arduino through the Vin pin and GND pin with a 9V battery.
An additional component you need for this to work successfully is a 9V battery snap (which comes with the Official Arduino Starter Kit).
Firstly, connect your 9V battery to the 9V battery snap. Next, take the red wire (of the 9V battery snap) and insert it into the Vin pin. After that, take the black wire and insert it into the GND pin, and your Arduino should run now.
Note: DO NOT USE a lithium-ion battery since it is very volatile and flammable. If you accidentally short-circuit your Arduino, it may cause this type of battery to explode. Try using a AA battery since it is less likely to explode.
Lithium-ion batteries are prone to overheating, too.
If you want to know all about an overheating Arduino and prevent it from happening to you, you should definitely check out my guide on preventing Arduino from catching on fire.
Option #2: Connecting Battery Through DC Power Adapter
Now, you can either buy a 9V battery with a power adapter in a battery case or create it yourself.
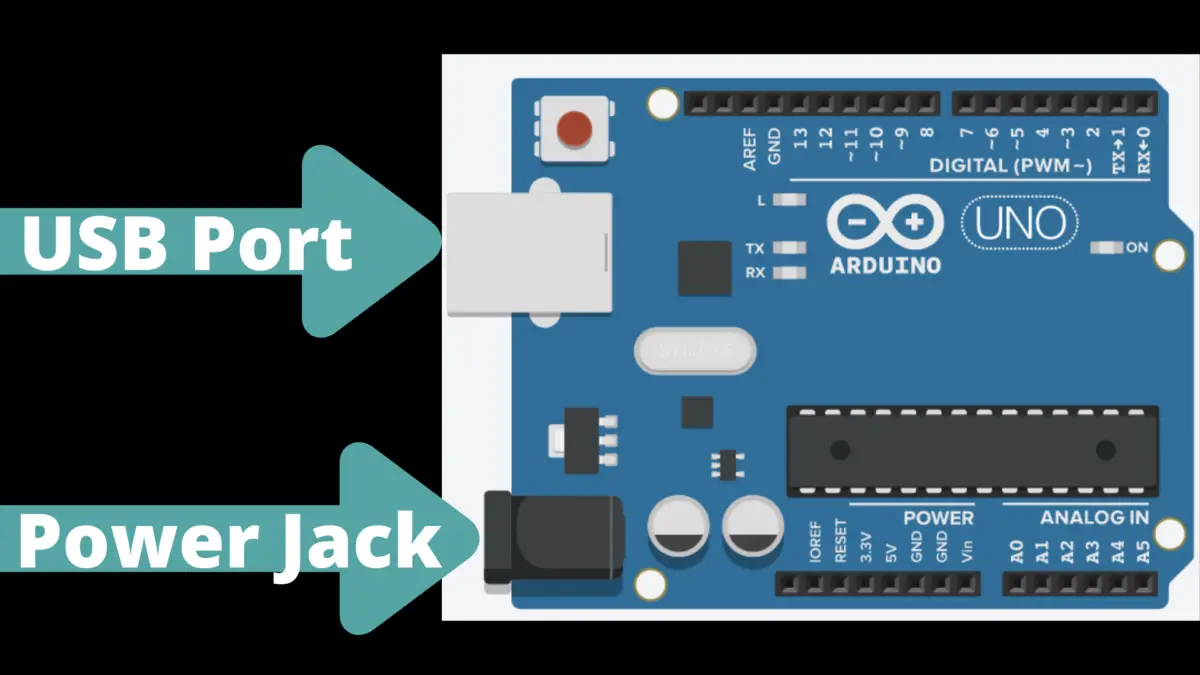
Either way, both will be plugged into the DC power (2.1 mm) jack on the Arduino. This jack is located below the USB port (the big grey, rectangle-shaped component), if you hold the Arduino so that the USB port is on the top left of the Arduino and there are two holes (for putting the screw in) on the right side.
If you choose to make one yourself, you should read the instructions at Instructables to create your own with a 9V battery snap, a coaxial plug 5×2.1 (K), a few inches of 1/8 inch shrink tube, and a few inches of 1/16 inch tube. Once you’ve created it, all you’ve got to do is snap the 9V battery into the battery snap and plug it into the DC barrel plug.
Option #3: Plugging In A Power Adapter
Again, we are utilizing the DC power (2.1 mm) jack on the Arduino, but this time we don’t need to do much work. If you have a power adapter lying around (you can also buy one), you can use it to power your Arduino. However, make sure it has a voltage between 7V and 12V, preferably one with 9V.
Even though Arduino only uses 5V, this method is suitable for supplying power because the voltage regulator will convert the voltage you use (from 7V to 12V) to 5V.
Option #4: Using A Battery Shield
A battery shield is another good option for powering your Arduino.
It is relatively cheap and can cost anywhere from $9 to $15 on Amazon (as of now). Moreover, it has a micro USB port for charging batteries.
Option #5: Using the USB Port To Connect To Portable Power Pack
Instead of using the USB cable to connect your Arduino to your computer, you can make your Arduino more portable by plugging it into a portable power pack.
My top 2 battery power bank choices are the Anker PowerCore Essential 20000mAh and the AUKEY 20000mAh. Both have a recharging time of 10 hours and can power the Arduino for approximately 16 hours. They’re both pretty slim and lightweight, and you can use either one to charge your phone.
Option #6: Utilizing the 5V pin
This is a last resort option. I say this because if you try to supply voltage through the 5V pin or 3.3V pin, you run the risk of damaging your Arduino. The voltage is not going through the voltage regulator so there’s a higher risk of damaging your Arduino.
If you do choose to use the 5V pin, do not apply more than 5V to minimize danger.
You can utilize the 5V pin by connecting the anode (red wire) from the 5V pin of the 5V DC-DC Converter (full name: 5V DC-DC Converter Step Up Power Supply DC-DC Booster Boost Adapter Converter Board Step-Up 500MA Voltage Regulator 1V-5V to 5V) to the 5V pin of the Arduino.
Next, you connect the cathode (black wire) from the GND pin of the 5V DC-DC Converter to the GND pin of the Arduino.
This converter is very cheap. On aliexpress.com, it only costs 43 cents!
Can You Run Arduino Without Programming?
You need to run code in order to make your Arduino function and possess different capabilities. Admittedly there are a few very basic “projects” you can implement without code, but they are useless and defeat the purpose of utilizing an Arduino.
From a more nuanced perspective, you can run an Arduino without creating your own code or programming it yourself.
Firstly, you can easily borrow code from the Internet since there are many forums to provide code you can run without having to come up with it.
Secondly, if you have the Arduino IDE installed, you can use the pre-existing code on there by clicking the word “Files” on the top left-hand corner and the word “Examples”. From there, you can choose the code you want to use.
If you bought the Official Arduino Starter Kit, you can get all the code (without typing any) for each of the 15 projects (except for the first one). It’s in the “Examples” section and is labeled “StarterKit_BasicKit”.
Another (costly) way of getting code without you having to write code is paying a friend who is experienced with Arduino to write you some.
In the end, I highly recommend you putting in the time and effort in learning how to code for Arduino. It’s a worthwhile investment because you will gain critical thinking skills, problem-solving skills, and more. Additionally, it’s relatively simple to learn and a lot of fun to work with.
Summary – tl;dr (Too Long; Didn’t Read)
Here are the main points you should remember after reading this article:
- You don’t need a computer to power your Arduino project. However, many people use it to both test their code and power their Arduino at the same time.
- You can power your Arduino by:
- Connecting a 9V battery to the GND and Vin pins on your Arduino board
- Using a battery shield
- Using a 5V pin
- Using a portable battery pack
- Plugging in a power adaptor
Now that you know the various different options for powering your Arduino without a computer, you should feel power-ful when working with Arduino!