Can You Learn Arduino Without A Board? (Full In-Depth Guide)
“To use a board or to not to use a board, that is the question” – like Hamlet contemplating death, I contemplated whether I should buy a board or not. After doing some research, I was stuck in a limbo of indecision. Should I invest in a physical board? Now that I’ve gain experience, I’ll be answering like this later in the article, but let’s answer this one first:
“Can you learn Arduino without a board?”
You can learn Arduino without a board by using online simulation tools. The most popular tools include Tinkercad and Wokwi. They are very useful since they let you create, modify, test, and run projects using the Arduino.
Of course, there are other simulators such as Proteus software. You can find more simulation tools at All3DP and decide whether or not you should spring for those. However, they require multiple downloads, aren’t free, and contain fewer features, which is why I don’t recommend them.
For instance, the Proteus software is not as easy to “set up” as Tinkercad or Wokwi. You’d need to do some zip installations, and it costs $25 per month. Granted, it does come with a free trial and a free version, but their capabilities are limited.
Fewer features can really stifle the potential of Arduino users’ creativity and their ability to create many different projects that have varying levels of complexity.
Consequently, the rest of this article will be focused on Tinkercad and Wokwi and my overall thoughts on whether you should use an actual, physical board or just the digital version.
Tinkercad
About
Tinkercad is an online tool for 3d modeling, coding, and circuitry. It was founded by Kai Backman (a former Google engineer) and Mikko Mononen and was launched as a free and open source to the public in 2011. Later, it was bought by Autodesk in May 2013 and has still remained free to this day.
Getting Started
Unlike other Arduino simulators I’ve tried, getting started with Tinkercad was pretty painless. I’ll admit I got lost when I tried to find the Arduino simulation, so I’ll give you a step-by-step guide (with pictures) so you don’t have to waste time finding it. Still, you should explore the website and see if anything piques your interest.
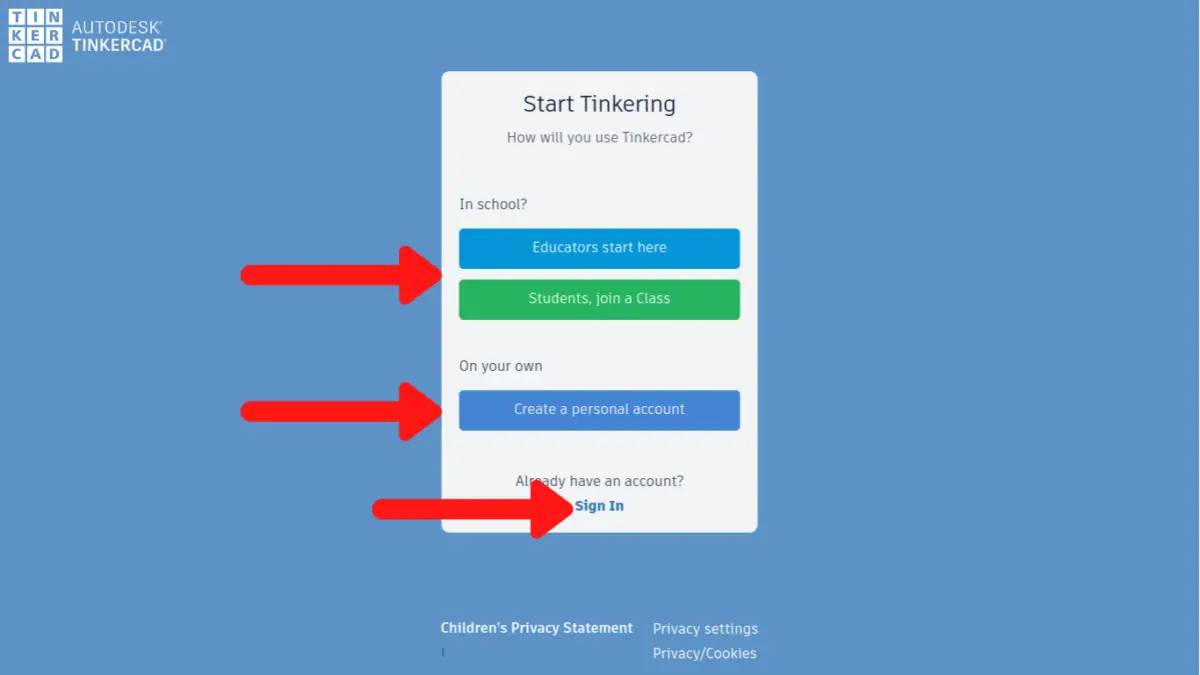
Step 1 – Go to their website by clicking on this link: https://www.tinkercad.com/
Step 2 – Click on the “Start Tinkering” button (near the bottom of the page) or the “Join Now” button (on the top right corner of the screen).
You need an account to start working in Tinkercad. This is also great because it saves your work automatically to your account when you leave. Plus, I’ve been using this for over 6 months and I haven’t gotten any emails from them (except for the welcome email).
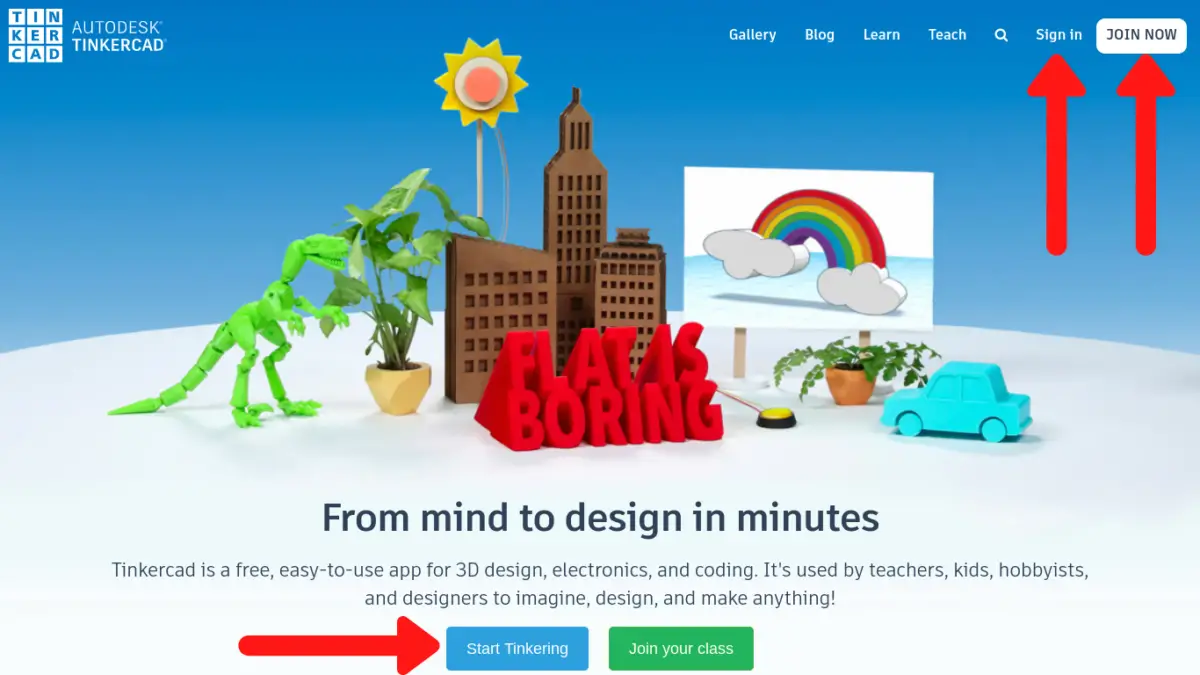
Step 3 – Sign up with Tinkercad by clicking on “Create personal account”
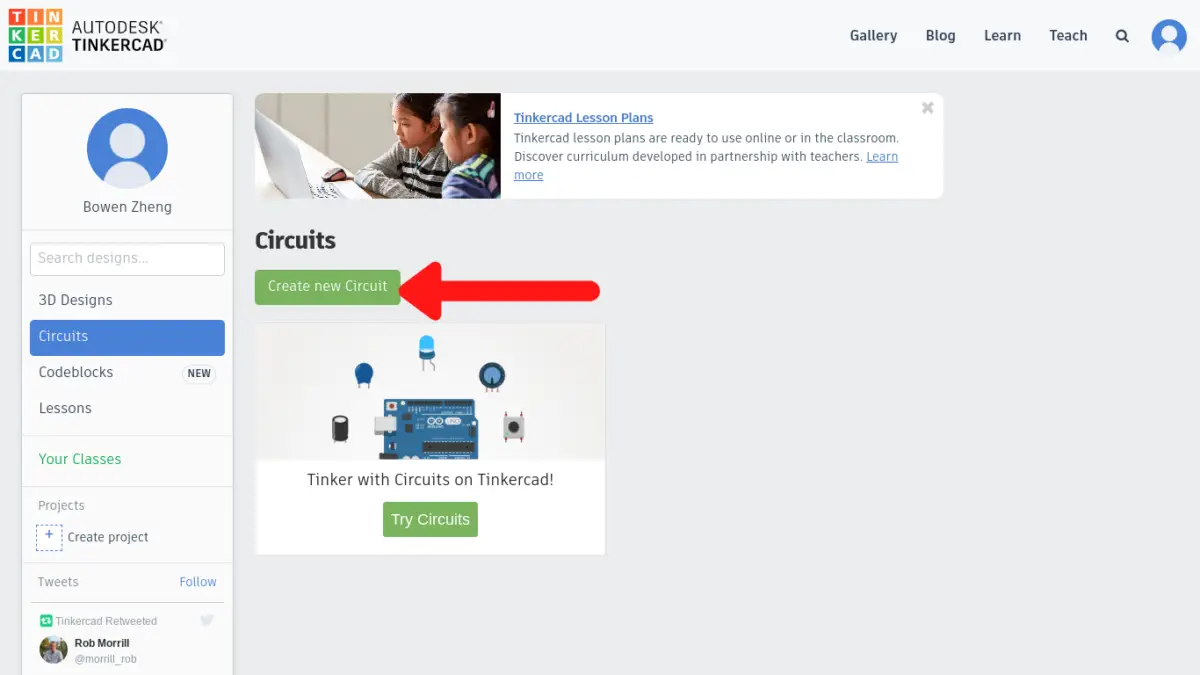
Step 4 – Click on “Circuits” in your dashboard. It’s on the left side of your screen.

Step 5 – Click on the green button that says “Create new Circuit” to start your project.
Step 6 – Finally, search for “arduino” in the search bar (on the right side of your screen). Click on the Arduino Uno R3 board and start working on it!
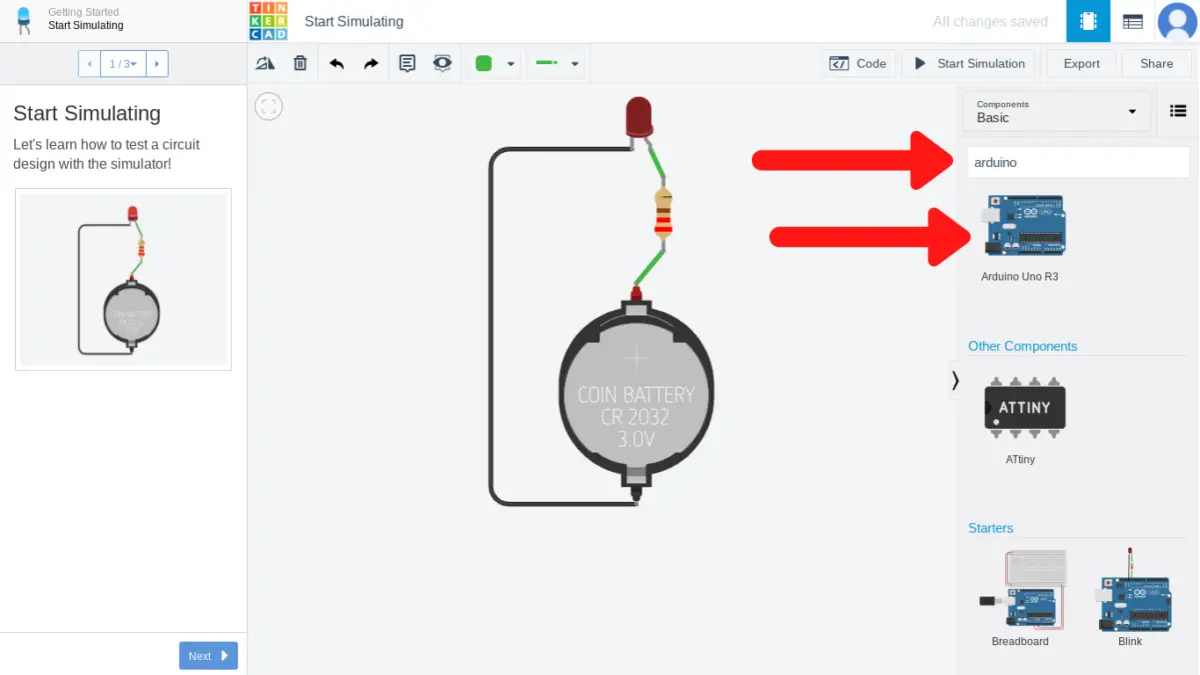
To delete the big coin circuit in the middle of your screen, just click on it and hit backspace on your keyboard.
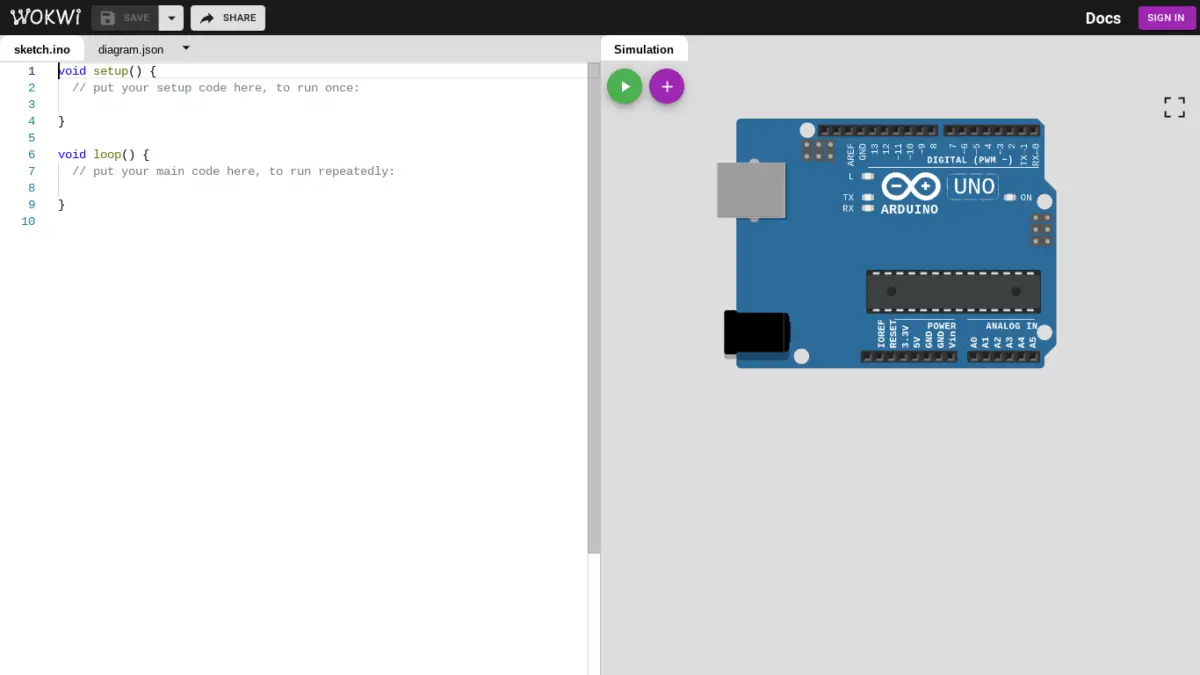
Wokwi
About
Wokwi was created recently in 2019 by Uri Shaked and his team. Even though it’s relatively new to the scene, this simulation is very useful, and there is even a Discord chat you can join to voice your opinions or problems. As its creator says on their site, this digital tool was created by Arduino users for Arduino users, so you can expect it to be of high quality.
Getting Started
Using Wokwi is so much easier to use and get started with compared to Tinkercad. They don’t require you to sign up with an email like TInkercad, but your work won’t be saved. That’s why there are only a few steps below:
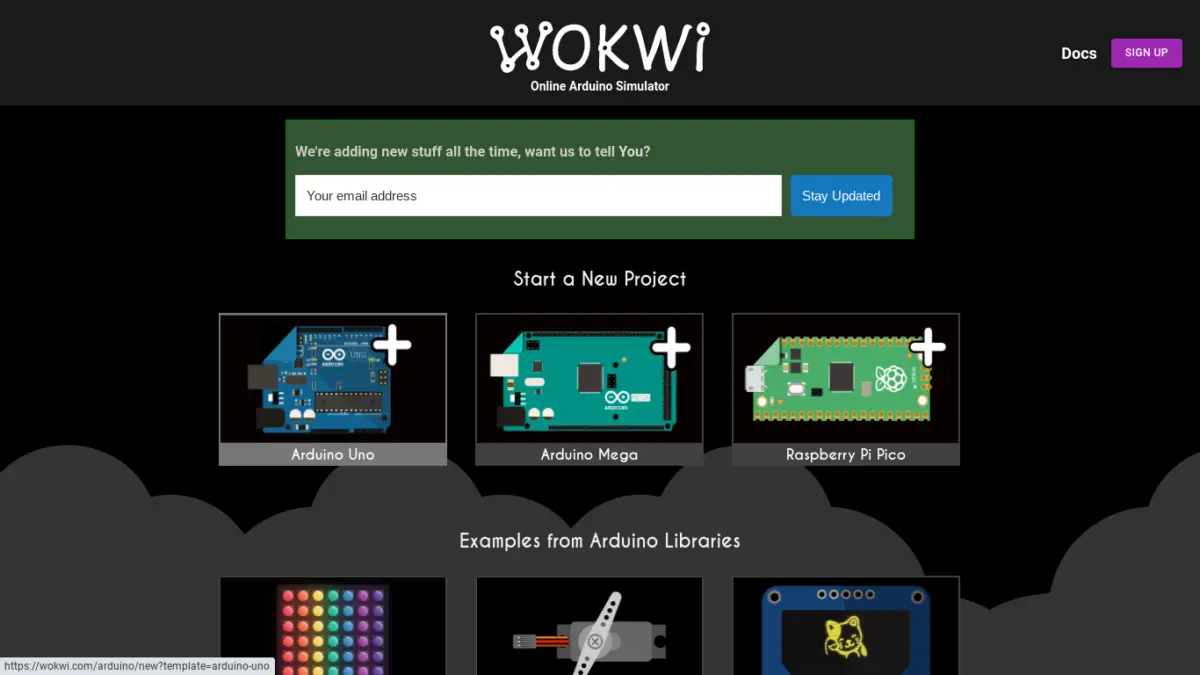
Step 1 – Go to their website by clicking on the link: https://wokwi.com/
Step 2 – Click on whatever board you need. For most beginners, they’d choose the Uno Rev 3.
Step 3 – Write your code on the left side. Add components by clicking on the purple plus sign button near the (top) middle of the screen. Simulate the Arduino once you’re done by pressing the green play button next to the purple plus sign button.
Pros and Cons Learning Arduino Without A Board
Whenever I try to make a decision on something, I always make a pros and cons list. Afterward, this allows me to understand what’s important to me, what I don’t care for that’s on the list, and which decision I would stand to gain from the most. Consequently, I’ve decided to create one for you so that you can come to your own educated conclusion.
Pros of Learning Without a Physical Arduino Board
- Saves you money
- When you use digital boards, all you need to access it is a computer.
- However, if you needed to use a physical board, you would have to buy one in addition to the components necessary for a project.
- For instance, the most popular beginner-friendly board is the UNO Rev 3. If you’re experienced, buying the board would set you back $23 (at the time of this writing), and we haven’t even talked about shipping fees or taxes yet.
- If you purchase the starter kit (which includes the board, the components you need to get started, and an instructions manuel), it would cost you around $106 with shipping and taxes included. That’s how much it cost me the last time I bought it.
- Saves you time
- Working with a physical board can be time-consuming because you have to physically clear everything off your breadboard to move onto a new project.
- But if you’re using an Arduino on Tinkercad and you want to move on, you can just delete everything in a few seconds or go back to your dashboard and click the green “Create new Circuit” button to start fresh.
- Moreover, if you decide to start working on and learning Arduino right now, you would have to wait for a week for the board to ship to your house. If you use the simulation, it would only take you a few minutes to get everything set up.
- Saves you effort and the hassle of fixing physical problems.
- For instance, inserting the ends of jumper wires or the leads (the small wires at the end) of electrical components into the small holes on the breadboard can be very tiring and strain your eyes. This is especially true if you have large fingers or low dexterity. You can sometimes slip up and insert the wires into the wrong holes, which means you have to waste time and fix the mistakes.
- On Tinkercad, you can just hover over the holes that you want to insert the wires into and just click on it. Moreover, the holes are highlighted when you hover over it, which makes it easier on the eyes.
- Additionally, Arduino users (especially beginners) can make mistakes that can physically damage their boards. For example, you can short-circuit or fry an Arduino if you supply it with too much power or you can burn out an LED (Light Emitting Diode) if you don’t include a resistor in the circuit.
- Can be used anywhere and at any time
- The best thing about using an online version of Arduino is that you can use it anywhere. You can use it on your mobile phone (but it may be harder to use), iPad, or any computer that supports macOS, Linux, and Windows. You can use it while in a restaurant, on a train, or in a car (as long as you’re not driving).
- For a physical board, you would need to be in an ideal environment that is quiet and peaceful, has a good light source, has hardwood floor, and has good ventiliation.
- Side note: a good light source helps you see and use your components better and ventilation moves the heat away from your Arduino and prevent it from overheating. This is especially useful if you’re prone to work it too hard. Hardwood floor is also best because if you drop small components, it’s easier to find them on hardwood instead of shaggy carpeting.
Cons of Learning Without a Physical Arduino Board
- Provides less satisfaction compared to using a physical board
- When using a physical board, putting components into the holes on the breadboard is always satisfying and enjoyable. They have a satisfying click, and building a physical project by yourself allows you to get your hands dirty. Consequently, you’d feel more proud of it at the end when it’s working.
- Even though the graphics are well-done and visually appealing, they don’t give you the feeling of actually working with an Arduino.
- Is limited in its abilities
- This one ties in with the “less enjoyable experience” bullet point from above.
- When using a simulator, you can only access the Arduino Uno Rev 3 board on Tinkercad while on Wokwi, you can only use the Uno Rev 3, the Mega, or the Raspberry Pi Pico.
- These devices are great and should suffice those starting out, but when they progress and move onto the next level (as we all should), their ability and capacity to learn more about Arduino and the different types of boards become extremely limited when they only use Arduino simulators.
- Moreover, you can only use a few libraries, you can’t use many different kinds of shields or modules, and you won’t find many electrical components to use.
- Shelters you from physical problems that Arduinos have
- I know I’ve mentioned previously in my pro list that not having to deal with short-circuiting or frying is a good thing when working with Arduino.
- However, absolute beginners or those who have worked with Arduino before and never encountered problems can be easily lulled into a false sense of security that they won’t face problems when working with a physical Arduino.
- Additionally, those users won’t be adequately prepared to face these problems for when they do arise. From my interaction with many users ranging in different skill levels (from Facebook and forums), they’ve told me that everyone is prone to mistakes.
If you want to learn how to better protect yourself and your Arduino from any damage, then you should consider reading my guide on preventable Arduino mistakes. It contains 10 tips that I’ve gleamed from my personal experience.
Final Verdict
My suggestion is that you should use both an Arduino simulator and a physical Arduino board. In my opinion, you shouldn’t heavily rely on either one since they each have their own advantages and disadvantages.
For those starting out, you should buy two boards. One is the legitimate (more expensive) version while the second one is a cheap alternative. When you’re waiting for them to arrive, start playing around with the online version. Familiarize yourself with the different features of Arduino and look at different projects. See how they work and try to recreate it yourself.
When the boards arrive, start working with those in tangent to the digital version. Here’s what I recommend: create an easy project (by following a Youtube video for the step-by-step breakdown) on the simulator. Then, try to recreate it on your cheap “dummy” board.
If you break it, that’s fine. It’s replaceable and in the process, you’ve learned the dos and don’ts of working with an actual Arduino board. After you’ve nailed it on your dummy board, you can test it on your expensive model if you want.
This process is great because you’re getting a “3-for-1” deal. For 1 project, you’re learning it in 3 different ways, which can solidify your learning and prepare you for future mistakes.
Still, if you’re having trouble deciding between Tinkercad or Wokwi, consider using the following link to access a table comparing the two.
https://forum.arduino.cc/t/virtual-online-arduino-simulator-wokwi-arduino-simulator/698481
If you’re just getting started with Arduino or are curious about what you should know about Arduino, then you should check out my guide on what you should know before starting Arduino.
Summary – tl;dr (Too Long; Didn’t Read)
Here are the key takeaway points you should keep in mind after reading this article:
- You don’t need a physical board to get started with Arduino
- Tinkercad and Wokwi are great resources for beginners
- Some pros of using an Arduino simulator are:
- It saves you money
- It saves you time
- It saves you effort and hassle of handling physical problems
- You can use it anywhere at any time
- Some cons of using an Arduino simulator are:
- Its abilities are limited
- It’s less satisfying to work with compared to a physical board
- It shelters you from learning how to deal with Arduino’s physical problems
In the end, I hope you’ll start using these Arduino simulators since I have a feeling they’ll make you go WOW-kwi!
References
I have used the following source(s) to make sure my information is up-to-date and applicable to the topic I discussed in this article: