Can You Add Wi-Fi To Arduino? Let’s Find Out!
Wi-Fi has proven itself to be very useful in our everyday lives. Did you know that some Arduino boards have Wi-Fi compatibility built right into their board? Sadly, this does not apply to every single board, and the ones that have this feature have a u-blox chip installed in it.
Consequently, you may be facing a tough decision: should you buy another Arduino board that has this capability or not? Some of you may even be wondering: “Can you add Wi-Fi to Arduino?”
You can definitely add Wi-Fi to your Arduino, as long as you buy a separate module or shield that enables it on your Arduino. A shield or a module can cost anywhere between $5 to $20. That may be pricy for some, but it’s a cheaper alternative compared to purchasing an Arduino board with Wi-Fi capability for over $20.
Adding Wi-Fi To Your Arduino
As I said before, you can add Wi-Fi to Arduino boards that lack Wi-Fi capability by purchasing a shield or module.
Because I won’t know which type of shield or module you’ll buy, I’ll just suggest some general tips to help you get started:
- Choose and buy a shield or module that has the most optimal size and features for your projects. You’ll want to be able to reuse these devices in the future for other Wi-Fi-related projects so that you can get your money’s worth.
- Here are some recommendations if you don’t have any idea which to pick.
- If you want to buy a module, I’d recommend the ESP8266 module. It’s very easy to use and is self-contained. It’s very efficient as it doesn’t use a lot of power, but packs a powerful punch. There’s also a lot of online resources and guide because it’s so popular. Lastly, it’s relatively cheap and can be programmed using the Arduino IDE.
- If you want to buy a module, I’d recommend the HiLetgo ESP8266 NodeMCU CP2102 ESP-12E Development Board Shield. It’s a great bargain since you can buy three of them for only $15 (at the time of writing) on Amazon. It’s fast and efficient in addition to possessing an LED indicator.
- Here are some recommendations if you don’t have any idea which to pick.
If you do choose to use an ESP8266 module, I’ve written a great guide on how you can set it up and use it. My ESP8266 guide is a must read as it also contains a lot of great tips!
- Connect the shield or module to your Arduino board.
- You can read the instructions manual that comes with it for guidance. If there aren’t any, go online and search how to use it.
- Write and upload code to your Arduino board, just like you would with any other project.
- Start communicating with your Arduino using your Wi-Fi shield or module.
Lastly, I’d highly recommend you buy a shield over a module because a shield is easier to use. For instance, when you’re including Arduino shield(s) in your project, you can connect some shields to the Arduino board by inserting the shield’s male header pins to the Arduino board’s female header pins.
The male header pins are the long, spiky metal wires while the female header pins are the long black rows with holes in them. As a result, stacking the Arduino board on the shield is really easy and fits perfectly (if you buy the correct, compatible ones). Here are some more reasons why I’d recommend a shield
- It’s easy to stack on your board.
- This removes the hassle of having to wire external circuitry to your Arduino yourself.
- It’s easy to remove.
- For many of the shields, their stackability allows for easy removals, which means you don’t have to use any soldering.
How Does The Arduino Connect To Wi-Fi?
Arduino boards with Wi-Fi built in can connect to Wi-Fi if you import the WiFiNINA library. Then, you’ll need to write the appropriate code that works with the Arduino WiFiNINA library before you can upload the code to your Arduino board. This library might not work if you have an MKR1000 Arduino board since it uses a chip other than the typical u-blox chip.
However, if your Arduino doesn’t come with Wi-Fi capabilities and you’re using a shield or module, then you’ll need to install a completely different library, which is the ArduinoWifi library.
Adding an Arduino library isn’t too difficult. It should take around 2 to 5 minutes for you to perform. Here are the following steps to installing the library:
- Go to the “Manage Library” tab by clicking on Sketch > Include Library > Manage Libraries
- Note: You can use the shortcut: control + shift + I to be more efficient.
- If you’re a Mac user, use the shortcut: command + shift + I.
- Note: You can use the shortcut: control + shift + I to be more efficient.
- Search for your preferred library in the searchbar.
- Click on the “Install” button.
- After a few minutes, you should see it installed.
- Finally, use the library by declaring it in your code at the top (see the previous section if you need a refresher).
To make this easier for you to understand, I will be going over a real example by trying to install the WiFiNINA library:
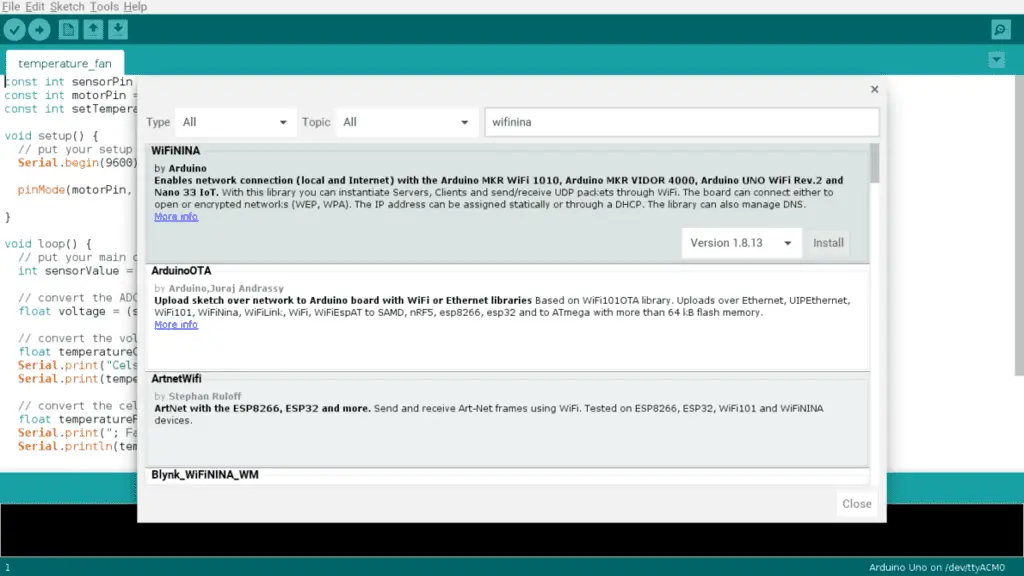
1. Go to “Manage Libraries”

Next, search for the library by typing in ‘WiFiNINA’ in the search and clicking “Install”.
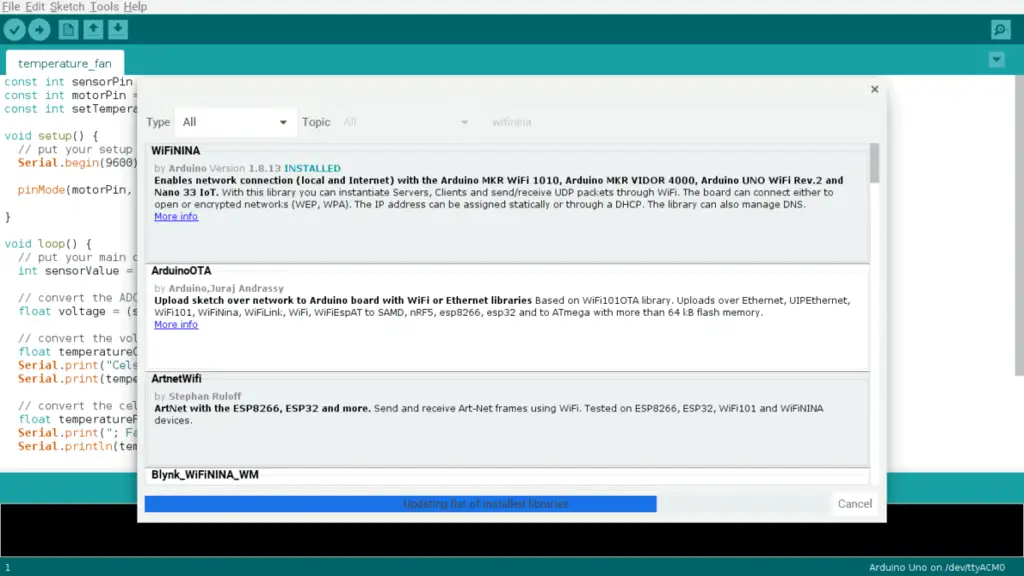
Afterward, you should see the “Installed” message, and now you can use the WiFiNINA library:
NOTE: You must remember to start your first line of code with the following or else it won’t work:
#include <WiFiNINA.h>If you want to learn more about libraries, go check out my Arduino library guide. It contains more tips and information on utilizing the power of libraries!
Summary – tl;dr (Too Long; Didn’t Read)
Here are the key points you should remember after reading this article:
- You can incorporate Wi-Fi capability into your Arduino board if it’s not already built into it.
- You can either use a shield or a module to add it to your Arduino board. It’s a cheaper alternative compared to buying an Arduino board with Wi-Fi.å
- Personally, I’d recommend using a Wi-Fi shield because it’s much easier to install and uninstall. It doesn’t require the use of any wires, and you only need to insert the male header pins on the shield into the female header pins on the Arduino board.
- If you want some recommendations, I’d recommend choosing the ESP8266 module if you want to work with modules. If you want to use a Bluetooth shield, I’d highly recommend the HiLetgo ESP8266 NodeMCU CP2102 ESP-12E Development Board Shield.
- You can either use a shield or a module to add it to your Arduino board. It’s a cheaper alternative compared to buying an Arduino board with Wi-Fi.å
- You can connect your Arduino to Wi-Fi by either installing the ArduinoWifi library or the library. Then, you’ll need to write the necessary code that incorporates parts of the library and upload your sketch to your board.
- To install the library, you’ll need to go to ‘Manage Library’ by using the keyboard shortcut CTRL + SHIFT + I. Then, search up ‘WiFiNINA’ in the search bar, choose the right one, and click install. After a few minutes, your Arduino library is good to go!
So what are you waiting for? Jump in this bandwidth wagon and explore the endless possibilities of using Arduinos with Wi-Fi connectivity!