Can Arduino Run 24/7? How Long Can It Stay On?
Arduino is often used to prototype ideas. Yet, they are also capable of running for a long time for certain projects, such as home security. For those who are interested in running an Arduino constantly, you may be wondering:
“How long can Arduino stay on? Can it run 24/7?”
Arduino can run 24/7 and stay on indefinitely. However, there are different factors that affect its performance and longevity such as external environmental conditions, human error, power supply, and potential interferences.
Knowing the specific factors that could prevent your Arduino from running for a long time is necessary, so I will break down the categories I mentioned previously for the rest of this article. Moreover, I discuss 4 ways you can power your Arduino on for a long time.
Potential Interference Factors
Many of the problems that arise from Arduino not functioning properly or becoming damaged in the long run are due to human errors such as miswiring or putting the board or chip under a lot of stress.
In order to prevent miswiring (or mixing up your wires), I would highly recommend you buy some nail polish. Then, you’d paint some wires red and some wires black. The red wires would be for positive (receiving power) and the black wires would be for ground.
If you don’t want to take the time to paint your wires, make sure to color-code them, which means assigning different color wires for different purposes. For instance, you could use yellow wires for positive and blue wires for ground.
You can also hurt the board or the chip if you apply too much power. They break down more easily because they are receiving excess voltage or current flow.
Finally, you may cause a future problem for your Arduino if you have bugs (or mistakes) in your programming. That’s why you should test each part of your code and debugging it before implementing it in the long run.
I’d highly suggest you include a watchdog timer in your code. A watchdog timer periodically checks in with the Arduino to make sure it’s functioning properly. Once it senses something is off, it will reset your Arduino program automatically to make sure it runs smoothly.
For instance, this timer could help prevent your Arduino from getting stuck in an infinite loop.
How To Power Your Arduino
In order for your Arduino to work and stay on all the time, you need to provide it with a power supply. There are various ways to power your Arduino such as a battery, DC adapter, USB cable, a battery shield, and a portable power pack.
To see more power supply alternatives for your Arduino, check out my other blog “Can You Run Arduino Without A Computer? Here’s How To Do It”. I also discuss in that blog how you could implement these alternate options.
USB Cable
This is the power supply beginners start out with. You use this cable to connect the Arduino to a computer. This also allows you to upload code, but it’s not very effective for projects because your computer would also need to be turned on.
Other alternatives to a computer include a power battery pack or wall adapter. I’d prefer the power pack since it’s more portable.
Battery
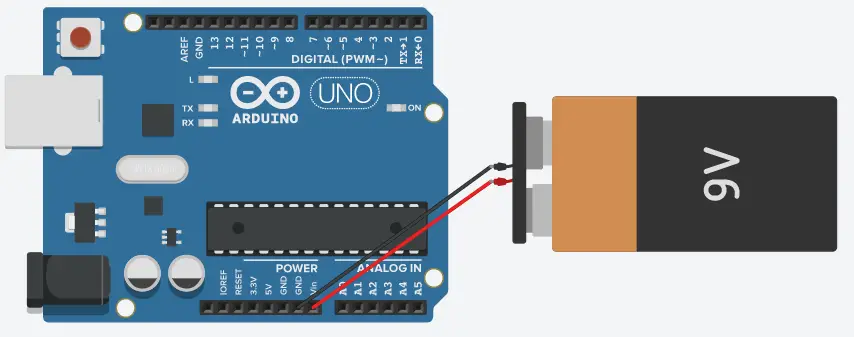
You can use a simple 9V (volt) battery to power your Arduino. It’s smaller than the other options, which means it’s more portable. You can either connect it through the DC adapter or through the pins on the Arduino.
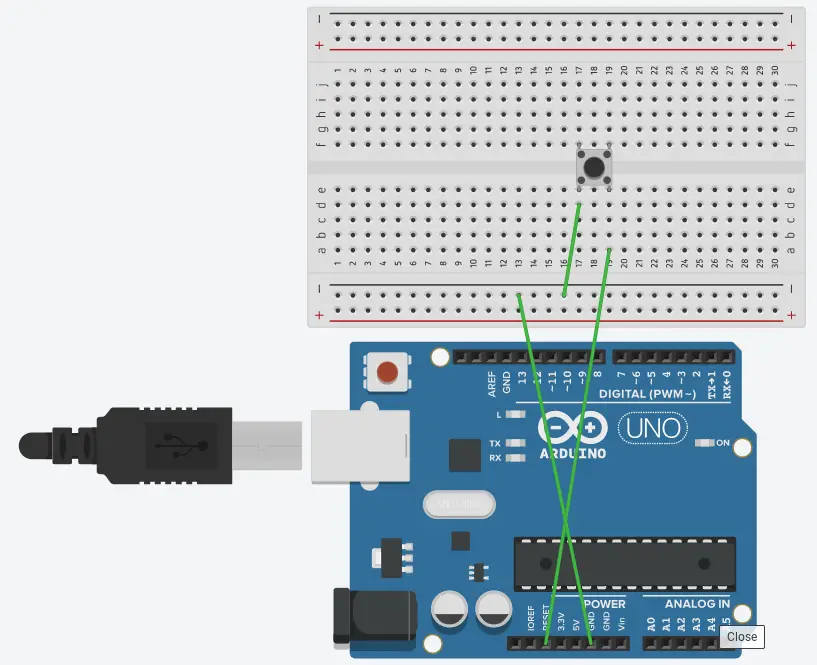
If you want to connect the battery through pins, you’d need a battery snap (which comes with the Official Arduino Starter Kit). You snap the battery into the battery snap, take the red wire (the anode) and connect it into the Vin pin of your Arduino. Then, you’d take the black wire (cathode) and insert it into the GND (Ground) pin.
DC Adapter
For this method, you are utilizing the DC power (2.1 mm) jack on the Arduino. If you have a power adapter lying around (you can also buy one), you can use it to power your Arduino. However, make sure it has a voltage between 7V and 12V, preferably one with 9V.
Even though Arduino only uses 5V, this method is suitable for supplying power because the regulation circuitry will convert the 7V-12V to 5V.
Power Pack
Like I’ve mentioned before, instead of using the USB connector to connect your Arduino to your computer, you can make your Arduino more portable by plugging it into a portable power pack.
My top 2 battery power bank choices are the Anker PowerCore Essential 20000mAh and the AUKEY 20000mAh. Both have a recharging time of 10 hours and can power the Arduino for approximately 16 hours. They’re both pretty slim and lightweight, and you can use either one to charge your phone.
Other Tips
If you don’t need the Arduino to be powered on for a specific amount of time, turn it off by programming it into the Arduino so that it can preserve power. When you need the Arduino to work again, turn it back on (using code).
This also works great to dissipate heat and to make sure your Arduino doesn’t overheat.
External Environmental Factors
There are also factors beyond your control such as the environment. Some challenges you may face are oxidation, humidity, corrosion, or dust.
The main thing you should be worried about is heat. Excessive heat could be a major potential threat to the longevity of the Arduino because it could overheat it. Overheating could greatly damage the Arduino or even start a fire.
For instance, the voltage regulators on the board could start getting hotter if you apply a voltage greater than 9V. That’s why you should stay under 9V to avoid any unnecessary hardware damage.
To avoid these problems, minimize the heat by using a heat sink or good air circulation. Make sure the room you’re holding the Arduino in is properly ventilated, allowing the heat to dissipate.
You could also attach a small fan to it and cool it down if your design allows it.
Lastly, try to avoid extreme temperature changes. For instance, you don’t want your Arduino to change its internal temperature from cold to hot or hot to cold rapidly, or else you’d damage it.
If you want to know all about an overheating Arduino and prevent it from happening to you, you should definitely check out my guide on preventing Arduino from catching on fire.
Summary – tl;dr (Too Long; Didn’t Read)
Here are the key takeaway points you should keep in mind after reading this article:
- An Arduino can run constantly if you power it with:
- A battery
- A portable power pack
- DC Adaptor
- Computer
- An Arduino might not run 24/7 due to the following factors:
- External environmental conditions
- Human error
- Poor power supply
- Potential interferences.
In the end, I hope you won’t have to stay up 24/7 figuring out how to run your Arduino constantly.