Best Easy 6 Tips For Stopping A Program In Arduino
I’ve had to stop an Arduino program for many of my projects due to logical errors in my code. These mistakes were annoying but were easy to fix. Consequently, I’m sharing 6 tips for those who are wondering:
“How do you stop an Arduino program?”
You can stop a program in Arduino by:
- Unplugging and plugging your Arduino
- Pressing the reset button
- Running “exit(0);”
- Utilizing an infinite loop
- Using sleep or hibernate mode, and
- Using the input pins
Mishandling a few of these techniques may end up lead to disastrous results and cost you time and effort, so I’ve dedicated the rest of the article to explain how you can implement them successfully.
But first, let’s answer the question:
Why Do You Want To Stop An Arduino Program?
You would want to stop an Arduino program to stop annoying loops, to start new projects, or to fix an error in your code.
In my experience with programming, I find that loops run forever because the coder forgot to include an exit condition or their code has an error that prevents the loop from ending.
As a result, it may be hard to escape the loop if you don’t stop the program as a whole.
If you to learn more about loops and how to use them to your advantage, you should read my guide on using loops in the Arduino IDE.
6 Different Ways To Stop An Arduino Program
Method #1: Unplugging and Plugging Your Arduino
This is the easiest method that many beginners (including myself) have done before.
All you’ve got to do is unplug the USB (Universal Serial Bus) cable from the Arduino’s USB port. Next, you should go back to your Arduino IDE (Integrated Development Environment) and resolve the errors. After, that upload the program to your Arduino by reconnecting the USB cord to your Arduino board.
Note: When you unplug the Arduino, the code is still saved in the Arduino’s memory. Once you upload new code to it, the previous batch will erase. That’s why if you have some important code, you need to save it in a file on your computer (or somewhere where you can retrieve it).
Method #2: Pressing the Reset Button
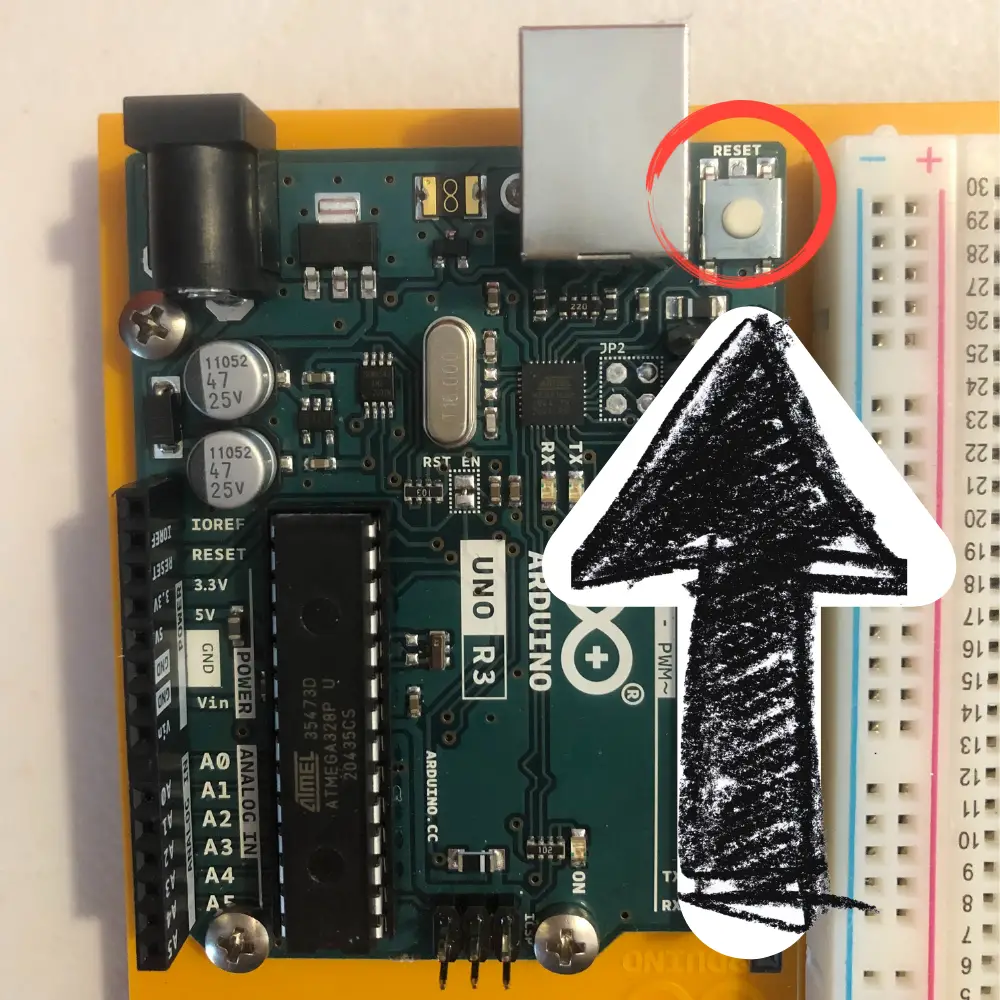
This is a simple alternative to the first method. If you don’t feel like unplugging and plugging your Arduino board back in, just press the reset button. It will restart your program from the beginning (just like the first method).
The reset button (usually an orange or white color) can be found under the word “Reset” on the Arduino board.
If you want to learn efficient ways to reset your Arduino, check out my guide on resetting your Arduino. These 5 methods have been tested by me repeatedly.
Method #3: Running Exit(0)
This technique stops the whole program from running, and it’s useful for stopping loops that have no exit condition. That way, you can go back to your code and fix the bugs in your loop.
Let’s take a look at the following code to see how it is done:
void loop() {
// All of your code here

/* Note you should clean up any of your I/O here as on exit,
all 'ON'outputs remain HIGH */

// Exit the loop
exit(0);  //The 0 is required to prevent compile error.
}
This example code with comments is courtesy of the user Zoul007 on Stack Overflow.
Method #4: Utilizing the Infinite Loop
Including an infinite loop in your code is an effective way to stop an Arduino program.
It basically keeps doing nothing (since the infinite loop is empty) until an external condition breaks it out of the loop.
There are three different ways to use an infinite loop in your void() function:
while (1) { /* empty */ }for (;;) { /* empty */ }while (true) { /* empty */ }By including one of these, you are effectively giving the illusion that the Arduino isn’t running. What’s really happening is that Arduino is looping through the empty code, and since there’s nothing there, nothing is being executed.
Method #5: Put Arduino In Sleep Or Hibernate Mode
By enabling Sleep or Hibernate mode, you are effectively putting the Atmel microcontroller on the Arduino development board to a semi-powered-down state. As a result, this uses less power, and the Arduino will remain in that state until you reset it or awaken it from an external influence (like tapping it).
Firstly, you connect one end of a jumper wire to pin 2 and the other end to GND (ground) pin on your Arduino board.
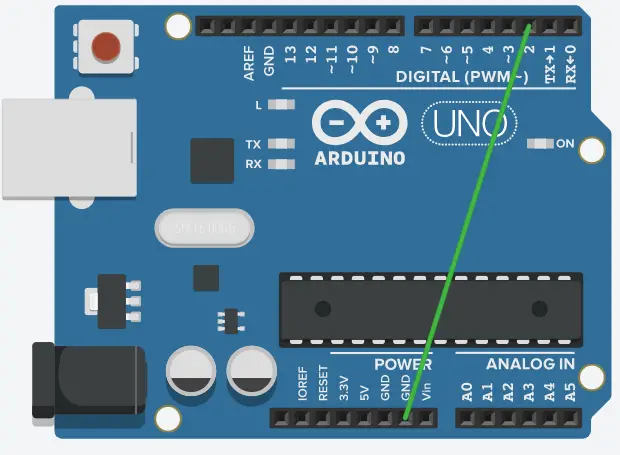
Next, upload the program to your Arduino and wait 5 seconds for the LED to turn off. This means the Arduino will go to sleep. Once the LED turns back on, unplug the jumper wire from pin 2 and GND pin. After 5 seconds, your Arduino should go back to sleep again.
The following code is for putting your Arduino to sleep:
/**
 * Author:Ab Kurk
 * version: 1.0
 * date: 24/01/2018
 * Description:
 * This sketch is part of the beginners guide to putting your Arduino to sleep
 * tutorial. It is to demonstrate how to put your arduino into deep sleep and
 * how to wake it up.
 * Link To Tutorial http://www.thearduinomakerman.info/blog/2018/1/24/guide-to-arduino-sleep-mode
 */

#include <avr/sleep.h>//this AVR library contains the methods that controls the sleep modes
#define interruptPin 2 //Pin we are going to use to wake up the Arduino


void setup() {
  Serial.begin(115200);//Start Serial Comunication
  pinMode(LED_BUILTIN,OUTPUT);//We use the led on pin 13 to indecate when Arduino is A sleep
  pinMode(interruptPin,INPUT_PULLUP);//Set pin d2 to input using the buildin pullup resistor
  digitalWrite(LED_BUILTIN,HIGH);//turning LED on
}

void loop() {
 delay(5000);//wait 5 seconds before going to sleep
 Going_To_Sleep();
}

void Going_To_Sleep(){
    sleep_enable();//Enabling sleep mode
    attachInterrupt(0, wakeUp, LOW);//attaching a interrupt to pin d2
    set_sleep_mode(SLEEP_MODE_PWR_DOWN);//Setting the sleep mode, in our case full sleep
    digitalWrite(LED_BUILTIN,LOW);//turning LED off
    delay(1000); //wait a second to allow the led to be turned off before going to sleep
    sleep_cpu();//activating sleep mode
    Serial.println("just woke up!");//next line of code executed after the interrupt
    digitalWrite(LED_BUILTIN,HIGH);//turning LED on
  }

void wakeUp(){
  Serial.println("Interrrupt Fired");//Print message to serial monitor
   sleep_disable();//Disable sleep mode
  detachInterrupt(0); //Removes the interrupt from pin 2;
}
This code is courtesy of thekurks. If you want to understand the code better, go to their blog here.
Method #6: Using Input Pins
To preface this, an input pin for Arduino reads the voltage and returns a value called “HIGH” if there is a voltage or a value called “LOW” if there is 0V (no voltage).
To do this, you need to check your input pin’s voltage level, then change the voltage. Once your code senses this change, it will exit the loop and stop the program from running.
Summary – tl;dr (Too Long; Didn’t Read)
Here are the key takeaway points you should keep in mind after reading this article:
- You would want to stop a program because you want to fix some mistakes in your code or end an infinite loop
- You can do this in one of six ways:
- Unplugging and plugging your Arduino
- Pressing the reset button
- Running “exit(0);”
- Utilizing an infinite loop
- Using sleep or hibernate mode, and
- Using the input pins
There’s nothing stopping you now once you’ve mastered learning and using these techniques!

