Best Arduino Clock Speed Guide: What’s the Fastest Arduino?
Speed is essential when we want to get something done quickly in our lives. No one enjoys waiting, whether it’s waiting in line to buy coffee or waiting for your old computer to start up. In the interest of saving every Arduino user a little time, I’ve created this guide to help you understand how to do it.
More specifically, I’ll go over the benefits and drawbacks of a fast Arduino, talk about tips for speeding up the board, show you the results of the Arduino speed tests I ran, and how you can test the speed of your own Arduino.
To help you get started, I want to answer a quick question: “What’s the fastest Arduino board?”
The Portenta H7 board is the fastest Arduino board with a clock speed of 480 MHz. However, the fastest board that’s not made by Arduino but still uses the Arduino IDE is the Teensy 4, which has a clock speed of 600 MHz.
Still, many Arduino users don’t need these two Arduinos because they are directed towards very niche audiences. I’d would recommend using the Arduino Due, which has a clock speed of 84 MHz. This is more than enough speed and should suffice many users’ projects.
Speed of Different Boards
The speed of boards depends on the clock speed it has been prescribed. That’s why I created this table to help you determine which one you should buy if you need a fast board. If you don’t need it (which many users don’t), it’s still interesting to see the clock speed of each board and each one’s price.
| BOARD | CLOCK SPEED (MHz) | PRICE (US) | PRICE PER CLOCK SPEED |
|---|---|---|---|
| UNO R3 | 16 | $21.90 | $1.37/MHz |
| Mega 2560 R3 | 16 | $40.30 | $2.52/MHz |
| Leonardo | 16 | $20.70 | $1.29/MHz |
| Micro | 16 | $20.70 | $1.29/MHz |
| Nano | 16 | $20.70 | $1.27/MHz |
| Due | 84 | $40.30 | $0.48/MHz |
| MKR WiFi 1010 | 48 | $32.10 | $0.67/MHz |
| MKR Vidor 4000 | 48 | $72.40 | $1.51/MHz |
| UNO WiFi Rev 2 | 16 | $44.80 | $2.80/MHz |
| Zero | 48 | $39.50 | $0.82/MHz |
| Yun Rev 2 | 16 | $56.40 | $3.53/MHz |
| Portenta H7 | 480 | $103.40 | $0.22/MHz |
| MKR WAN 1310 | 48 | $40.30 | $0.84/MHz |
| Nano Every | 20 | $12.90 | $0.65/MHz |
| ESP32 | 240 | $10.99 | $0.05/MHz |
| Teensy 4 | 600 | $19.95 | $0.03/MHz |
The last two boards (the ESP32 and Teensy 4) are not made by the Arduino company itself, but they’re compatible with the Arduino IDE, the libraries, and the programming language Arduino uses.
Still, they’re faster than the majority of the Arduino boards, but you really don’t need these boards except for special cases. Many users can make use of the Arduino Due, which is the second-fastest board made by the company Arduino.
In the fourth column labeled “Price Per Clock Speed”, I did some calculations to see which board is the most worth it at its price point. I understand that there are other factors that go into determining the price for these boards (such as size or memory), but if you’re solely focused on speed, this column is for you.
In that column, there appears to be a correlation: the higher the clock speed, the more you are getting your money’s worth. For instance, the ESP32 and Teensy 4 boards are pretty fast boards and they have a PPCS (price per clock speed) of 5 cents per MHz and 3 cents per MHz respectively.
The Due has a PPCS of $0.48 per MHz while the Portenta H7 has a PPCS of 22 cents per MHz. This is a great deal and enforces my suggestion that you should use the Due if you want a faster Arduino.
Fun Side Poll

| Arduino Board Type | Votes |
|---|---|
| ESP32 | 31 |
| SMT32F4 | 12 |
| Teensy 4 | 9 |
| Due | 5 |
There were other boards mentioned in the poll, but I didn’t include them here because either the boards received no votes or the volume of the votes was so minuscule that it was negligible (meaning not worth mentioning).
Still, the numbers from the table above and the results with this survey don’t match exactly, which means that either the data I found was not very precise or the real-world application is different than what was advertised.
Note: I didn’t include data for the SMT32F4 board in my big table because I couldn’t find any. What I mean is that I found data for a whole line of boards with “SMT32F4” in front of other numbers rather than information about a specific board.
Clock Speed
Clock speed is very important to your Arduino. To make sure we’re on the same page, the clock speed of an Arduino is the number of instruction cycles the Arduino’s CPU (Central Processing Unit) can handle in one second. In other words, it can determine how fast the CPU can run.
The clock speed is typically measured in megahertz (MHz). Other times, it can be measured in gigahertz (GHz) if there is a higher amount to be measured.
A typical Arduino board has 16 MHz, which means it can run 16 million hertz. This translates to the board being able to run 16 million clock cycles per second.
Generally, a higher clock speed is preferred, but I still made a pros and cons list of having a fast clock speed so that you can make a decision yourself whether you want a higher clock speed or not.
Fast Clock Speed Pros and Cons:
PROS:
- The most obvious reason you would want fast clock speed is if you want fast results and want the Arduino to work quickly.
- For instance, if you have a time-critical project, you should use a faster Arduino.
- Still, you can handle slow processors or multitasking using other methods such as making your code more efficient. Use optimization techniques like choosing #defined over variables or making use of functions.
If you want to learn how to optimize your Arduino’s memory and/or what to do when you encounter issues with its memory, then you should check out my first guide on memory.
If you want to learn more memory tips to optimize your Arduino’s memory, then you should consider my second guide to Arduino’s memory. It also contains some great tips on adding memory to your Arduino!
- A faster processor can easily handle high quality samples of inputs when you are working with sound processor.
- It can also make your life much easier if you are doing video processing such as creating an output or sensing an input.
CONS:
- Fast Arduinos are more expensive compared to slower ones.
- You can see this pattern in the table above comparing the different boards, their cost, and clock speed.
- Slower ones require less energy use and save more power for you.
- A faster processor can put a constraint on your circuit design.
Arduino Speed Tests
Because I’ve found the 16 MHz hard to digest in terms of real-world situations, I decided to run a few tests with some code that used between 2,000 to 3,000 bytes of the flash memory.
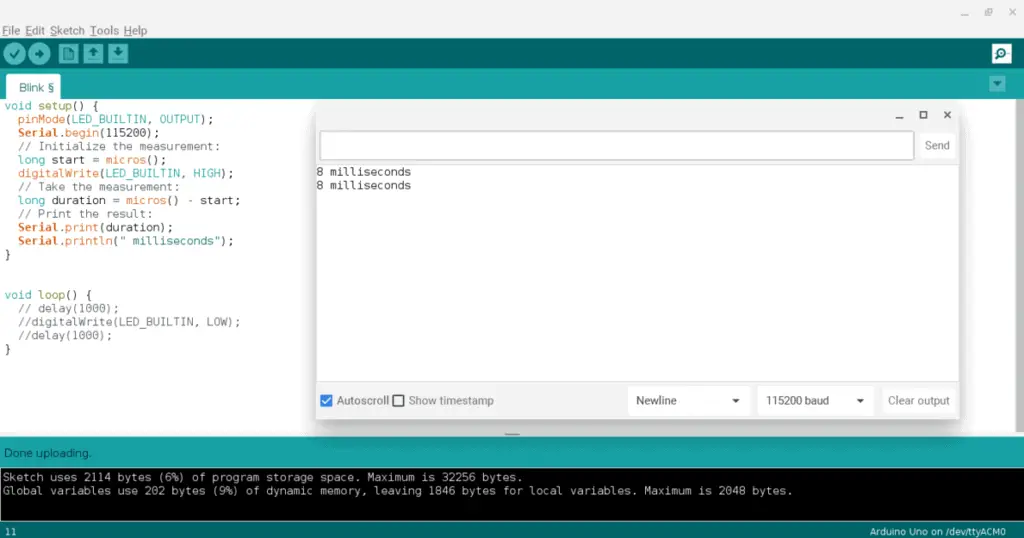
The first test I ran wasn’t very precise. I used the built-in “micros()” function, and I got a result of 8 milliseconds repeatedly.
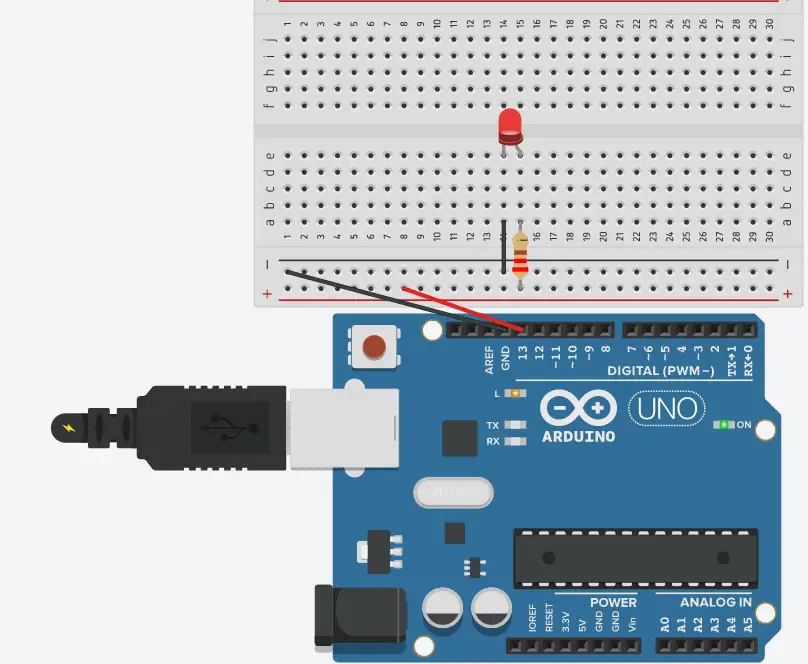
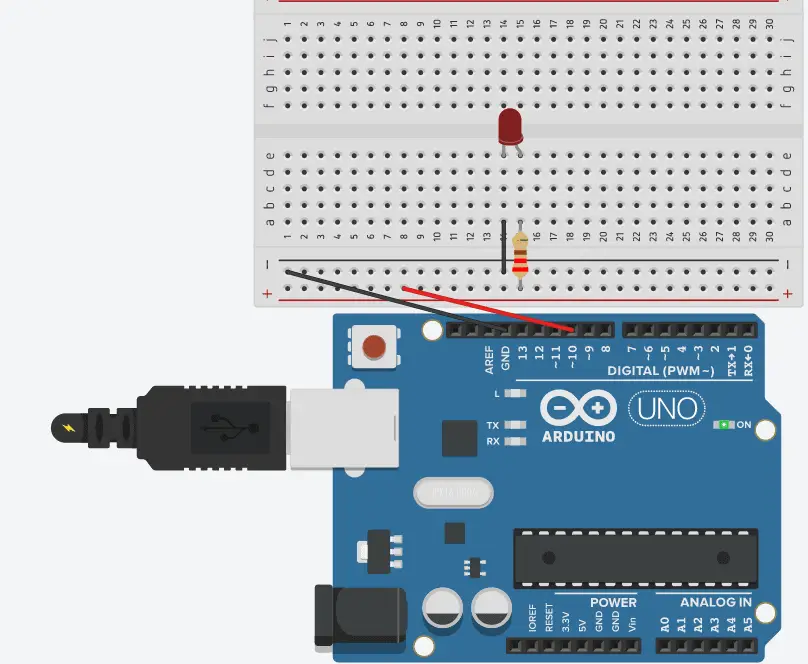
My Arduino circuitry setup consisted of 3 jumper wires, a red LED, and a 220Ω (ohm) resistor. The 3 jumper wires included a short green wire, one long green wire, and a long yellow wire. I used the long wires for the GND (ground) header pin and pin 13.
This is the setup I used on my Arduino board if you want to try it yourself:
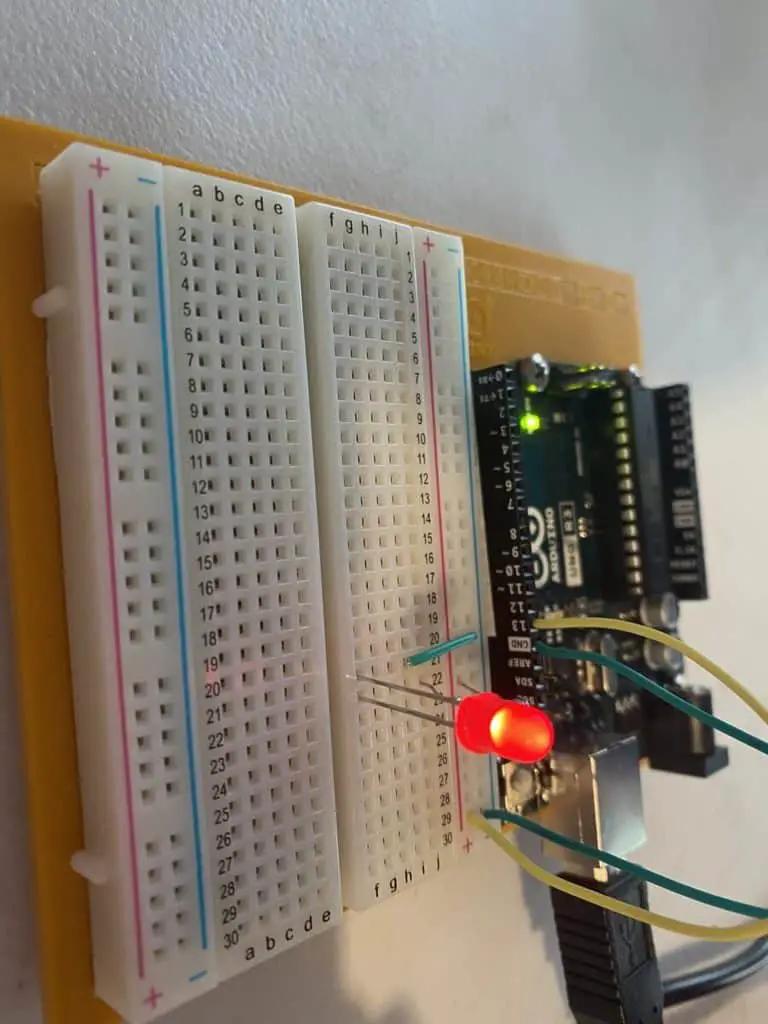
This is the side view of how I implemented it 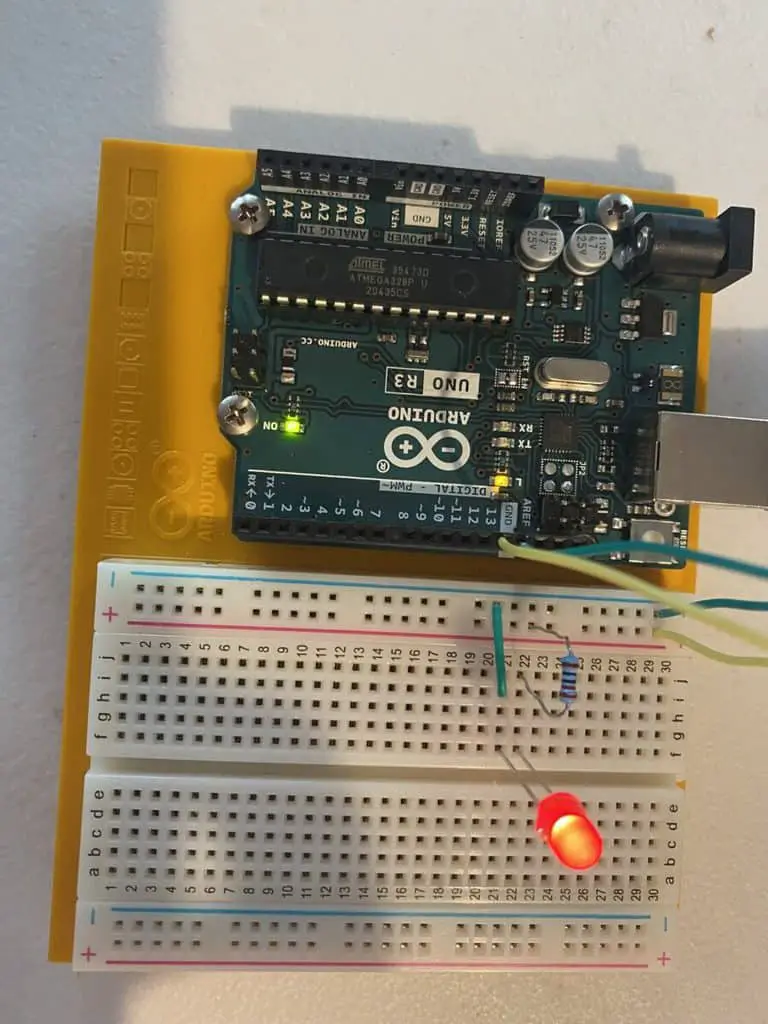
This is the top view of how I implemented it
For a neat, less confusing diagram, look at the following picture:
Next, you can copy and paste the following code into your Arduino IDE and upload it:
void setup() {
  pinMode(LED_BUILTIN, OUTPUT);
  Serial.begin(115200);
  // Initialize the measurement:
  long start = micros();
  digitalWrite(LED_BUILTIN, HIGH);
  // Take the measurement:
  long duration = micros() - start;
  // Print the result:
  Serial.print(duration);
  Serial.println(" milliseconds");
  // makes this more user friendly and creates a new line after each full message
}


void loop() {
  //delay(1000);
  //digitalWrite(LED_BUILTIN, LOW);
  //delay(1000);
}
There are some cases in which your Arduino might not recognize your Arduino. In those instances, one potential reason for why this happens if because your drivers aren’t updated.
If you want a more in-depth solution to updating your drivers and your Arduino, check out my guide on updating your Arduino.
After your successful upload, go to your serial monitor by clicking on the magnifying glass icon on the top right corner. You should see the following result:
As I’ve mentioned before, this wasn’t a very precise measurement, so I ran a second (different) test. I took advantage of the Arduino’s own clock cycle and Timer 1 by using the TCCR1B register (which is like a special variable that gives us control over the timer).
Once again, I used the same setup as before: 3 jumper wires, a red LED, and a 220Ω (ohm) resistor. Here’s the same diagram as before as a refresher.
Using the same pin as before (pin 13), I used a different sketch and ran it. Here’s the code for you to test:
void setup() {
  pinMode(LED_BUILTIN, OUTPUT);
  Serial.begin(115200);
  // initialize the measurement
  TCCR1B = bit(CS10);
  TCNT1 = 0;
  digitalWrite(LED_BUILTIN, HIGH);
  // take the measurement
  unsigned int cycles = TCNT1;
  // print the result
  Serial.print("Cycles: ");
  Serial.println(cycles - 1);
  Serial.print("Microseconds: ");
  Serial.println((float)(cycles - 1) / 16);
}


void loop() {
  // delay(1000);
  //digitalWrite(LED_BUILTIN, LOW);
  //delay(1000);
}
Here are my results so you can compare yours:
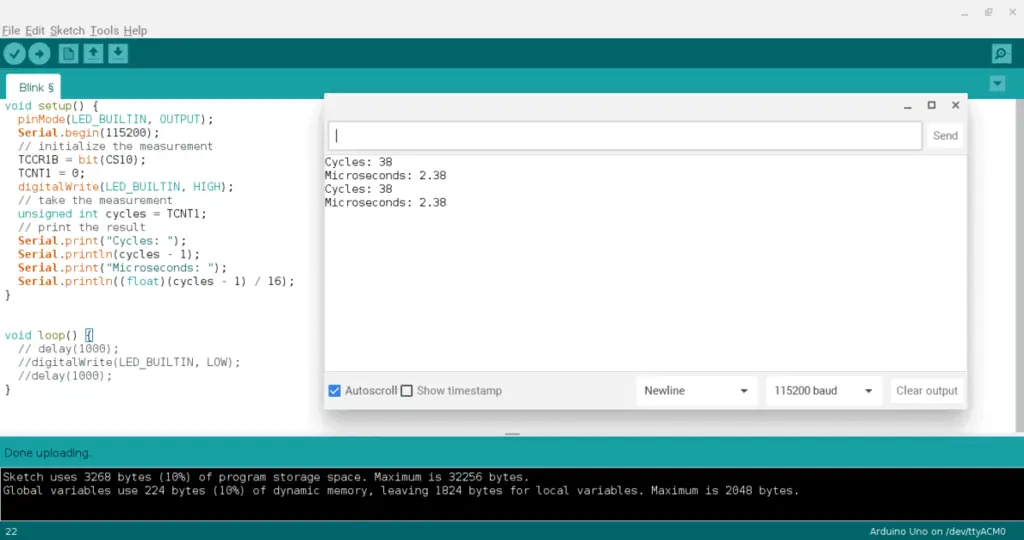
As you can see, this method is very precise. It tells exactly how many cycles it took to run my code (which is 38 clock cycles), and the precise amount of time it took to run (2.38 milliseconds).
This is really fast, but I was curious to see if this was true for all pins, so I ran more of the same tests on different pins. What’s interesting is that pins with the tilda (or the “~” symbol) next to it took longer to run. Here is a specific result:
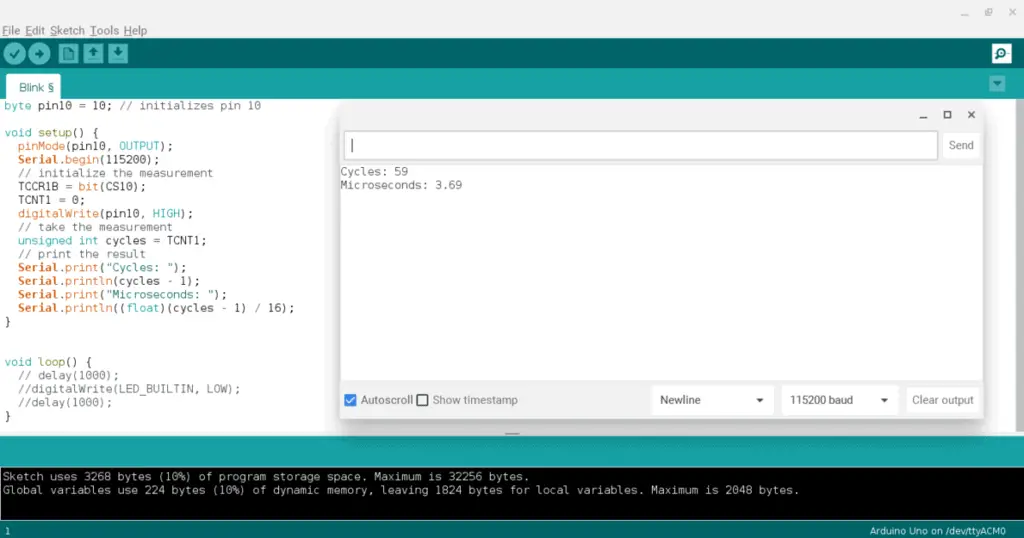
As you can see, pin 10 (which has a tilda next to it) took 59 cycles (21 more than pin 13) and 3.69 milliseconds (1.31 more than pin 13) to run. That left me wondering,
Why did that happen?
Well, the tilda next to the pin number tells you that it can be used for Pulse Width Modulation (PWM), which means you can control analog components using digital outputs. For example, you can make an LED look like it’s brightening or dimming with this technique.
Anyways, because the pin is using PWM, the digitalWrite() function has to run longer with my code than the pins without this feature.
Here is the code for pin 10 if you want to test it out yourself:
byte pin10 = 10; // initializes pin 10

void setup() {
  pinMode(pin10, OUTPUT);
  Serial.begin(115200);
  // initialize the measurement
  TCCR1B = bit(CS10);
  TCNT1 = 0;
  digitalWrite(pin10, HIGH);
  // take the measurement
  unsigned int cycles = TCNT1;
  // print the result
  Serial.print("Cycles: ");
  Serial.println(cycles - 1);
  Serial.print("Microseconds: ");
  Serial.println((float)(cycles - 1) / 16);
}


void loop() {
  // delay(1000);
  //digitalWrite(LED_BUILTIN, LOW);
  //delay(1000);
}
Also, make sure to only switch the one end of the jumper wire from pin 13 to pin 10. Everything else can be left the same way.
Tips For Making Arduino Run Faster
- Find and use alteratives to functions that slow down your Arduino.
- For instance, use the millis() function instead of the delay() one.
- Don’t use PWN pins if you don’t need it. As you can tell from my experiment above, pins with the PWM feature slow down your Arduino.
- Assemble a bootloader yourself to aid the increased clock speed.
- Use optimization techniques such as using #defined for declaring variables.
Summary – tl;dr (Too Long; Didn’t Read)
Here are the key takeaway points you should keep in mind after reading this article:
- The Portenta H7 board is the fastest Arduino out there
- Some pros of having a fast Arduino are:
- Fast results
- Great video processing
- Ability to evaluate multiple inputs
- Some cons of having a fast Arduino are:
- More expensive
- Requires more energy and power
- Puts a constraint on your circuit design
- The clock speed determines how fast the Arduino’s CPU can run
- Here are some tips for making an Arduino run faster:
- Use time-saving functions
- Don’t use PWN pins
- Make your own bootloader
- Use #defined for declaring variables
In the end, I hope this article has ex-speed-dite your understanding how you can make your Arduino run faster!
References
Here are some of the sources I used to ensure that I use the most helpful, up-to-date information to better support you on your Arduino journey: