Arduino Noise Guide (How It Works and Tone Blocking Explained)
The word noise typically has a negative connotation. For me, I associate the word with all the ruckus my siblings make when they’re playing on their instruments. Still, noise can become something beautiful when the sound created is auditorily pleasing.
However, in this guide, I won’t be showing you how to make beautiful, sweet tunes. Instead, I’ll show you how you can make your own noise with the Arduino. This is very useful for projects that warn you of something like an alarm clock or an alarm system that warns you of an intruder.
Before I get into how you can make some noise with your Arduino, I’ll need to first answer the question:
Can Arduino Make A Noise?
The Arduino can make a noise as long as you have the right equipment and code. Notably, you’d need the tone() function in order to make the said noise.
The tone() function has 3 parameters, but it only requires you to use two. The syntax for the code is:
tone(pin number, frequency, duration);The first parameter (pin number) is the pin number on the Arduino board that you’ve connected to your piezo using a breadboard.
The second parameter (frequency) plays a sound that depends on the hertz you set it at.
The third parameter (duration) is not required but it basically tells your piezo how long it should be playing the sound for. The duration is in milliseconds, which means that if you wanted the noise to play for 1 second, you’ll need to pass 1,000 as its argument.
When you’re using the tone() function, you’ll need to be aware of its limitations:
- If you pass a number smaller than 31 (hertz) as the tone() function’s second argument, the sound will either be poorly produced or nonexistent.
- You shouldn’t use the analogWrite() and tone() function with pins 3 and 11.
- This is because the tone() function uses the same internal timer (built into the Arduino) as the analogWrite() function, which means you’ll hear some strange sounds. Moreover, they both won’t work as you expect it would.
- You can’t use the tone() function with 2 different pins and play it simultaneously.
- For example, if you have 2 piezos where one is connected to a different pin, you’ll have to play them one at a time.
- This means you’ll need to implement the noTone() function to turn off the first piezo’s noise before you can proceed to use the next tone() function.
How Do You Make Arduino Make A Noise?
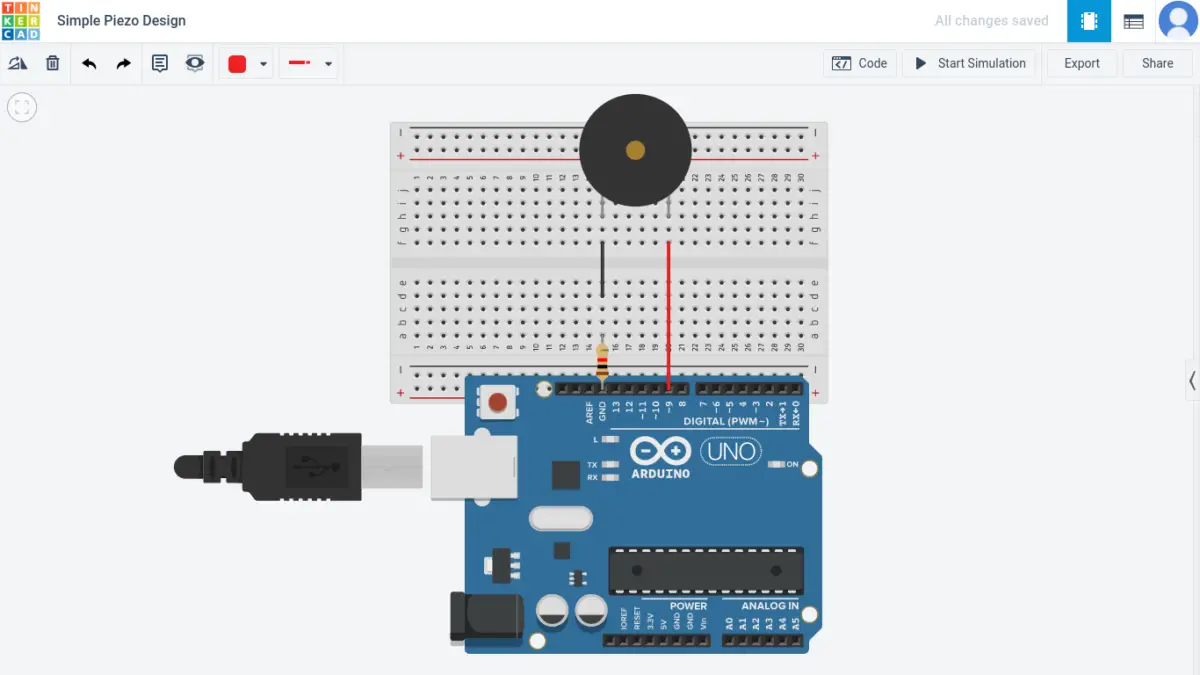
All you need is the tone() function, a piezo, a breadboard, 2 jumper wires, a 100 ohm resistor, and an Arduino Uno Rev 3 (besides a computer and a USB cable) to make an Arduino produce noise.
The setup is pretty simple:
- Place the piezo on the breadboard.
- Connect one end of a jumper from pin 9 (or any pin you choose) on the Arduino board and the other end to breadboard next to one of the end of the piezo.
- Connect one end of the 100 ohm resistor to the GND pin on the Arduino and the other end to the breadboard.
- Finally, connect one end of another jumper wire in front of the 100 ohm resistor and the other end next to the other end of the piezo.
If that explanation was complicated, you can look at my model here.
Next, we’ll need to write code to make this actually work.
// This is an example sketch to make a sound out of the piezo

int pinPiezo = 9; // you need to specify the pin your piezo is hooked up to. In my case, it's pin 9

void setup() {

} // nothing is needed inside to make the piezo make a sound

void loop() {

  tone(pinPiezo, 500); // this tells the piezo to play a frequency of 500 hertz

// if you want the sound to alternate (like a siren), you'd need to add a delay and another tone function (uncomment the next 2 lines if you want to try)

// delay(1000); // this pauses the sound for 1 second so that you'd get two distinct noises
// tone(pinPiezo, 1000); // this tells the piezo to play a frequency of 1000 hertz

}
Now, your piezo should be making some noise! You should also experiment with the frequency. Choose a higher or lower number and listen to the change. What do you notice?
You can also try to experiment with the frequency to match the frequency of that of a siren.
Is The Arduino Tone Function Blocking?
The Arduino tone function is not a blocking function. A blocking function basically means that whenever the function is doing something, the rest of your sketch is paused until the function has finished doing what it’s supposed to be doing.
A great (and common) example of a blocking function is the delay() function. This function pauses your program from performing depending on the number of milliseconds you set as its argument.
Consequently, advanced users would avoid the delay function and switch to incorporating the millis() function to stop a certain function in their code from doing stuff while the rest of the sketch continues. For beginner projects like the Blinking LED, the delay function should suffice.
If you want to learn more about time functions and how you can utilize them successfully in your projects, check out my time function guide.
Summary – tl;dr (Too Long; Didn’t Read)
If you’re in a pinch for time and don’t have time to read through everything or you need a refresher, here are the main takeaways:
- You’ll need to use a piezo, Arduino board, breadboard, 2 jumper wires, the tone() function, a breadboard, and a 100 ohm resistor to create sound.
- The tone() function only takes three arguments: the pin number that’s connected to the piezo, the frequency (in hertz), and the length of time you want to play the sound for in milliseconds.
- Note: the third parameter (duration) is optional.
- Don’t use the tone() function with:
- The value of the first parameter smaller than 31 hertz.
- The analogWrite() function with pins 3 and 11.
- 2 different pins that are connected to two different piezos and played at the same time.
Now, the only remaining question is: “Are you ready to make some noise for piezo and the tone() function?”